Pages

Showing posts with label Fun Foam. Show all posts

Saturday, July 14, 2018

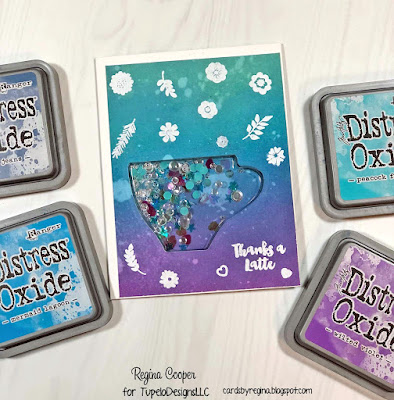
Thanks a Latte Shaker Card - TupeloDesignsLLC DT Project

Hi Everybody,

It's Saturday!  I am guest designing this month posting on Saturday's for TupeloDesignLLC.  I hope y'all aren't tired of seeing shaker cards but if you know me, you know when I learn something new or try something different, I get excited and post about 10 times on it.  This is the last one I promise. 

I made a coffee cup (can also be a tea cup) shaped shaker card using a Jillibean Soup stamp and die set called Latte Love and also the coordinating shaker cards with envelopes.  The shaped coffee cup PVC window fits perfectly into the cards. I had a lot of fun with this set!  The only thing that I did not do is cut out some flowers with the dies. I'll do that soon because I just got a Sizzix Sidekick so that would be perfect to use for this!


The first thing I did was take a piece of Strathmore watercolor paper and sponged Oxide Inks on it, blending well. I used Broken China, Peacock Feathers, Mermaid Lagoon, Faded Jeans and Wilted Violet. I spritzed water into my hand and sprinkled it on the watercolor paper and after a few seconds, dabbed the water off with a paper towel.  

Next, I embossed some of the stamps and a sentiment on the card using my Misti.  I used Hero Arts white embossing powder so that it would show up well. 

I sponged a few different pieces of watercolor paper and chose another one for the inside of the card.  I used all of the colors on this one except for the Wilted Violet.  I also sprinkled water from my hand onto the paper. 

Next you place the coffee cup shaker window in the slot, fill it with whatever you'd like, such as sequins, beads, confetti, etc., and tear off the backing of the shaker window.  I used some from both of these packs... they're SO much prettier in person, Sequin Pack Watercolor and Sequin Pack Birthday.  Close the card together and firmly press together.  I had cut out the coffee cup shape with the die in the stamp set so I used the piece of the watercolor paper from the die shaped like the coffee cup in the back of my window.  You don't have to do this. So now you can see some of the purple color from the front to tie them in together. 

I used a metallic silver pen and drew steam coming out of the cup.  I feel like I can't draw very good at all but I like how this looks. :)  I drew it and just thickened it up some.

The final thing I did was use a Die-Namics set from My Favorite Things called, Words for Friends.  I cut it out using a thick white cardstock and fun foam.  I wanted it to have some dimension.  I sponged the Wilted Violet Oxide Ink that I used on the front of the card on almost all of the letters, leaving some white at the top.  Next, I took used embossing ink and went over all the letters with it and sprinkled sparkly embossing powder over it.  I saw this done a while ago on a Jennifer McGuire video and I love making letters/words look this way.  So fun!


Did I inspire you to try a shaped shaker window?  A couple of previous posts showed me using a chipboard star shaker window and a balloon shaker window. The balloon one was fun because I made a coordinating tag, gift bag and card.  The tag had the shaker window on it. 

TupeloDesignsLLC offers free shipping with no minimum purchase. 

Thank you so much for stopping by and have a great day!


Regina


Monday, March 6, 2017

Hello Card - Two Altenew Stamp Sets Used

Hi Everybody,

I just wanted to share a quick card that I made for someone going through a rough spell.  I hope this made her smile.  I forget about coloring my stamps with Memento Markers and stamping so that's what I did here.  You can also color your stamp with the markers and then spritz with water and stamp if you want more of a watercolor look.  


I used a hello die and sponged part of it with the same color Memento Ink as the marker I used.  Next I stamped Versamark over the hello and sprinkled sparkly embossing powder on it and heat set.  I cut out on top of fun foam and using Stick It.  

Supplies Used:


  • Gina K Designs White 120# Cardstock, the purple is hers as well and I'm so sorry but she doesn't sell it currently.  It was a limited edition color a couple years ago I believe. 
  • Altenew Stamps on front, Botanical Garden
  • Altenew Stamps for inside, Wishing You 
  • Memento Markers, Lilac Posies and Bambo Leaves
  • Memento Lilac Posies Ink
  • Hello Die, Lawn Fawn
  • Envelope Liner Die, Papertrey Ink
  • Judikins Sparkly Embossing Powder
  • Versamark Ink
  • Fun Foam
  • Clear Sequins, Pretty Pink Posh
  • Scor-Tape

If you need a quick card, pull out those Memento Markers and color your stamps.  I hope I inspired you today.

Thanks for stopping by and have a great day!


Regina

Wednesday, September 9, 2015

I Brake For White Crayon Sunflowers

Hi everybody!

I needed to make a birthday card for someone and I love to make Fall cards for people who have birthdays in September.  I love this stamp set from I Brake For Stamps called Bubble Wrap, Lattice and Flowers.  This stamp set has so many possibilities!!! If you use Coupon Code SAVE10REGINA, you will receive 10% off your order.


I made a card using the lattice stamp as the background and colored the sunflower with copics recently.  I wanted to show another way to use this sunflower stamp.  I did the White Crayon Technique. 


The White Crayon Technique is very simple.  All you do is stamp your image, I used Memento Black Tuxedo and I randomly stamped the sunflower on some white card stock.  Then I colored the petals of the sunflowers with a white crayon and it doesn't have to be perfect.  Next I sponged a few Tim Holtz Distress Inks all over this piece of card stock.  The colors I used will be listed below.  Then you take a paper towel and rub over the card stock and it will wipe most of the ink off of the petals and leave the white crayon.  That's all there is to it.  It's just another technique to give a different look to your stamps.  I find myself always coloring with copics the normal yellows and oranges.  

I embossed that orange looking card stock with one of the new We R Memory Keepers Next Level Embossing Folders called Woven.  They are 6x6 so I love the size and there are lines on the inside so you can line your card stock up correctly.  You get the deepest emboss with these, they are beautiful.  There are a few different ones and 2 to a set.  Here's a link to Amazon for the  Woven Embossing Folders.  They are very reasonably priced too.  Less than $10 for 2.  You will love them!  
I cut out the Happy Birthday To You with a Lawn Fawn die called Happy Birthday Border die.  I used card stock for the brown words and fun foam for birthday to pop it up a little.  I wanted the word birthday to stand out so I made it white to match the sunflower petals. I used a Wink of Stella Clear pen and went over the words and the centers of the sunflowers to give just a little sparkle.  I used some brown twine and added a little sunflower charm.  

List of Supplies Used:

  • Gina K Designs white, chocolate brown, and tomato soup card stock and the middle layer that is a mustard golden yellow came in a pack of an assortment called Sun Kissed Autumn.
  • W R Memory Keepers Next Level Embossing Folder, Woven
  • Tim Holtz Distress Inks:  Ripe Persimmon, Crushed Olive, Rusty Hinge and Mustard Seed
  • Fun Foam
  • Lawn Fawn Happy Birthday Border die
  • Pop Dots
  • American Craft Brown Twine
  • Clear Wink of Stella Glitter Pen
  • Sunflower Charm from my stash
  • White Crayon 
  • Tombo Dot Runner Adhesive


I hope you'll try the White Crayon Technique.  Did I inspire you to run to your craft room and make a Fall Card?  Check out  I Brake For Stamps.  There are over 4,000 stamps and digis as well and weekly 50% off specials.  If you use Coupon Code SAVE10REGINA, you will receive 10% off your order.  

PLEASE NOTE:  If you would like to join my blog and follow my work, please click on the 2 little squares up by Join This Site at top left of page.  Then a window will pop up and click Follow.  The Join This Site button goes to an error message.  Still trying to fix this. 

 Thanks for stopping by and have a great day!


Regina I Brake For Stamps Design Team Member