Pages

Showing posts with label Thank You. Show all posts

Saturday, July 14, 2018

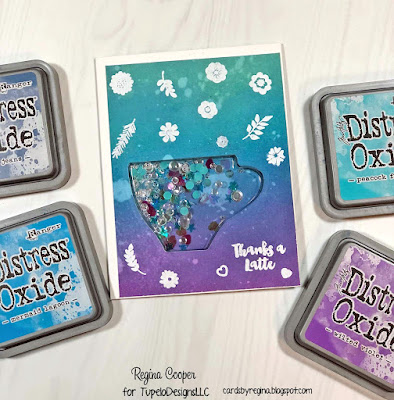
Thanks a Latte Shaker Card - TupeloDesignsLLC DT Project

Hi Everybody,

It's Saturday!  I am guest designing this month posting on Saturday's for TupeloDesignLLC.  I hope y'all aren't tired of seeing shaker cards but if you know me, you know when I learn something new or try something different, I get excited and post about 10 times on it.  This is the last one I promise. 

I made a coffee cup (can also be a tea cup) shaped shaker card using a Jillibean Soup stamp and die set called Latte Love and also the coordinating shaker cards with envelopes.  The shaped coffee cup PVC window fits perfectly into the cards. I had a lot of fun with this set!  The only thing that I did not do is cut out some flowers with the dies. I'll do that soon because I just got a Sizzix Sidekick so that would be perfect to use for this!


The first thing I did was take a piece of Strathmore watercolor paper and sponged Oxide Inks on it, blending well. I used Broken China, Peacock Feathers, Mermaid Lagoon, Faded Jeans and Wilted Violet. I spritzed water into my hand and sprinkled it on the watercolor paper and after a few seconds, dabbed the water off with a paper towel.  

Next, I embossed some of the stamps and a sentiment on the card using my Misti.  I used Hero Arts white embossing powder so that it would show up well. 

I sponged a few different pieces of watercolor paper and chose another one for the inside of the card.  I used all of the colors on this one except for the Wilted Violet.  I also sprinkled water from my hand onto the paper. 

Next you place the coffee cup shaker window in the slot, fill it with whatever you'd like, such as sequins, beads, confetti, etc., and tear off the backing of the shaker window.  I used some from both of these packs... they're SO much prettier in person, Sequin Pack Watercolor and Sequin Pack Birthday.  Close the card together and firmly press together.  I had cut out the coffee cup shape with the die in the stamp set so I used the piece of the watercolor paper from the die shaped like the coffee cup in the back of my window.  You don't have to do this. So now you can see some of the purple color from the front to tie them in together. 

I used a metallic silver pen and drew steam coming out of the cup.  I feel like I can't draw very good at all but I like how this looks. :)  I drew it and just thickened it up some.

The final thing I did was use a Die-Namics set from My Favorite Things called, Words for Friends.  I cut it out using a thick white cardstock and fun foam.  I wanted it to have some dimension.  I sponged the Wilted Violet Oxide Ink that I used on the front of the card on almost all of the letters, leaving some white at the top.  Next, I took used embossing ink and went over all the letters with it and sprinkled sparkly embossing powder over it.  I saw this done a while ago on a Jennifer McGuire video and I love making letters/words look this way.  So fun!


Did I inspire you to try a shaped shaker window?  A couple of previous posts showed me using a chipboard star shaker window and a balloon shaker window. The balloon one was fun because I made a coordinating tag, gift bag and card.  The tag had the shaker window on it. 

TupeloDesignsLLC offers free shipping with no minimum purchase. 

Thank you so much for stopping by and have a great day!


Regina


Friday, June 9, 2017

Hello Lovely Thank You Card

Hi Everybody,

I love to color flowers.  Normally my stamp will be one flower, maybe three or to have more, I'll have to mask them.  Well, today my card shows a beautiful bouquet of flowers from Concord & 9th and I didn't even have to mask them all.  The stamp set is called Hello Lovely and it is just that, such a lovely set.  What I like about it is the gorgeous bouquet but also you can stamp out layered flowers for a watercolor effect, and the sentiments will fit any card, plus the cool splatter marks stamp is a bonus.


I actually did a little bit of masking with this card using post it tape to cover right along the edges of where I was going to be overlapping.  You can stamp this bouquet across your stamp, hang it off the side of your card in one or two places, do what I did here and stamp 2 bouquets together.  If you cut them right you can get 2 cards out of it as well.  Who doesn't love that right?


There is a lot going on in this card for sure but isn't it cool!  I used Zig Real Brush Watercolor Markers to color the flowers.  I did use a paintbrush and water because my water brush was putting out too much water.  I know it is quite vibrant but I wanted a bright, summery, happy result.  I embossed it with one of my most favorite embossing powders, Ranger Silver Pearl.  This is softer than white, it's so beautiful in real life.  I used Canson Montval watercolor paper, which I like to use with Zigs.  After I painted the background and everything dried, what did I do??  I threw water droplets on it lol.  I sprayed some water into my hand from my mister and dropped it out onto the card.  They came out a little bit larger than I wanted on the purple flower but I think it looks good.

That's the cool thing about working with water, you never know what you're going to get.  And, yes, I have to admit, I tend to use watercolors sometimes as I would Copics, which I kind of did here.  A different mentality is needed when watercoloring. Forget everything you know, loosen up and let the water do most of the work for you. I haven't fully give up control to the water yet, but I'm getting there. :)

We went out to dinner last weekend with some family on my husband's side and his Mom paid for it which was so generous.  I wanted to make her a beautiful thank you card and this is it.  I used Versafine Onyx Black to emboss the Thanks sentiment and I needed some filler around it and low and behold, they included a stamp in this set that was perfect, splatters!  You can use this on so many cards.  If you are not comfortable splattering black paint, gold paint, etc., on your cards, use this stamp (see the pic above, it's at the top in the middle, splatter dots).  I LOVE IT!  I embossed these using Stampendous Detail Fine Gold Embossing Powder.  I took little pieces of scotch tape and covered some of the dots where I wanted just a few from the stamp.  When you do this, use the tape to cover the parts (of any stamp) that you don't want to cover with ink, ink it up, then take the tape off, and stamp.  I used a gold metallic pen to put some little gold dots in the centers of the flowers to tie it all in together.  

You really get your $$$ worth out of this stamp set.  I've got some ideas that I'm going to be trying with the bouquet in the near future as well.

Thanks for stopping by and have a great day!


Regina


Tuesday, May 2, 2017

Ombre' Emboss Resist Thank You Card

Hi Everybody,

I haven't posted anything in a few days BUT I have a pretty good excuse... I got married!  Woo Hoo! We had the wedding at home with only our parents there and it was so special.  I know it meant a lot to them.  My now husband, Richie, used to be on a BBQ team so we had BBQ and the fixin's, sausage balls that are amazing from a local coffee shop.  They aren't 'balls'.  I was intrigued by them when I first discovered them because they roll them out on a sheet and cut them into rectangle pieces. Because they aren't balls, they aren't as hard, packed as tight, really amazing.  We had cheesecake, red velvet cup cakes and mini brownies for desserts.  We are going to have a reception later on and will have cake, champagne, etc., but this was perfect for this day.

 I wanted to share a few pics with you.  Our parents were the photographers so these are just amateur pics lol.  Richie made DIY curtain panels from canvas drop cloths.  You can see I only had time to steam the left side lol.  We made an 'alter' by using a sofa table and candles.  A Baptist Preacher performed the ceremony.

I couldn't think of what kind of card to make the Preacher so I think the technique that Jennifer McGuire showed a few months back with the Ombre' Embossed Backgrounds are a safe bet for any occasion card.  His favorite colors are red and blue for the Ole Miss Rebels football team, here in Mississippi.


I used a Red Rubber Stamps Leaves Background stamp with Wow White Embossing Powder.  I sponged with Faded Jeans Tim Holtz Distress Ink, dark to light, bottom to top.  The Thank You die is from Spellbinders Phrase Set 2.  The red enamel dots are from Eyelet Outlet.

We have a really long porch so this worked out well.  There are lots of trees so we had privacy.  I don't think the neighbors would be able to see us out their windows with binoculars lol.


I just wore a simple dress.  I completely forgot about a bouquet.  Richie had bought 4 bunches of flowers and I thought they were to put around the house but he bought them to pick and choose flowers for the bouquet.  He knows I love bright color flowers, especially orange Gerbera Daisies. Somebody said you are supposed to take pics with the bouquet under the rings so that's what we did.
I just wanted to share my day with you, the wedding took place April 28th.

Thanks for stopping by and have a great day!

Regina

Saturday, April 22, 2017

Altenew Watercolor Wonders - Color My World

Hi Everybody,

I love flowers so I instantly fell in love with Altenew stamps.  The first stamp set of theirs I bought was called Watercolor Wonders.  I used it today for the first time because I was intimidated by all the stamps but once I looked at the diagram on the back of the package showing how to put different stamps together to layer, I couldn't stop stamping!  I don't really think you can mess this one up.  No matter what colors you put together, it will still look good because it's abstract or watercolor.  I stamped each part of this card 3 times to get it to look dark.  You can also take a paint brush with water and go over it to give a lighter watercolor look.


How fun is this card!  I also jumped on the black sentiment strip with white embossing bandwagon lol.  Seems that everyone is doing this.  I thought it really worked here.

Supplies Used:


  • Recollections white 110# white cardstock for base, Gina K Designs Passionate Pink and Black Onyx and Bristol Smooth Paper
  • Altenew Watercolor Wonders stamp set
  • Right At Home, Color In Sentiments stamp set
  • Inks used:  Tim Holtz Spun Sugar, Work Lipstick, Picked Raspberry, Abandoned Coral, and Twisted Citron, Memento Bamboo Leaves, New Sprout and Dandelion, Gina K Designs Sweet Mango and Bubblegum Pink
  • Zig Markers, Pink and Dark Pink (to color sentiment)
  • WOW white embossing powder
  • Clear Wink of Stella glitter pen
  • Pretty Pink Posh clear sequins

I do have to say I stamped this on the Bristol Smooth Paper and regular white cardstock and it looks so smooth on the Bristol as compared to the cardstock.  I know a lot of people like to use Bristol as a watercolor paper.  If you just want to color a layer or maybe two, Bristol can work for you, like what I did above, coloring in the Thank You sentiment stamp.  I have tried to use watercolor paints with this paper and it can't take several layers.  The fibers of the paper start coming up.  That's just my opinion.  For stamping it is great because it produces such a smooth result.

So go PLAY, STAMP, and don't be intimidated like me.  Have FUN most of all!


Thanks for stopping by and have a great day!


Regina

Thursday, March 23, 2017

Altenew Layered Daisy Thank You Card

Hi Everybody,

I made a card that I think is so pretty I may make one for myself lol.   I love the colors in this card.  I used the Altenew layered Daisy stamp set.  I think this set was something like $4.99, well worth the money for sure.


If I went a little overboard with the sequins, it might be because I'm covering up a boo boo lol.  I'm going to also put some glossy accents on the thanks die to shine it up a bit.  Who wouldn't want to get this in the mail right?  As you can see I'm not planning on writing very much in this one. :)


Supplies Used:


  • Recollections White 120# for the base
  • Neenah 80# White, Papertrey Ink Berry Sorbet and Patterned Berry Sorbet Paper Pack
  • Hero Arts Thanks Stamp and Die Set
  • Altenew Layered Daisy Stamp Set
  • I used these inks for the flowers:  bottom to top, light to dark... Tim Holtz Spun Sugar, Gina K Designs Innocent Pink, and Papertrey Ink Berry Sorbet.  
  • I used these inks for the leaves:  bottom to top, light to dark... Tim Holtz Twisted Citron, Gina K Designs Jellybean Green and Tim Holtz Mowed Lawn
  • Pretty Pink Posh Clear Sequins

I spent a lot of time playing with ink combinations for the different layered stamp sets I have which was actually fun to do.  Some of them surprised me looking so good and some surprised me looking so awful together. 

I don't think you can go wrong sending someone a card with the layered flowers on them.  I hope I inspired you to try them if you haven't.  Like I said the Altenew set I used has 6 stamps, 3 for flowers and 3 for leaves and is around $5.  

Thanks for stopping by and have a great day!


Regina