Pages

Wednesday, September 30, 2015

I Brake For Bucks

Hi everybody!

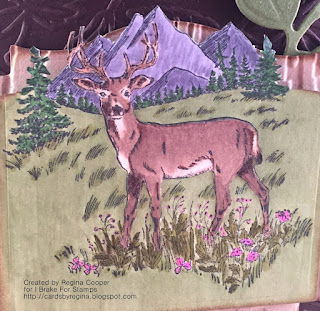
Deer hunting season is almost here and so I thought I would make a card using this Buck stamp from I Brake For Stamps.  This is a great stamp to use for a masculine card.  I cut off the top of the stamp as you can see on my card with a plan in mind.  I colored it about 4 weeks ago and decided to make a card with it this week and forgot what my plan was LOL!  I cut it off because I didn't want blue sky to show but I can't remember why.  :(  Please tell me I'm not the only one who is like this.  


Here's the stamp... If you use Coupon Code SAVE10REGINA at checkout, you will receive 10% off of your purchase. 


I used embossing folders as you can see on the card background and the background the stamp is on and sponged ink around the edges of the die the stamp is on.  I cut a couple pieces of camo ribbon and adhered to card, adding bronze brads in corners.  I colored the stamp with Copics and I asked my boyfriend to make sure I colored it accurately and he said yes.  Yay!  I cut the stamp out with a die and cut off the top part of the stamp (for whatever reason?!?) and cut out the leaves and For You sentiment with dies.  Supplies listed below.  

It is kind of difficult to make masculine cards and I usually don't put ribbon on them, twine maybe, but not ribbon, but I made an exception here.  I usually make masculine cards pretty CAS but I tried to add as much as I could to this one to see how much I could do and it still be a masculine card. This card will be to display in my boyfriend's reload room so I made it 6" square.  

Supply List:

  • Recollections 110# white card stock for base
  • Gina K Designs Fresh Asparagus, Kraft and Chocolate Brown card stock
  • Tim Holtz Gathered Twigs ink (used to sponge around die)
  • Memento Tuxedo Black 
  • Tombo Mono Adhesive
  • Brown Fun Foam (to pop up stamp)
  • Pop Dots
  • Zig Two Way Glue Pen
  • Leaves embossing folder by Darice
  • Woodgrain embossing folder, Tim Holtz Alterations 
  • Copic Markers
  • Spellbinders Foilage Die
  • Spellbinders Labels 18 die
  • Spellbinders Classic Large Squares Die (to cut out stamp)
  • Sizzix Dies, Card Phrases Set #3 (For You die)
  • Camo ribbon from big box store
  • Bronze brads from big box store

Isn't it amazing how many different supplies we use on a single card?  

Did I inspire you to get this stamp to make masculine cards for the deer hunting men in your life?

Thanks so much for stopping by and have a great day!!


Regina - I Brake For Stamps Design Team Member


Sunday, September 27, 2015

Crazy Birds - It's a Party!

Hi everybody!

My boyfriend's sister is one of those that have tons of friends, always surrounded by them and loves to have a good time, won't say no to a party.  I love that about her!  I thought this card would be perfect for her using the bird stamps, dies and accessories.  I made the background and am happy with how it turned out.  


The background is so simple and such a wow factor!  All I did was rub a few colors of Tim Holtz Distress Ink across my kraft mat (it wipes right off).  I laid my piece of watercolor paper on top of this ink and gently pressed all over.  I used a heat gun to dry it.  If you have areas of water, you can dab with a paper towel then use heat gun.  Then I put a little bit of water in my hand and trickled droplets onto the watercolor paper and let it sit a minute or so and dabbed it with a paper towel and that is where  you see the white areas, the spots.  

I colored the birds, hats, and present with Copics and a glitter pen and cut the birds out with the matching dies.  I fussy cut the hats and present because I don't have dies but I'm getting a Scan N' Cut around 10/9 and I'll try to cut the accessories out with this.  I'll do a blog post to let you know how this goes.  I added a few silver sequins to the out and insides. I used a Lawn Fawn stamp on the inside.  

I hope you like my card.  I love this set so much for men and for fun people!  Try some fun backgrounds, there's no right or wrong.

Supply List:

  • Tim Holtz Crazy Birds Stamps
  • Tim Holtz Crazy Birds Dies
  • Tim Holtz Crazy Talk Stamps
  • Lawn Fawn Scripty Sayings
  • Recollections 110# white card stock
  • Papertrey Ink Berry Sorbet Card Stock
  • Strathforth 140# Cold Press Watercolor Paper
  • Tim Holtz Distress Inks in Festive Berries, Spiced Marmalade, Picked Raspberry, Squeezed Lemonade and Cracked Pistachio
  • Copic Markers (I'm sorry but I threw the paper away accidentally that listed the colors I used)
  • Sakura Silver Star and Clear Star Glitter Pens
  • Tim Holtz Scissors
  • Silver Sequins
  • Ranger Matte Multi Medium Adhesive (for sequins)
  • Tombo Mono Adhesive
  • Versafine Ink in Black 
What a FUN card!  I had a blast making it too because you just never know exactly how your background will turn out and once you put the birds on it, it just all comes together so perfectly.  

Did I inspire you to pull out your Crazy Birds?  Thanks for stopping by and have a great day!

Regina

Wednesday, September 23, 2015

I Brake For Poinsettias

Hi everybody!

I see that my fellow card making friends have been making Christmas cards for a few months now, this is my first one of the year!  Yay!  I think it turned out beautiful!  The first time I saw this stamp I knew I had to have it.  This stamp is from I Brake for Stamps called Poinsettias in Squares.  If you use Coupon Code SAVE10REGINA, you will receive 10% off of your order.  There are over 4,000 stamps so I'm sure you will be able to find several that fit your taste.  Time to get the Christmas ones! 

Here's the stamp.  Look at the possibilities!  


First, I stamped with Versamark Ink and embossed with silver embossing powder.  I cut the squares out with scissors and then I cut 9 squares out with my Silhouette that were a little larger.  The tiles are 1-1/8" so the squares I cut out are about 1-1/4".  I glued down the poinsettia tiles to the silver squares that I cut and then cut a piece of vellum and used pop dots to pop them up and give dimension.  I embossed the red layer with poinsettias.  I colored the stamp with Copics.  It was so relaxing to color this too.  
Finally I cut out the Joy from my Silhouette, design ID# 36114, using glitter paper and used some cute glitter enamel dots.  I love these!  

Supply List:

  • I Brake For Stamps Poinsettias in Squares stamp
  • Gina K Designs White and Red Velvet Card Stock
  • Grafix 40# Clear Vellum
  • Martha Stewart Elegant Paper Pad (used silver under the poinsettia squares)
  • Sizzix Texture Fades Embossing Folders by Tim Holtz 2/pkg - Texture Poinsettia Pattern
  • American Crafts Christmas Glitter Papers
  • Silhouette Design Joy, # 36114
  • Versamark Ink
  • Martha Stewart Sterling Silver Embossing Powder
  • Virginia Turtle Stamps Starlight Glitter Enamel Dots
Copics: Poinsettia Stamp R22, R24, R29
Poinsettia Leaves G43, G46
Poinsettia Center Y15 and dots of R27

Did I motivate you to make a Christmas card?  Start now!  

Thanks for stopping by and have a great day!

Regina - I Brake For Stamps Design Team


Tuesday, September 22, 2015

St. Louis Arch Thank You Card

Hi everybody!

Today I want to share a Thank You card I made.  It's simple but I think it looks so clean and nice, what do you think?  I stayed with a friend when I went to St. Louis last week and I thought this St. Louis Arch stamp would be perfect to go on my card to her.  This stamp is from I Brake For Stamps.     If you use Coupon Code SAVE10REGINA, you will receive 10% off your order. 


I embossed the stamp with black embossing powder and colored the Arch with a silver glitter pen.  Isn't that pretty?  I used a Sizzix stamp with matching dies and finished it off with some silver metal beads.  I used Black Soot ink around the edge of the die to set it off from the white card stock background.

Supply List

I Brake For Stamps St. Louis Arch stamp
Gina K Designs Black Onyx and White Card Stock
Recollections Ebony Embossing Powder
Sakura Silver Star Pen
Sizzix Framelits Thank You Stamp and Die (It has Stephanie Barnard's name on the set but I don't see a name, it has 658838 on it)
Silver Metal 5mm Sticker Beads
Tim Holtz Black Soot Ink and Sponge

Thank you for stopping by and have a great day!

Regina

Monday, September 21, 2015

Cards using MFT Stencils

Hi everybody!

I just wanted to share a couple cards that I made yesterday.  I made the Thank You card for my next door neighbor's Mother, who stayed here overnight and kept Barney when I went out of town to St. Louis.  I know, you think my having a 'baby sitter' for Barney is insane right?  He would be scared if he had to be here by himself all night because he never has.  :)

I just made a simple background using a My Favorite Stamps stencil called Scrolled BG.  I inked it up with Tim Holtz Spun Sugar Distress Ink.  The Thanks die is a Lawn Fawn die called Scripty Thanks.  I use these scripty dies a lot.  I topped it off with a few sequins and used some Wink of Stella Clear glitter pen over the word, thanks to give it a subtle sparkle.


I made this card for someone whose Father recently passed away.  I know she doesn't like pink so I made the flowers blue.  I used a My Favorite Things stencil called Rose Builder.  I love this stencil!  It is so relaxing to use this stencil and mask and just take your time.  That's what I did, went around the card masking as I went with Post It Masking Tape.


I ended up stamping a sentiment inside.  It said, Sending Thoughts and Prayers Your Way.  I used ink colors, Tim Holtz Tumbled Glass and Bamboo Leaves by Memento.

I hope you liked my cards!  Thanks for stopping by and have a great day!

By the way.... My BLOG IS FIXED!  The JOIN THIS SITE is FIXED.  It no longer goes to an error message.  So happy about this!


Regina

Thursday, September 17, 2015

Witch Please Halloween Card

Hi everybody!

Virginia Turtle stamps are so fun!  I made a Halloween card using the Witch Please stamp set and Monster Mix Sequins.  Here's a link to Virginia Turtle and here is a link to the Witch Please Stamp Set and Monster Mix Sequin Mix.  These sequins are so cute, there was even a little ghost, pumpkin and bat in there and I wanted to use the bat on this card but thought it was too cute to use. 

Use Coupon Code SAVE10REGINA and receive 10% off your order. 


I used a spiderweb stencil and sponged different color inks to make the background.  I think it turned out really pretty.  A list of supplies are below:


  • Witch Please Stamp Set
  • Monster Mix Sequin Mix
  • Recollections #110 white card stock and purple card stock also from Michaels
  • Lawn Fawn Large Stitched Rectangle Stackables Die
  • Tim Holtz Distress Inks in Dusty Concord, Twisted Citron, Spiced Marmalade
  • Spellbinders Labels 18 Die
  • Tim Holtz Mini Round Blending Tool
  • Copic Markers
  • Black Tulle
This Witch Please stamp set is a Limited Edition and when it's gone, it's gone so hurry and order!  Use Coupon Code SAVE10REGINA and receive 10% off of your order.

Did I inspire you to make some cute Halloween cards?  They don't have to be scary, they can be cute too. 

Thanks for stopping by and have a great day!

Regina


Wednesday, September 16, 2015

I Brake For Men Who Cook

Hi Everybody!

I have to tell you that I Brake For Stamps has just about any stamp that you could possibly be looking for.  They have over 4,000 stamps so that's to be expected right?  I needed to make a birthday card for my boyfriend and I found the perfect stamps.  He is an awesome cook, grills so good and is on a BBQ team that competes. We are going to St. Louis toward the end of the week so we'll be there during his birthday so wait until you see the stamps I used. 

Here is a link to I Brake For Stamps and I used these two stamps, Kiss The Chef and St. Louis Arch.

If you use Coupon Code SAVE10REGINA, you will receive 10% off of your order.  


This is a pretty straighforward card.  I colored the image with copics and cut out using a Spellbinders die. The Let's Eat Y'all is a cut file from the Silhouette Store, design # 13324.  I used a Lawn Fawn Die for the Happy Birthday sentiment.  I cut out stars with a Spellbinders die to match the patterned paper.  I have a 6x6 paper pad with burlap paper so I used that to make the ribbon banners.  I added the copper nailheads in the corners.  

On the inside I used a Spellbinders die that matches the front die but larger and used the Silhouette Sketch Pens to write inside.  I am horrible at writing in cards and my handwriting isn't so great anymore so I love using the Silhouette pens.  These are the ones I have...  Silhouette Pens Starter Kit and Silhouette Glitter Sketch Pens and Silhouette Starter Kit.  Not sure how I acquired all of these but I love the glitter ones.  I have written in many cards with the black glitter pen.  All you do is figure out what size paper you are going to put in your card and put those measurements in the silhouette on the screen where you put your paper size and then you put your text where you want it on the paper and it will write it out there.  

I used Versamark and embossed the St. Louis Arch stamp with black embossing powder and colored the Arch with a Sakura glitter pen. 

Supplies:

  • Gina K Designs White and In The Navy Card Stock
  • My Mind's Eye patterned paper, Summer Splash
  • Die Cuts With a View 6x6 The Burlap Paper Stack
  • Lawn Fawn Die, Happy Birthday Border
  • Silhouette Design# 13324, Let's Eat Y'all
  • Spellbinders Die Labels 8 and Stars
  • Copic Markers:  
Skin E00, E11 
Fire Y15, Y17, Y38  
Steak E35, E39, E30
Apron C01, C03, C05
Shorts C01, C03, B93, B95, B97
Sandals E33, E35
Oven Mitt R22, R24, R27, R29
Meat Fork Sakura Silver Star Glitter Pen
  • Sakura Glitter Pen, Silver Star (Arch)
  • Silhouette Sketch Pens Starter Kit (Blue Pen)
  • Recollections Embossing Powder, Ebony
  • Nailheads, Copper 3mm
  • Tombow Mono Adhesive, Dot Runner
  • Zig 2 Way Glue Pen
Be sure to check out I Brake For Stamps50% off Deal of the Week StampsOverstocksBister and all of the other awesome stamps and digis.  Now is the time to get your Christmas stamps. Use SAVE10REGINA coupon code for 10% off. 

Thanks for stopping by and have a great day!


Regina - I Brake For Stamps Design Team


Friday, September 11, 2015

Crappy Day Card

Hi everybody!

I made my first card for the Virginia Turtle Design Team.  For the most part, people loved this card and stamp set.  A couple people criticized it and said how tacky it was and they would never use it.  This happened in one of my card making Facebook groups and my post was deleted.  

The last time I checked, card making was supposed to be FUN, no right or wrong way of doing things.  I would NEVER EVER criticize someone's creation, especially publicly in a group.  It didn't bother me because I'm confident enough to think my card is cute LOL, but what does that say about the person doing the criticizing? Sorry, I probably shouldn't have put that in my blog but it just really surprises me that some people can't just keep on scrolling if they don't like a card or a comment, etc., they have to cause drama.  Am I the only one that sees this on a daily basis?  Facebook can be an awesome social media outlet if used in the right way.... that's all I'm saying about that (said Forrest Gump lol)


Everybody has a Crappy Day once in a while.  I thought this stamp set was cute because if sent to the right recipient, don't you think they would be surprised to get this card and would chuckle or at least smile?  I would love to know what you think.  

Here's the stamp set and a link to it, Oh Crap. If you use COUPON CODE SAVE10REGINA, you will receive 10% off of your order, includes pre-order stamp sets as well. 


Here's my card....


Aren't the flies a nice touch?  LOL!  Come on!  I always make pretty cards with flowers so sometimes it's just fun to have fun with it and this is what I called myself doing.  


I love this Halloween and Christmas set as well.  


I hope you liked my card.  Again, I know this isn't for everyone but given the right circumstance and recipient, I know I can make someone laugh with these stamp sets.  Isn't that why we send cards, to make people happy?  

Thanks for stopping by and have a great day!

PLEASE NOTE:  If you would like to join my blog, click on the 2 little squares beside Join This Site and a window will open and click Follow.  Thank You!


Regina


Thursday, September 10, 2015

Sympathy Card using My Favorite Things Stencil and Masking

Hi everybody!

I love stencils!  I made a sympathy card using the My Favorite Things stencil called Rose Builder and I think it turned out so pretty.  I masked as I went along, took my time and it turned out great.  


I can't decide if I want to stamp inside or not.  I am not even worried about messing it up by stamping crooked because I have the MISTI.  If you don't have one, this is a must have for stamping correctly every time.  Your stamping will be straight and if you stamp too light, you can go over it again.  How many cards have I messed up by stamping too light, well, and then put something over it to hide and fix.  Isn't that what we card makers do?  :)

Supplies Used:


  • Gina K Designs White, Kraft and Bubble Gum Pink Card Stock
  • My Favorite Things Stencil, Rose Builder
  • Versamark Ink
  • Zing Chestnut Embossing Powder
  • Tim Holtz Spun Sugar
  • Memento New Sprout
  • Tim Holtz Mini Ink Blending Tool (love!)
  • Post It Masking Tape
  • Craft Medley Sequins

I hope you like this card and will try stencils.  I love them for making backgrounds as well.  

Thanks for stopping by and have a great day!

PLEASE NOTE:  If you would like to join my blog, click on the 2 little squares beside Join This Site and a window will open and click Follow.  Thank You!


Regina


Wednesday, September 9, 2015

I Brake For White Crayon Sunflowers

Hi everybody!

I needed to make a birthday card for someone and I love to make Fall cards for people who have birthdays in September.  I love this stamp set from I Brake For Stamps called Bubble Wrap, Lattice and Flowers.  This stamp set has so many possibilities!!! If you use Coupon Code SAVE10REGINA, you will receive 10% off your order.


I made a card using the lattice stamp as the background and colored the sunflower with copics recently.  I wanted to show another way to use this sunflower stamp.  I did the White Crayon Technique. 


The White Crayon Technique is very simple.  All you do is stamp your image, I used Memento Black Tuxedo and I randomly stamped the sunflower on some white card stock.  Then I colored the petals of the sunflowers with a white crayon and it doesn't have to be perfect.  Next I sponged a few Tim Holtz Distress Inks all over this piece of card stock.  The colors I used will be listed below.  Then you take a paper towel and rub over the card stock and it will wipe most of the ink off of the petals and leave the white crayon.  That's all there is to it.  It's just another technique to give a different look to your stamps.  I find myself always coloring with copics the normal yellows and oranges.  

I embossed that orange looking card stock with one of the new We R Memory Keepers Next Level Embossing Folders called Woven.  They are 6x6 so I love the size and there are lines on the inside so you can line your card stock up correctly.  You get the deepest emboss with these, they are beautiful.  There are a few different ones and 2 to a set.  Here's a link to Amazon for the  Woven Embossing Folders.  They are very reasonably priced too.  Less than $10 for 2.  You will love them!  
I cut out the Happy Birthday To You with a Lawn Fawn die called Happy Birthday Border die.  I used card stock for the brown words and fun foam for birthday to pop it up a little.  I wanted the word birthday to stand out so I made it white to match the sunflower petals. I used a Wink of Stella Clear pen and went over the words and the centers of the sunflowers to give just a little sparkle.  I used some brown twine and added a little sunflower charm.  

List of Supplies Used:

  • Gina K Designs white, chocolate brown, and tomato soup card stock and the middle layer that is a mustard golden yellow came in a pack of an assortment called Sun Kissed Autumn.
  • W R Memory Keepers Next Level Embossing Folder, Woven
  • Tim Holtz Distress Inks:  Ripe Persimmon, Crushed Olive, Rusty Hinge and Mustard Seed
  • Fun Foam
  • Lawn Fawn Happy Birthday Border die
  • Pop Dots
  • American Craft Brown Twine
  • Clear Wink of Stella Glitter Pen
  • Sunflower Charm from my stash
  • White Crayon 
  • Tombo Dot Runner Adhesive


I hope you'll try the White Crayon Technique.  Did I inspire you to run to your craft room and make a Fall Card?  Check out  I Brake For Stamps.  There are over 4,000 stamps and digis as well and weekly 50% off specials.  If you use Coupon Code SAVE10REGINA, you will receive 10% off your order.  

PLEASE NOTE:  If you would like to join my blog and follow my work, please click on the 2 little squares up by Join This Site at top left of page.  Then a window will pop up and click Follow.  The Join This Site button goes to an error message.  Still trying to fix this. 

 Thanks for stopping by and have a great day!


Regina I Brake For Stamps Design Team Member