Pages

Showing posts with label Masculine Card. Show all posts

Sunday, June 17, 2018

For Daddy - Father's Day Card

Hi Everybody,

Happy Father's Day!  Enjoy your time with your Dads today.  I'm not getting to see mine today but we're having lunch next week so I'll give him this card next week.

My Dad is 74 and still rides a Harley Motorcycle so for the past few years, I made a card for him with motorcycles on them.

Here's an example of one of them lol.


This year, I wanted something more sentimental for him.  I found this super cute stamp from Penny Black called For Daddy and there's a story behind why I wanted to use this stamp.

When I was a little girl, my Dad worked second and third shifts mainly and when he would get ready to leave, I would grab his legs to try to keep him from leaving and he would say, "I have to go to work to buy you chocolate milk" and I would say, "Okay"... lol   

I'm assuming he will remember this if I do. :)


I colored with Copic Markers and I cut out a mask to put over the colored stamp.  Next I stamped the background around the stamp with Tree Rings by Stampin' Up.  I wanted a neutral, masculine background so the stamp itself would stand out but all that white area would be covered.  I used Altenew mini ink cubes in the grays called, Warm Gray and started with light and went down to the third color to create an ombre effect. It's hard to find good gray ink colors that work well together and I really like these. 

I had this Happy Father's Day die in my stash and cut out with black cardstock, adhering with a Zig Two Way Glue Pen.

The bottom layer gray cardstock is Bazzill brand, not sure of the color. I used the textured side. 

The inside says, have an amazing day. The sentiment inside is from The Ton Stamps, Thoughtful Poppies stamp set. 

I hope you like my card and the story behind it.  I can't wait to give it to him!  

Thanks for stopping by and enjoy your day!


Regina

Monday, June 4, 2018

Baseball Eclipse Card - Masculine Card

Hi Everybody,

This past Saturday I posted a couple of Eclipse Cards with instructions using the beautiful Alexandra Renke papers for a couple of ladies that helped me with physical therapy.  Links to the papers I used on the cards from Saturday are in that blog post.  Link to that post is below. 

I just wanted to post one more Eclipse Card I made and this is for the owner. He likes baseball because his son plays so I made a card for him using baseball patterned paper.  I think these can be great masculine cards.  


I made this card in about 15 minutes.  When you use patterned paper they are the fastest to make because you already have your background made, but the alcohol ink and stamped backgrounds are more fun because you made the background yourself. 

I used a Die-Namics die from My Favorite Things called Big Thanks.  This is the perfect size for these cards.  It's about 3-1/2" long.  A few people had asked me how big my card is because I think they thought the die was bigger than it is.  My card is an A2 card.  

Here's a link to my blog post with instructions.  

Here is a link to TupeloDesignsLLC online store where I got the Big Thanks die.  They offer Free Shipping with No Minimum Purchase so check them out.  They sell all of your favorite brands. 


Thanks so much for stopping by and have a great day!


Regina


Sunday, March 11, 2018

Love You To The Moon

Hi Everybody,

So, lately I have had some medical issues one being, I have to get a double knee replacement, one in April and one in May. I hope it doesn't affect my crafting too much but I can always color stamps and make cards later.  My husband has been wonderful and I wanted to make a card to tell him how much I appreciate him.  


I made an Oxide Ink background, trying to use colors that I think of when I think of what the Earth looks like, as well as masculine. Next I used Toner Paper from Thermoweb to cut out the Tim Holtz Mini Globe Die and then foiled with the beautiful Amber Watercolor Deco Foil.  I just love how awesome this foiled globe looks against this matte background.  

I picked up this Love You To The Moon and Back Stamp on clearance at Hobby Lobby, made by Stampendous.  So many people in the Stamp Junkies group on Facebook showed their clearance haul so I had to go check out my local store.  I was a little disappointed that I didn't see many clearance items but I did buy several and I also had a give a way in the Junkies group, whoever guessed closest to what I spent would win a prize. So fun! 

I was so afraid I would mess up my background using this wood block rubber stamp on the front.  I am so used to the Misti now which ensures I'll stamp straight.  I bet I messed up alot of cards using these wood block stamps back in the day. :)

I used Gina K Designs Kraft cardstock for bottom layer and the Oxide Ink top layer is Bristol Smooth paper.  

I used Simon Says Stamp stamp set called You Matter on the inside.  I foiled the matching You die to this set with Lapis Watercolor Foil from Thermoweb.  I used Versafine Onyx Black to stamp the sentiments on front and inside and then embossed with clear embossing powder to make it stand it more.  I used Brutus Monroe Embossing Ink and Icicle Embossing Powder.  If you haven't tried this brand, please do, I think you'll be pleased.

There are two perfect sentiments in this Simon Says Stamp set to go with this globe die... You Rock My World and You Make The World a Better Place. 

I hope I inspired you to make your spouse, boyfriend, partner, etc., a card to show how you appreciate them.  I don't do this enough, sad to say.  He's about to have to help me through two surgeries back to back so I better start doing better lol.  

Thanks for stopping by and have a great day!

Regina

Tuesday, September 26, 2017

Moose Fishing - Masculine Card

Hi Everybody!

I am on the Strawberry Jude Stamps blog today!  I am really excited to be guest designing for them this month.  I am using such an adorable stamp set called Fishing with Moose and Hedgehog.

HERE IS A LINK to the Strawberry Jude Stamps online store - its worth checking out I promise!  

HERE IS A LINK to the stamp set I am using on today's card.  They're other new release is a super cute dragon card and HERE IS A LINK to this stamp set called, Dragons & Jewels. 


This card was so much fun to make!  I love the cute little critters in this set so it was hard to choose which to use so I picked the moose.  I tried to use as many stamps as I could here to create a scene.

First, I stamped the moose and his tacklebox beside him and a fish and hook connected to the fishing pole.  Next, I drew in a dock around the moose and colored with Prismacolor Pencils.  I also colored the fish with Prismacolors and drew in scales.  There were a few scales but I added more.  I cut the fish and dock out.

Then, I used some Canson watercolor paper with some Gansai Tambi watercolor paints.  I used a big, flat paintbrush and painted lightly at the top and gradually made it darker.  I cut out clouds with a stitched die and also the watercolor panel background with a stitched rectangle die, so they would match. 

Finally I stamped the word, Fishing, cut out with a banner die and sponged around it and the clouds with inks. 

This stamp set is PERFECT for masculine cards as you can see and I had a lot of fun using the different stamps on one card.  

I hope I inspired you to draw in scenes and detail around your stamps. Obviously, you're not going to do this on every card because it does take some time, but I know you'll have special occasions for a husband, Dad, etc., where you would want to take more time on the cards. 

This is just one way to make a card with this set, it doesn't have to be complicated or time consuming.  Lay it all out how you want to and make sure you're having FUN with it. 

If you would like to learn more about drawing in scenes around your stamps, adding detail to your stamps, etc., I learned this from taking classes at Kit and Clowder.  Alyce Keegan is the best coloring teacher.  She teaches you how to use the pencils or markers in the classes, why you are shading where you are by teaching lightsource.  There are monthly pencil and marker classes, which I take, and there are Technique classes such as Skin and Hair, Clothing where you learn how to draw in and color pleats, etc., Animal Class and so on.  Check out their website where you will find a couple of free classes.  You can see what they're like and if this is for you. 

Thanks for stopping by and have a great day!


Regina

Tuesday, June 6, 2017

Masculine Camo Card Using Inlaid Dies

Hi Everybody,

Father's Day is coming up and I always struggle to come up with a design for a masculine card.  My brother's birthday is 6/20 so I made him a card and wanted to share to give you an idea for a masculine card.  I hope you like it.  I'm trying to learn new techniques and this is one... inlaid dies. I know it's been around for a long time but this is the first time I've ever tried this and I love it!  It is so much fun!


I used my MISTI and the Corners that you can buy to make sure my sentiment wasn't crooked.  I used the L Shape Ruler for this.  I've never used a vertical sentiment so I just thought I'd do something different.


Close up


Close Up


Here's what you do:

Step one:  Choose your card stock color and get a heavy piece of white card stock to put behind it. It doesn't have to be white... (whatever color you want as long as it's heavy to act as a buffer).

I chose a Kraft card stock by Gina K Designs and put her 120# white piece behind.

Step two:  Choose the dies you want to use

I chose Tim Holtz Garden Greens die set.  I love this set, there are about 10 dies in the set

Step three:  You can either do this one die a a time OR if you have a magnetic platform you can put them all on at once like I did.  I made my whole card front in one pass.  How cool is that??

I used Magnetic Platform and ran all the dies through at once 

Step four:  Put your dies where you want them to be on the card stock and run through your Big Shot or whatever die machine you have, with the heavy card stock behind it.  This will keep your dies from cutting all the way through the card stock on top, thus creating an inlaid die design.  Continue putting your dies where you want them on the card stock and continue to run through your machine, with the heavy card stock behind it.

I decided after I had already run my dies through that I wanted camoflage on the card because my brother hunts.  So I just cut out the dies I wanted to use with the camoflage patterned paper.  I got this at a big box store, 12x12 sheet.  Then you glue it on top of the dies you want to cover. I used a Zig Two Way Glue Pen.

I could've used the camoflage paper in the beginning but I didn't think about it.  If your inlaid die cuts cut out a little, you can just glue them on.  Some of mine were a little loose and I turned the card stock over and took a chisel wide Zig Two Way Glue Pen and went over the entire back to adhere them and then put that on top of my black card stock piece.  The glue will not go through to the front of the card.

You can really make this fun.  You can use patterned paper for your inlaid dies, you can use a different color than white on the bottom and have a solid or patterned die cut go there.

I don't know if I explained this well or not, again, this is why I want to make videos.  I love to share what I learn.  I love to answer your questions, etc.

I wanted Happy Birthday to go on the front of the card somewhere but I didn't want to cover the front much.  I chose this vertical Happy Birthday sentiment from Whimsy Stamps called, Kitty Ballons.  The dies I used are from Tim Holtz called Garden Greens.  I love this set!  There are about 10 dies in this set.  They cut like butter too.  I stamped the sentiment with Versafine Onyx Black ink and embossed with Stampendous Detail Clear Embossing Powder to give it some shine.

I couldn't find my ribbon banner dies so I cut them myself so if they look like they are handmade, well, they are lol.  I didn't want to go have the Silhouette cut them for me.  I put some fun foam behind the ribbon banner to give it some dimension.  Lastly, I added some Eyelet Outlet black enamel dots.

As I was looking through all of my dies, I got so many ideas for this technique!  You can use flowers, hearts, shapes, anything you want with solid or patterned paper.

I hope you'll try this technique.  I loved using the magnetic platform to run them all through at once. I want to make up a bunch of these for male and female so I have something ready for a card when I need it

Thank you so much for stopping by and have a great day!


Regina


Wednesday, September 30, 2015

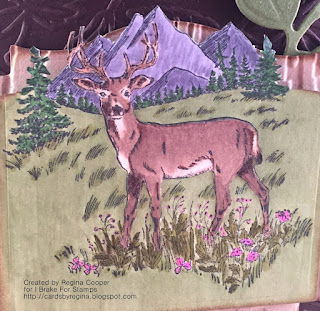
I Brake For Bucks

Hi everybody!

Deer hunting season is almost here and so I thought I would make a card using this Buck stamp from I Brake For Stamps.  This is a great stamp to use for a masculine card.  I cut off the top of the stamp as you can see on my card with a plan in mind.  I colored it about 4 weeks ago and decided to make a card with it this week and forgot what my plan was LOL!  I cut it off because I didn't want blue sky to show but I can't remember why.  :(  Please tell me I'm not the only one who is like this.  


Here's the stamp... If you use Coupon Code SAVE10REGINA at checkout, you will receive 10% off of your purchase. 


I used embossing folders as you can see on the card background and the background the stamp is on and sponged ink around the edges of the die the stamp is on.  I cut a couple pieces of camo ribbon and adhered to card, adding bronze brads in corners.  I colored the stamp with Copics and I asked my boyfriend to make sure I colored it accurately and he said yes.  Yay!  I cut the stamp out with a die and cut off the top part of the stamp (for whatever reason?!?) and cut out the leaves and For You sentiment with dies.  Supplies listed below.  

It is kind of difficult to make masculine cards and I usually don't put ribbon on them, twine maybe, but not ribbon, but I made an exception here.  I usually make masculine cards pretty CAS but I tried to add as much as I could to this one to see how much I could do and it still be a masculine card. This card will be to display in my boyfriend's reload room so I made it 6" square.  

Supply List:

  • Recollections 110# white card stock for base
  • Gina K Designs Fresh Asparagus, Kraft and Chocolate Brown card stock
  • Tim Holtz Gathered Twigs ink (used to sponge around die)
  • Memento Tuxedo Black 
  • Tombo Mono Adhesive
  • Brown Fun Foam (to pop up stamp)
  • Pop Dots
  • Zig Two Way Glue Pen
  • Leaves embossing folder by Darice
  • Woodgrain embossing folder, Tim Holtz Alterations 
  • Copic Markers
  • Spellbinders Foilage Die
  • Spellbinders Labels 18 die
  • Spellbinders Classic Large Squares Die (to cut out stamp)
  • Sizzix Dies, Card Phrases Set #3 (For You die)
  • Camo ribbon from big box store
  • Bronze brads from big box store

Isn't it amazing how many different supplies we use on a single card?  

Did I inspire you to get this stamp to make masculine cards for the deer hunting men in your life?

Thanks so much for stopping by and have a great day!!


Regina - I Brake For Stamps Design Team Member


Tuesday, September 22, 2015

St. Louis Arch Thank You Card

Hi everybody!

Today I want to share a Thank You card I made.  It's simple but I think it looks so clean and nice, what do you think?  I stayed with a friend when I went to St. Louis last week and I thought this St. Louis Arch stamp would be perfect to go on my card to her.  This stamp is from I Brake For Stamps.     If you use Coupon Code SAVE10REGINA, you will receive 10% off your order. 


I embossed the stamp with black embossing powder and colored the Arch with a silver glitter pen.  Isn't that pretty?  I used a Sizzix stamp with matching dies and finished it off with some silver metal beads.  I used Black Soot ink around the edge of the die to set it off from the white card stock background.

Supply List

I Brake For Stamps St. Louis Arch stamp
Gina K Designs Black Onyx and White Card Stock
Recollections Ebony Embossing Powder
Sakura Silver Star Pen
Sizzix Framelits Thank You Stamp and Die (It has Stephanie Barnard's name on the set but I don't see a name, it has 658838 on it)
Silver Metal 5mm Sticker Beads
Tim Holtz Black Soot Ink and Sponge

Thank you for stopping by and have a great day!

Regina

Wednesday, September 16, 2015

I Brake For Men Who Cook

Hi Everybody!

I have to tell you that I Brake For Stamps has just about any stamp that you could possibly be looking for.  They have over 4,000 stamps so that's to be expected right?  I needed to make a birthday card for my boyfriend and I found the perfect stamps.  He is an awesome cook, grills so good and is on a BBQ team that competes. We are going to St. Louis toward the end of the week so we'll be there during his birthday so wait until you see the stamps I used. 

Here is a link to I Brake For Stamps and I used these two stamps, Kiss The Chef and St. Louis Arch.

If you use Coupon Code SAVE10REGINA, you will receive 10% off of your order.  


This is a pretty straighforward card.  I colored the image with copics and cut out using a Spellbinders die. The Let's Eat Y'all is a cut file from the Silhouette Store, design # 13324.  I used a Lawn Fawn Die for the Happy Birthday sentiment.  I cut out stars with a Spellbinders die to match the patterned paper.  I have a 6x6 paper pad with burlap paper so I used that to make the ribbon banners.  I added the copper nailheads in the corners.  

On the inside I used a Spellbinders die that matches the front die but larger and used the Silhouette Sketch Pens to write inside.  I am horrible at writing in cards and my handwriting isn't so great anymore so I love using the Silhouette pens.  These are the ones I have...  Silhouette Pens Starter Kit and Silhouette Glitter Sketch Pens and Silhouette Starter Kit.  Not sure how I acquired all of these but I love the glitter ones.  I have written in many cards with the black glitter pen.  All you do is figure out what size paper you are going to put in your card and put those measurements in the silhouette on the screen where you put your paper size and then you put your text where you want it on the paper and it will write it out there.  

I used Versamark and embossed the St. Louis Arch stamp with black embossing powder and colored the Arch with a Sakura glitter pen. 

Supplies:

  • Gina K Designs White and In The Navy Card Stock
  • My Mind's Eye patterned paper, Summer Splash
  • Die Cuts With a View 6x6 The Burlap Paper Stack
  • Lawn Fawn Die, Happy Birthday Border
  • Silhouette Design# 13324, Let's Eat Y'all
  • Spellbinders Die Labels 8 and Stars
  • Copic Markers:  
Skin E00, E11 
Fire Y15, Y17, Y38  
Steak E35, E39, E30
Apron C01, C03, C05
Shorts C01, C03, B93, B95, B97
Sandals E33, E35
Oven Mitt R22, R24, R27, R29
Meat Fork Sakura Silver Star Glitter Pen
  • Sakura Glitter Pen, Silver Star (Arch)
  • Silhouette Sketch Pens Starter Kit (Blue Pen)
  • Recollections Embossing Powder, Ebony
  • Nailheads, Copper 3mm
  • Tombow Mono Adhesive, Dot Runner
  • Zig 2 Way Glue Pen
Be sure to check out I Brake For Stamps50% off Deal of the Week StampsOverstocksBister and all of the other awesome stamps and digis.  Now is the time to get your Christmas stamps. Use SAVE10REGINA coupon code for 10% off. 

Thanks for stopping by and have a great day!


Regina - I Brake For Stamps Design Team