Pages

Showing posts with label Graciellie Design. Show all posts

Friday, December 1, 2017

Country Christmas Using Foil


Hi Everybody,

This month Graciellie Design is collaborating with Thermoweb.  We are having a blog hop to show you beautiful projects using Christmas and Winter themed stamps from Graciellie Design combined with products from Thermoweb such as Deco Foil, Gina K Designs Foil-Mates and Fancy Foils, Transfer Gel, and more to inspire you to make some beautiful Christmas cards.

I am using a digital stamp set called Winter Blessings
HERE IS A LINK to this stamp set 
HERE IS A LINK to Graciellie Design online shop
HERE IS A LINK to Thermoweb's Website


The first thing I did was position the pine limb and pine cones how I wanted them and printed on a laser printer.  This is one of the neat things about digital stamps... you can size them and place them wherever you want to and when you print out using a laser printer, you can foil the image because it printed with toner ink. In this case, I used multiple foil colors to make it look as realistic as I could. 
I am using a few products from Thermoweb on this card including the Gina K Designs Fancy Foil in Radiant Red.  This foil is SO pretty because it looks glittery. I used the Gina K Designs Fancy Foil in Radiant Red for the bow and Green Deco Foil for the pine cone with the Mini Minc Machine.  I am very fond of the watercolor foils and the Amber Watercolor Deco Foil is so perfect for the pine cones. I sponged around the focal image stamp with Distress Inks in Pumice Stone and Antique Linen to give it a 'rustic' appearance.  

I have a scalloped rectangle die that cuts out a 'frame' piece so I used that part along with the Gina K Designs Foil-Mates Backgrounds in Ornamental Holiday.  I love the look of diagonal lines on a card, which is one of the choices in this package.  I used the Gina K Designs Fancy Foil in the Radiant Red with this. 

Let me explain what the Foil Mates are in case you are not familiar with them because you do not want to miss out on using these on your cards this year. The Foil Mates Backgrounds and Sentiments are designs printed with toner so that all you have to do is cut them out however you want to, put your foil on top like you normally would and feed through your Minc or Laminator.  That's it!  I had a family emergency occur in October and we are still dealing with this so I am not on schedule at all making Christmas cards.  A friend of mine told me to start in July and I did not listen lol, so I will be using these Foil Mates and Deco Foil because it is so quick to use but looks like you spent hours getting it to look that way. 

The sentiment is from the Gina K Designs Foil-Mates Sentiments in Holiday Cheer. I also used the Gina K Designs Fancy Foil in the Radiant Red with this sentiment and I cut a background out for it using the Thermoweb Toner Paper and a stitched oval die and then foiled the toner paper oval that I cut out with the die.

The bottom layer card stock is Gina K Designs Christmas Pine and the red card stock behind the pine cones image is Gina K Designs Red Velvet.  I think those colors make the perfect "Country Christmas" card. 

I also used Thermoweb's Sticky Tape Runner and Medium Zots Singles. Both of these adhesives work wonderfully.  I do believe the Sticky Tape Runner is permanent so make sure you put what you're adhering exactly where you want it, but that's a good thing. It's nice to know my card will get to the recipient in one piece without corners lifting, etc. I like the size of the Medium Zots and that they're packaged as singles.  I would recommend any of Thermoweb's products.  I have been happy with every product that I have tried. 

Your next stop in the hop will be Terri Burson.  Make sure you finish the hop with Graciellie Design blog because she always has amazing techniques to share including videos.  The November winner will be announced on that post and a $20 gift card to Gracielle Design Shop as a prize for today's hop.  

Also be sure to check out the Words and Shadows SVG Word Bundle - Winter Edition, 50% off, no code needed.  These are Christmas and Winter themed words, detailed and shadow, over 126 total.  They can be sized to whatever size you need them to be. 

I hope I inspired you to check out the Foil Mates and Fancy Foils from Thermoweb.  They practically do all of the work for you.  You just sit back and watch the foil works its magic.

Thanks for stopping by and have a great day!

Regina


Wednesday, November 1, 2017

Cheery Christmas New Release Blog Hop

Hi Everybody,

Have you started making your Christmas cards?  If not, Graciellie Design is having a blog hop to inspire you to start them.  We are featuring Really Reasonable Ribbon.  Below I will explain how the monthly Ribbon Club works.

The new release includes four new digital stamp sets and a pack of digital paper.  HERE'S A LINK to Graciellie Design online shop to see them all.  The one I am using is called Cheery Christmas.  I LOVE the detail in this wreath and it was so much fun coloring it with Copic Markers.  There is a lot of great detail on the holly leaves and I really like the fonts used here.


HERE'S A LINK to CHEERY CHRISTMAS stamp set


HERE'S A LINK to Holiday Traditions Digital Patterned Paper


I started this card by printing the wreath and sentiment and then colored the wreath with Copic Markers and fussy cut it out.  It seemed a little risky to cut this out with my Scan N Cut.

Next, I printed one of the digital patterned papers in the new set called Holiday Traditions and HERE'S A LINK to this paper pack. This card turned out so well with the red damask print I chose.

I used a die set from Gina Marie Designs called the Scalloped Rectangles.  It was really nice to be able to use both of the sizes on this card as a frame.  This card was made a little larger than an A2; it is 5"x 6-1/2".  The sentiment was cut out using the Stitched Rectangle Die.  Since a laser printer was used, the sentiment was foiled using Thermoweb DecoFoil in Gold.  Since darker greens were used for the wreath, the DecoFoil Pen was used to add specks of gold foil randomly on the wreath to brighten it up.

Ribbons with gold edges were chosen to coordinate with the gold in the card.  I wrapped it around the card and separately tied a double bow using the Bow Easy.  Even if you are like me and not very good at tying bows, the Bow Easy really makes it easy to do.  I used a glue dot to glue the bow down and pop dots under the wreath.

The ribbon used is from Really Reasonable Ribbon.  I am very impressed with the quality of this ribbon.  It's beautiful, easy to work with and doesn't ravel when you cut the edges.  I would highly recommend trying it.  I love the monthly Ribbon Club because you get a beautiful assortment of ribbons that coordinate with each other.  The Christmas Assortment was used for this card and is pictured below.  I used the ribbon on the right end. 


I also have the Country Holiday Collection shown below.  How beautiful are these colors???  Seeing ribbons like this makes me want to use ribbon more on my cards.  It does add a lovely touch.  I feel like ribbon adds something extra to the card to show you really want to dress the card up to make it even more special.


Here's how the Monthly Ribbon Club works....  The customer joins and from then on (until you say you would like to stop) they automatically bill and ship a new assortment on the first of each month.  Each assortment contains 7-9 different styles and 14-18 yards of ribbon.  Typically it is 9 styles and 17 or 18 yards.  Each monthly assortment is either a holiday or color themed assortment of coordinating ribbon. 

The October Christmas Assortment I used had 9 styles and 17 yards of ribbon and lace.  The November assortment assortment is the Country Holiday Collection shown above and has 9 styles and 18 yards of ribbon. 

There will be a special in November where you can start with the October/November set pictured above for a reduced price.  Head over to the website for more details, pricing, etc. HERE'S A LINK to Really Reasonable Ribbon. 

The link to the Ribbon Club Category is Monthly Ribbon Club Category

As always we want to share more project ideas with you, so make sure you visit each blog for more inspiration and also for a chance to win a $20 gift card -not coupon- to the shop, so you can get our entire Holiday Traditions collection this month! 

Your next stop in the blog hop is TERRI BURSON of WAVING MY WAND. She always showcases her projects so beautifully.  HERE IS A LINK to her blog. 

If you would like to start the hop from the beginning, you will start at the Graciellie Design blog and HERE's A LINK. 

Thank you so much for participating in our hop and I hope you'll take a minute and check out Really Reasonable Ribbon's website.

Thanks for stopping by and have a great day!

Regina

Monday, October 16, 2017

Blessed

Hi Everybody,

Did you know that Graciellie Design offers rubber stamps sold through Unity Stamp Company?  There was a new stamp release beginning of this month and the design team is having a blog hop to inspire you.  If you purchased stamp sets at the beginning of the month, you'll get lots of ideas.

I used two stamp sets for the card I'm showing today called Sending Kindness and May Blessings Follow You.  You can purchase these two sets in digital or rubber stamp form.  Here are links for both stamp sets in digital and rubber stamp form.


Sending Kindness Digital Stamp Set
Sending Kindness Rubber Stamp Set (Unity)

May Blessings Follow You Digital Stamp Set
May Blessings Follow You Rubber Stamp Set (Unity)


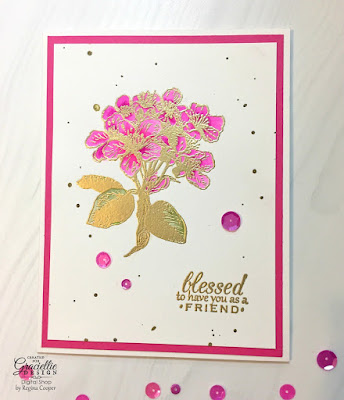
I used the apple blossom flower stamp, it's the perfect size for the center of a card.  I love the sentiments  in the May Blessings Follow You about blessings and blessed. There are SO many people I could send this card to.

I used Brutus Monroe Gilded Embossing Powder.  This was the first time for me to use this and it was fabulous.  It embossed so smooth and such a beautiful, shiny color.  I colored the stamp with Zig Real Brush Markers and I actually only used one color for the flowers.  I found out after the fact this was not watercolor paper but I tried it anyway.  The results weren't too bad actually.  I embossed the sentiment also with the Gilded Embossing Powder.

To finish it off I added some pink sequins from The Ton and flicked some gold Gansai Tambi watercolor paint on the card to get some specks on there.  I put post it tape over the sentiment and flower when I did this.  No way could I have flicked that paint and it not gotten it on either of those.

I used Gina K Designs Passionate Pink Cardstock for the mat layer.

Your next stop is Terri Burson who always blows me away with her outstanding, amazing creations.

If you would like to start the hop from the beginning, start at Graciellie Design blog.

Thank you so much for stopping by and have a great day!


Regina


Monday, October 2, 2017

Sending Kindness - Unity Stamp Co New Release Blog Hop

Hi Everybody,

Did you know that Graciellie Design offers rubber stamps sold through Unity Stamp Company?  New stamp sets have been released and we are excited for you to see samples created by the design team. Get ready to be inspired!

The stamp set I am using today is called Sending Kindness.  You will see Quick Tip Videos/Quick Tips if you click on the Sending Kindness link.  The pears are being used because they remind me of Fall.  


This card started with Fresh Asparagus card stock from Gina K Designs used for bottom layer.  Next, Gina K Designs Ivory layering weight card stock was added and embossed with a leaves embossing folder.  Part of the leaves were gently rubbed over with copper pigment ink to give a little color but yet not take away from the stars of the show which are the pears and sentiment. 

The pears were stamped with Memento Tuxedo Black ink and colored with Copic Markers.  They were fussy cut out since my Scan N Cut cannot recognize images that do not have a solid black outline around it's entirety. 

I stumbled upon this golden yellow card stock from Close To My Heart that has the woodgrain embossing and thought that would be perfect to go on the card because of the green and this golden yellow combination.  Although these are colors I do not normally use, it is good to step out of the box sometimes and try different color combos. 

The golden yellow part that looks like pallet boards was cut out using a die and the sentiment was stamped with Versamark Ink.  To give the sentiment a little shine and dimension, it was embossed with Zing Chestnut Embossing Powder.  The pears were also given a little bit of dimension using Pop Dots to make them stand out more.  To balance out the card, one of the pears sets was cut in half so a single pear could be placed at the bottom.    

A Clear Wink of Stella pen was used over the pears and a Gold Wink of Stella pen used on parts of the leaves, specifically some of the edges and veins.  To add that final touch, it was finished off with a piece of ribbon wrapped around and glued underneath.  

Unity Stamp Company is sponsoring three prize packages, which includes three stamp sets each!  The three winners will be announced on October 16th.  Please comment on my blog for a chance to win!

Your next and last stop will be Terri Burson and you will be WOWED by her card I promise.  


Thank you so much for participating in our blog hop.  If you would like to start from the beginning, you will go to Graciellie Design blog


Regina

Tuesday, August 15, 2017

Graciellie Design Inspiration Blog Hop 8-15


Hi Everybody,

Welcome to the Graciellie Design Inspiration Blog Hop where we will be showcasing the beautiful Magnolia Dreams set!  Magnolia Dreams consists of a stamp set with the gorgeous magnolia that I'm using on today's card, along with digital papers and SVG's. Paper Temptress made a cardstock pack especially for Graciellie Design to go with this new set. The colors work together so perfectly!  


Click here to be taken to this cardstock pack at Paper Temptress.


I started the card using Paper Temptress Teal BASIS 80# with the Aqua BASIS 80# as the next layer. The teal floral patterned paper is from the digital paper pack in the Magnolia Dreams collection.  I wanted the magnolia to really stand out so I made it large size, cut it out with the Scan N Cut and then foiled with Deco-Foil Rose Gold Foil.  I wanted to add just a hint of color so I used Copic Markers to add the same colors as the other parts of the card. Martha Stewart Clear Microbeads are glued down in the center of the magnolia. 

I thought Paper Temptress White Splitz Ribbon would be perfect on this card.  I used the Solar White Thin Columns cardstock by Paper Temptress under the flower.  I aIways tend to use regular cardstock but I really like the stripes/columns found on the Solar White Thin Columns cardstock.  It adds just the right touch when you want a design on your white cardstock that is not overwhelming.  

I sized the sentiment from the Magnolia Dreams stamp set and printed it out with my laser printer on Paper Temptress Heavy Weight Vellum 48# and foiled in Deco-Foil Rose Gold Foil.  I wrapped the vellum around the back of the Solar White cardstock and glued it down.

To finish off I added some clear sequins and sponged ink around the Solar White cardstock.  

This is a beautiful collection with endless possibilities.  One advantage to working with digital stamps and SVG's is that you can size them however you want.  I have heard people refer to stamp sets in the past that they liked but they wished a flower or sentiment in the set was larger.  One of the great advantages of digital stamps is how they allow you to make them as large or small as needed for your particular project. 

If you would like to start from the beginning of the hop, please visit Graciellie Design blog.  

Your next stop is Shylaa Shree.  

Thank you so much for stopping by and joining us for this inspiration blog hop.  Have a great day and Good Luck! 


Regina

Friday, August 11, 2017

Flower Shaker Card - All Dies Card

Hi Everybody,

I made a card today using all dies, no stamps.  Typically I use 1-3 dies on a stamped card. This one was fun to make and it's for someone who needs to show her pretty smile again so I hope this card will help.

I used the My Favorite Things Die-Namics Shaker Flower for this one, all the pieces are right there for you....


I started with choosing cardstock.  I am using Paper Temptress Pink BASIS 80# and Magenta BASIS 80# for the bottom layers of the card and Gina K Designs Grass Green and Jellybean Green for the grassy area, stem and leaves.  These are all excellent cardstocks.  I've been using Gina K Designs for about 6 years now.  I've recently started using some of the Paper Temptress cardstocks and I really like them.  They are different weights, textures, etc., so it's fun to use striped, linen, pearl, metallic, etc.  I would recommend their 80#, it cuts like butter.

I used Paper Temptress Azealea Metallic/Mica for the inside of the flower (the back) and The pink polka dot patterned paper is actually digital paper from Graciellie Design from the Magnolia Dreams collection.  These papers are so beautiful and the colors are so in right now, pink and teal.  I think if you take a peek at this website, you will love what you see.

I used Tim Holtz dies called Garden Greens.  I cut them out with Thermoweb toner paper and foiled in Deco-Foil Pink Melon.  I cut the clouds out with the toner paper and Deco-Foil Opal.  How pretty is this foil?? I'm in love!  It looks like a subtle rainbow of color. I didn't want anything bright for these clouds.  They are toned down, yet interesting.  

I LOVE these little butterflies.  These dies are from Impression Obsession (DIE 046-A). There are five different butterflies in this set.  They are perfect small embellishments.  I cut them out with toner paper and foiled with Deco-Foil Watercolor Summer Rainbow.  This is one of my favorite foils with the pink, silver and golden colors together.

The sequins are a mix that came from The Ton Stamps.  I added some extra seed beads and bugle beads.

I used Scotch Foam Tape and Scor-Tape to adhere the pieces of the flower together.  The word smile is a die from Sizzix called Card Phrases #3.  I cut this out with a heavy white card stock and cut it out again with Deco-Foil Summer Rainbow, placing the die on the pink and silver parts and adhered it to the white cardstock and put a thick coat of Glossy Accents over the top.  I also used a Zig Two Way Glue Pen and Mini Glue Dots in adhering miscellaneous parts of the card. 

Isn't this a fun card??  I hope I inspired you to definitely get your Deco-Foil out and play and also make a card only using dies, just for a change.

Thanks so much for stopping by and have a great day!


Regina

Thursday, August 10, 2017

Foiled Mosaic Background

Hi Everybody,

I was playing with Deco Foil Transfer Gel and a Tim Holtz Mosaic Stencil and when I foiled it with the Deco Foil Lapis Watercolor Foil, I was blown away with how beautiful it was. I wanted to make a card with it but wasn't quite sure how I would add it to other stamps, card stock, etc.  


The first thing that I put with it was Paper Temptress card stock called Gold Pearl Linen.  This card stock is so pretty and it's a great weight too.  It's a light gold, if that makes sense, not real yellow in color.  I used ribbon from Paper Temptress as well called 5/8" Opulance Ribbon in Gold.  I loved this ribbon with the other two elements for the card.  It's a sheer, classy ribbon that is easy to work with. 

Next, I cut out the magnolia flower from the Magnolia Dreams Stamp Set by Graciellie Design with my Scan N Cut and foiled with Deco Foil Rose Gold Foil.  I decided not to color the flower this time because I didn't want to take away from the mosaic foiled background.  I just added some Martha Stewart Clear Microbeads in the center of the flower.  You just put glue down where you want them and sprinkle them on glue, easy as that.  Just make sure you are doing it in something like a shoe box top because they will go all over the place.  

I added a sentiment from a stamp set called, Good Thoughts from Graciellie Design.  I also foiled the sentiment with the Deco Foil Rose Gold Foil.  I really like this color foil because it's not a bright yellow gold.  Sometimes you want gold but not so yellow and this is it.  After I printed it, I cut a ribbon banner from white card stock. I finished it with a few dew drops from The Ton.  I love these as a change from sequins and they hold really well.  If you want embellishment but not shiny bling like sequins, dew drops are your answer. 

(sentiment is from this beautiful stamp set)


I want to comment on this magnolia flower in the set.  This flower is perfect because the shading is already there so it looks good just foiled or if you want to color it there is no need to guess where the shading is so you can quickly color up some and use on cards. 

This stamp set is part of a set that includes the stamp set, patterned paper, matching card stock, SVG's.  Everything coordinates so well together.  There is currently an August Promotion at Graciellie Design if you buy the entire Magnolia Dreams set, you will get a free gift. You can buy individually as well. 


There will be a blog hop on the 15th of this month so I hope you'll join us to win some prizes for commenting.  There will be lots of inspiration from the Design Team.

Thank you so much for stopping by and have a great day!


Regina


Tuesday, July 25, 2017

New Design Team Announcement


Hi Everybody,

I just wanted to announce today that I will be a Design Team Member of Graciellie Design effective 8/1/17.  Below is a link to the Graciellie Design Shop on Etsy and her blog.  She has created such beautiful designs!  If you love flowers, butterflies, birds, fruit, nature in general, and vintage, you will love the designs you see here.  She also offers beautiful digital papers and SVG's as well.  


Here is a link to her shop..... Graciellie Design  where you'll find beautiful stamp sets, SVG's and digital papers.  Here is a link to Gracie's Blog.  You will find awesome tutorials using her products and creative ways to use foil.


On August 1st and 2nd we will be having a blog hop.  On August 1st there will be two teams participating, Graciellie Designs DT and Paper Temptress DT.  There will be beautiful new product releases available at that time and prizes on both days. There will another blog hop on August 2nd with the other half of Graciellie Designs team also featuring the new releases and prizes. 


I hope you'll join us on August 1st and 2nd.  :)

Thank you for stopping by and have a great day!


Regina