Pages

Showing posts with label Christmas Card. Show all posts

Saturday, July 28, 2018

Merry Christmas Non-Traditional Foil Colors - TupeloDesignsLLC DT Project

Hi Everybody,

This is my last post as guest designer for TupeloDesignsLLC.  Since they're having a Christmas in July sale, I thought I'd make another Christmas card.  Wow, I'll have two already!  I've never made them in July, it's fun actually to do something different than flowers, etc.

I made a very easy card this week using Thermoweb Deco Foil and Foil Mates. I like using non-traditional colors on Christmas cards occasionally so I thought it would be fun to us them with the foils. I used aqua and hot pink. 


I used a Lawn Fawn Mini Wreath Die Set.  You can cut this wreath apart and make it larger as well but I did not here. I used Thermoweb Deco Foil in Aqua and the Gina K Designs Fancy Foil in Passionate Pink.  I think these two colors look fabulous together! I used Thermoweb Toner Paper to cut out the dies first and then ran these through my Mini Minc Machine with Foil over them. I made a few extra berries. The sentiment is from Lawn Fawn called Merry Christmas Border Die. I used the Aqua Deco Foil for this to tie in with wreath. I used a Zig Two Way Glue Pen to glue everything down. 

The background is Gina K Designs Foil Mates in Polka Party.  I used Deco Foil in Silver for this.  I tied some silver metallic twine around the left side of card, adding a bow and then used fun foam to pop it up on a white card base. 

Super easy and fun to make!!  

Did I inspire you to make a Christmas card in July using Thermoweb Deco Foil?  I think these Foil Mates are so great because they already have the toner on them, you just choose your color foil and run it through your machine and you're done. 

TupeloDesignsLLC offers FREE shipping with NO minimum purchase. 

Thanks so much for stopping by and have a great day!


Regina

Saturday, July 21, 2018

Let It Snow Shaker Card - TupeloDesignsLLC DT Project

Hi Everybody,

It's Saturday which means I'm guest designing for TupeloDesignsLLC today. I told you I wouldn't make any more shaker cards but I kind of fibbed, that's what I'm showing today.  I said I wouldn't show anymore 'shaped shaker cards' lol.  

I wanted to make a few Christmas cards in July to at least get ahead of the game by a few.  I seem to always be scrambling at the end of November, first of December making them. Some people make them throughout the year but I've never been able to do that and plus, I put away my Christmas stamps, paper, dies (until end of November).  Hmm, maybe if I kept Christmas craft supplies out all year, I wouldn't start making cards after Thanksgiving. 


I have been playing with a new product called Tonic Mirror Card.  I love the weight and thickness of this cardstock!  It's a great alternative to foil and comes in a variety of colors.  If you don't have a laminator or Minc Machine, this is a product you might want to try because it looks similar to foil but it is cardstock.

I've been using the Mirror Card mostly for word dies but I'm trying something new today with it.  I used it on the entire card!  I think it looks awesome!  

I made a snowglobe shaker card.  First, I used the Chrome Silver Mirror Card for the background and embossed it with a snowflake embossing folder I had in my stash. This cardstock embosses so beautifully!  

I have a snowglobe outline die in my stash so I cut it out using the Ruby Red Mirror Card and I cut the base off. I used My Favorite Things Wide Circle Stitched Dies for the snow globe part, using thick white cardstock for the window and cut a circle also for the inside window out of clear acetate. I used Scotch 3D 1/2" foam tape under the circle to give it the height so there is room for the sequins. I also use Scor-Tape with shaker cards to make sure I have a super sticky double sided tape to hold the window in place. I wish I would've embossed the clear acetate window with a snowflake embossing folder. Have you tried that?  It really adds something to your window but is subtle. 

I filled the shaker card with sequins, seed beads, etc., you can use whatever you'd like in a shaker card but here I chose red and silver metallic sequins, clear seed beads, and a longer clear bead. (not sure what they're called)  Here is a link to various sequins

I decorated the snowglobe window with snowflakes from the Lawn Fawn Mini Snowflake Die Set. I really love these dies because of the assortment in different sizes. If I had more time, I actually would've filled this snow globe with these snowflakes, adhering two together using the Silver Mirror Card.  How pretty would that be!  The back of the mirror card is white so that's what I meant by adhering two together, so you wouldn't see the white on the back. 

Finally I used a strip of clear vellum at the bottom of the card adhering it with Stick It.  That's actually my secret to not seeing under vellum, use Stick It. Try not to mess up the glue with your fingers when sticking it down and you won't be able to see under it at all!  I've searched years for the solution to seeing under vellum.  Now you don't have to hide your glue dots, etc, under your die cuts or whatever you're using on the vellum.  I used the Lawn Fawn Let It Snow Border Die cut out in Imperial Blue Mirror Card on the vellum.  To finish it off, I added a few of the snowflakes I had cut out of the Lawn Fawn Mini Snowflake Die Set. I used a Nuvo Glue Pen to glue down the snowflakes. 

I am going to give this card to my husband's nephew who loves Ole Miss college football team, their colors are red, blue, and white. I make him some kind of Ole Miss color card every year and he loves them. I'll put Ole Miss on the base of the snow globe in silver letters. 

Did I inspire you to start your Christmas cards?  Think about how many you typically send out and make a few every month.  It was fun making this Christmas/winter card in July.  One reason I made this card a snowflake card is it is so freakin' hot here in Mississippi!!  It feels like 105 degrees outside right now.   Yuck!  Did it make me feel cooler to make a snowflake card, kind of, or maybe it was the fact that I turned the A/C down to 70 degrees.  :)

Remember TupeloDesignsLLC offers free shipping with no minimum purchase. 

Thanks so much for stopping by and have a great day!


Regina

Saturday, December 9, 2017

Easy Christmas Card and Bag Toppers Using Foil

Hi Everybody,

A couple of posts ago, I showed how to make simple bag toppers for candy.  I am hooked on these!  I took some to my dentist office a few days ago with a card and they loved getting these.  This time I used foil which makes them even more fun to make.  Who doesn't like shiny??

I made this card using the Gina K Designs Foil Mates Backgrounds in Ornamental Holiday and Gina K Designs Foil Mates Sentiments in Holiday Cheer. I used the Thermoweb Decofoil Transfer Sheets and the Gina K Designs Fancy Foils.  I also used these to make the bag toppers.  I made these a little wider so that the tag would fit.  They are appr. 4-1/2" wide x 4-3/4" tall and scored at 2-3/8".  If you would like to see the original post about bag toppers, HERE IS A LINK to that post.

I used Fancy Foils in Radiant Red for this Background (link above for the background)
I used Silver Deco Foil Transfer Sheets for the Sentiment (link above for the sentiment)
I cut out an oval stitched die a little larger than the sentiment and foiled it in the silver. 


I just added the silver and red metallic twine sticking out from behind the tag on the card.  The cardstock layer on the bottom is Gina K Designs Red Velvet.  I love this red color for Christmas and Valentines cards. 

For the bag toppers I used a mix such as Deco Foil Transfer Sheets in Magenta (Love this color!), Fancy Foil in Sparkling Silver, Deco Foil Transfer Sheets in Ocean Blue, the background in Large Snowflakes from Gina K Designs, and I don't know the name of the second one with the ornaments on it but I don't think she sells this one any longer.  


Next week, I'll take these to my doctor's office to give to my doctor and his nurse.  It's just a little way of saying I appreciate you.  Everyone in the family will get one along with their gifts. These are great to take to teachers, kids in class, neighbors, etc.  

I hope I inspired you to use foil this year on your cards and try these fun bag toppers. Who said Christmas needs to just be red and green.  Try something different such as the magneta, ocean blue, etc. It's so much fun!

Thanks for stopping by and have a great day!


Regina

Friday, December 1, 2017

Country Christmas Using Foil


Hi Everybody,

This month Graciellie Design is collaborating with Thermoweb.  We are having a blog hop to show you beautiful projects using Christmas and Winter themed stamps from Graciellie Design combined with products from Thermoweb such as Deco Foil, Gina K Designs Foil-Mates and Fancy Foils, Transfer Gel, and more to inspire you to make some beautiful Christmas cards.

I am using a digital stamp set called Winter Blessings
HERE IS A LINK to this stamp set 
HERE IS A LINK to Graciellie Design online shop
HERE IS A LINK to Thermoweb's Website


The first thing I did was position the pine limb and pine cones how I wanted them and printed on a laser printer.  This is one of the neat things about digital stamps... you can size them and place them wherever you want to and when you print out using a laser printer, you can foil the image because it printed with toner ink. In this case, I used multiple foil colors to make it look as realistic as I could. 
I am using a few products from Thermoweb on this card including the Gina K Designs Fancy Foil in Radiant Red.  This foil is SO pretty because it looks glittery. I used the Gina K Designs Fancy Foil in Radiant Red for the bow and Green Deco Foil for the pine cone with the Mini Minc Machine.  I am very fond of the watercolor foils and the Amber Watercolor Deco Foil is so perfect for the pine cones. I sponged around the focal image stamp with Distress Inks in Pumice Stone and Antique Linen to give it a 'rustic' appearance.  

I have a scalloped rectangle die that cuts out a 'frame' piece so I used that part along with the Gina K Designs Foil-Mates Backgrounds in Ornamental Holiday.  I love the look of diagonal lines on a card, which is one of the choices in this package.  I used the Gina K Designs Fancy Foil in the Radiant Red with this. 

Let me explain what the Foil Mates are in case you are not familiar with them because you do not want to miss out on using these on your cards this year. The Foil Mates Backgrounds and Sentiments are designs printed with toner so that all you have to do is cut them out however you want to, put your foil on top like you normally would and feed through your Minc or Laminator.  That's it!  I had a family emergency occur in October and we are still dealing with this so I am not on schedule at all making Christmas cards.  A friend of mine told me to start in July and I did not listen lol, so I will be using these Foil Mates and Deco Foil because it is so quick to use but looks like you spent hours getting it to look that way. 

The sentiment is from the Gina K Designs Foil-Mates Sentiments in Holiday Cheer. I also used the Gina K Designs Fancy Foil in the Radiant Red with this sentiment and I cut a background out for it using the Thermoweb Toner Paper and a stitched oval die and then foiled the toner paper oval that I cut out with the die.

The bottom layer card stock is Gina K Designs Christmas Pine and the red card stock behind the pine cones image is Gina K Designs Red Velvet.  I think those colors make the perfect "Country Christmas" card. 

I also used Thermoweb's Sticky Tape Runner and Medium Zots Singles. Both of these adhesives work wonderfully.  I do believe the Sticky Tape Runner is permanent so make sure you put what you're adhering exactly where you want it, but that's a good thing. It's nice to know my card will get to the recipient in one piece without corners lifting, etc. I like the size of the Medium Zots and that they're packaged as singles.  I would recommend any of Thermoweb's products.  I have been happy with every product that I have tried. 

Your next stop in the hop will be Terri Burson.  Make sure you finish the hop with Graciellie Design blog because she always has amazing techniques to share including videos.  The November winner will be announced on that post and a $20 gift card to Gracielle Design Shop as a prize for today's hop.  

Also be sure to check out the Words and Shadows SVG Word Bundle - Winter Edition, 50% off, no code needed.  These are Christmas and Winter themed words, detailed and shadow, over 126 total.  They can be sized to whatever size you need them to be. 

I hope I inspired you to check out the Foil Mates and Fancy Foils from Thermoweb.  They practically do all of the work for you.  You just sit back and watch the foil works its magic.

Thanks for stopping by and have a great day!

Regina


Saturday, November 18, 2017

Merry Christmas

Hi Everybody,

I made this Christmas card for today's post using Brutus Monroe products and I'm also up on the Brutus Monroe blog today. 

I don't make a lot of square cards but sometimes when I'm using a 6"x6" stencil and I want to keep most of the background, I'll make it square.  This card base is 5-1/2"x5-1/2".  


I started by using a sheet of this pretty gray cardstock from the Kaleidoscope Wings Inspiration Kit.  An alternative would be to use the Lunchbag cardstock that is the Kraft color.  I wanted to use the Snowflake Stencil and make it glittery and dimensional.  I decided to use some Cosmic Shimmer Glitter Embossing Paste in Frosted Dawn Sparkle.  It has the exact look that I was going for!  You just spread the paste over the taped down stencil with a palette knife, get the excess off to put back in the jar and then pull off the stencil carefully.  It needs to dry for a few hours so keep that in mind when using this, but it's worth it.

Next I grabbed a cup of Gevalia Mocha Latte (because it is expresso coffee) and sat down to color some of the stamps in the new Comfort and Joy Holiday Kit. I stamped the images with Memento Black Tuxedo Ink and colored with Copic Markers, just using 2 reds and 2 greens.  I use Xpress It Blending Card when coloring with Copics. I decided to fussy cut them out which was a little bit of a challenge with the holly leaves but I took my time and was able to do it.  I popped these up with Scrapbook Adhesives Black 3D Foam Squares.  

I embossed the Merry Christmas sentiment on Wagon Cardstock with Brutus Monroe Ultra Fine Alabaster Embossing Powder and cut out with a banner die. 

To finish it off I added some gold glitter Stickles to the center of the poinsettia and glossy accents on the berries. 

This was a fun card to make!  Grab the coloring media of choice and a stencil and make a beautiful Christmas card. 

Thanks for stopping by and have a great day!


Regina

Friday, October 27, 2017

Season's Greetings Shaker Card

Hi Everybody,

I am on the Sweet 'N Sassy Blog today using a stamp set from Sweet 'N Sassy Stamps called Season's Greetings.  Currently, this stamp set is 20% off. 


Have you used the Gina K Designs Fancy Foils? Oh Emm Gee!  They are so much fun!  I used the Foilmates Background Ornamental Holiday pack with the stripes.  I also used the Holiday Colors Foil in Radiant Red and DecoFoil in Green.

I decided on making a shaker card for this one.  I stamped with Versafine Onyx Black Ink and embossed with Brutus Monroe Ultra Fine Icicle Embossing Powder.  I used Bristol Smooth Paper and colored with Zig Markers and put some Clear Wink of Stella over the top, nothing fancy here. I always try to use a Cardinal anytime I can because I lived in the St. Louis area for 20 years, need I say more?? For the snow part, I used Nuvo Gloss White and put a thick coat on.  I then tied some red and white bakers twine around the mailbox, so cute!

I used My Favorite Things Wide Circle Stitch Dies and cut out in a heavy white cardstock. For the clear part I used Fellowes Binder Covers.  They are the perfect weight for shaker cards and not expensive, 100 for around $20.  Can't beat that!  I didn't want to cover the beautiful striped foil so I cut circles from regular circle dies for the front and back.  I embossed the front clear window with a snowflake embossing folder. I filled the shaker window with red, green and silver sequins from my stash and some silver bugle beads for something a little different.

I stamped the greeting with the Versafine Onyx Black to make it really stand out from all the red and green I have going on here.  I used a fishtail banner die and cut a frame outline using Thermoweb Toner Paper and then foiled in Green. I just love how that green foil looks with the red and white.  To finish it off I used some Nuvo Red Berry drops around the window frame and each side of sentiment.  

I had a lot of fun making this card!  Did I inspire you to make some Christmas cards?  Foil is so much fun!  It can really jazz up anything you are doing.  You can't go wrong with birds and bird houses on your holiday cards. 

Thanks so much for stopping to see what I'm up to.  Have a great day!


Regina

Thursday, October 19, 2017

Dashing Through The Snow

Hi Everybody,

I'm having a lot of fun making Christmas cards and check out this super cute stamp set from Sweet 'N Sassy Stamps called Holiday Hugs.  The images are adorable and I'm loving the font for the sentiments.  


You might not can tell but boy did I use a lot of products on this card!  LOL! 


This was a fun card to make.  I started by embossing some snowflakes with Brutus Monroe Ultra Fine Alabaster Embossing Powder and then using the Cornflower Brutus Monroe Colorburst over them.  The embossing resists the Colorburst which is fun.  I put a couple layers on to make it a little darker.  

Next I used Brutus Monroe Glue on the bottom part and then sprinkled Flower Soft in Polar White all over, tapped off any excess and put it aside to dry.  I used a Darice die called Evergreen Border for the middle part and used Nuvo Gloss White Drops to go around tree branches to give the appearance of snow and put aside to dry.  I used Nuvo White Blizzard Glitter Dots on the Snowflakes, dotting it on the circle parts.  I love these drops because they look like whatever the color is below so these have a blue color to them like the Colorburst sky. 

I used the MISTI stamping tool to stamp the pequin with Memento Tuxedo Black Ink and colored the penguin part with Copic Markers.  Then I stamped him three more times so that I could paper piece the snowboard and his hat.  I used the Lawn Fawn Perfectly Plaid Rainbow Pad for the purple in the hat and the Christmas Pad for the red in the snowboard. I never paper piece but those paper pads just looked like so much fun.  I used the Nuvo Gloss White to add dimension and shine to the balls on his hat.  I propped him up with foam squares to give him dimension and make him look like he's riding down the hill.  

I used Thermoweb Toner Paper to cut out the Tim Holtz Paper Snowflakes Die and then foiled with Silver Decofoil.  Their foil is so pretty!  

For the sentiment, I stamped on #48 Vellum with Versafine Onyx Black Ink and then Embossed with Brutus Monroe Ultra Fine Icicle Embossing Powder to give it lots of shine.   

Here's a tip for you..... are you listening.... I use Stick It under Vellum and you can't see it.  I used it here.  You can't see it if the sticky part isn't messed up that is.  For instance if you stick your finger in it and some of it rubs away, that's what I mean by 'messed up', then you may be able to see where that is.  Try it and let me know what you think!  In hindsight, I should've rounded the corners of the vellum.  

Finally I used Gina K Designs Red Hot Cardstock for the bottom layer.  I forgot to mention the paper I used for the top and that is Arches 140# Coldpress Watercolor Paper.  This is very thick and can take a lot of water.  I wasn't sure how much spritzing I would be doing on the Colorburst so I chose this paper so it could handle it, and it did. I taped it down with Scor-Tape.

Sweet 'N Sassy Stamps is having sales right now  --- 

20% Off Select Stamp Sets

50% off  Select Stamp and Die Sets

Free Dies with Select Stamp Sets

Thanks so much for stopping by and have a great day! 

Regina

Monday, September 18, 2017

Oxide Ink Background for Christmas Card

Hi Everybody,

I have been somewhat MIA the last few days due to a knee issue but I'm back now.  I love this card that I'm showing you today.  I made an Oxide Ink background using Worn Lipstick, Candied Apple and Abandoned Coral.  These colors look really great together!  I did the smooshing technique where you put some ink down on your craft mat, spritz with water and 'smoosh' your watercolor cardstock into the ink.  I usually do it in two colors and use the heat gun for a few seconds. You may or may not need to dab with a paper towel. Then I'll dab it in another color or two and use heat gun again for a few seconds.  It's totally up to you because it will turn out different each time you do it so you just have to judge it for yourself to see when it looks right to you.  I love it when there is a little bit of white left. I took the spray bottle top off and flicked some water drops from the tube part of the sprayer.  You can use a paint brush as well.  You can also flick little spots of paint if you'd like. I used Bristol Smooth cardstock for this card. 


I used the stamp set from Sweet 'N Sassy Stamps called Christmas Botanicals. This is a lovely stamp set and I think you can do so much with it since there are two different kinds of flowers and also separate pieces such as holly leaf, berries, etc.  I love the font for Merry Christmas too.  I stamped everything with Versamark Ink and embossed with Stampendous Detail Fine Gold Embossing Powder.  Even though the flowers and leaves were somewhat colored in when I stamped them on the Oxide Ink background, I colored in the poinsettias and leaves with Zig Markers.  I used a Gold Wink of Stella pen for the center and then went over the centers of the flowers and the berries with Glossy Accents for some added shine and dimension.  

That's it!  When you make an Oxide Ink background, half of your work is done for you!  Did I inspire you to make an Oxide Ink background and use your Christmas stamps on it?  I think this gives the stamps a totally different look than the traditional way that I usually do them. 

Thanks for stopping by and have a great day!


Regina


Thursday, September 14, 2017

Christmas Wreath

Hi Everybody,

This week I am on Sweet 'N Sassy's Blog using stamp sets called Christmas Wreath and Christmas Wishes.  This is the first Christmas card I've made this year!  I promised myself I would start in July and make a few each month and that did not happen.


The card stock I am using is from Gina K Designs called Cherry Red, Black Onyx, and Layering White.  I am really liking the brighter green and red together this year so I stamped the wreath with Colorbox Ink in Jalopeno.  I stamped the berries with Gina K Designs Cherry Red and it covered beautifully.

I got married this past April so I thought it would be nice to make cards using stamps such as 'from us' or 'from the family' so I used a stamp set called Christmas Wishes.  I really like the fonts in this set. I stamped with Versafine Onyx Black and embossed with Zing Clear Detail Fine Embossing Powder to give some dimension and shine.  I love how crisp and black Versafine ink looks.

I cut the letter 'B' out with the Silhouette machine.  I have been wanting to get a wooden letter B to go on the front door ever since I got married in April. Monograms are very popular where I live in Mississippi so I liked the idea of using the Letter 'B' on the card making it more personal since the card is 'from our family' and we're newly married this year.   The bow was also cut out with the Silhouette, folded and glued together.  I brushed Wink of Stella in Clear over the bow and put some Glossy Accents in the center.

To finish it off I used some red and silver metallic twine from my stash. Glossy Accents were used on the berries and the letter 'B' to give lots of shine and dimension.  

HERE IS A LINK to the Sweet 'N Sassy online store for more Christmas stamps, dies, etc.

I hope I inspired you to make some Christmas cards, especially ones that are personal and unique for your family.  

Thanks so much for stopping by and have a great day!


Regina

Monday, August 7, 2017

Christmas Tree Shaker Card in Shadow Box

Hi Everybody,

I haven't posted in a week because my Aunt Paula passed away last Monday.  She had fought cancer for 11 years and it's been so sad to see the toll it had taken on her, but the worst part was the dementia, well, for the family anyway.

My post today is kind of a memorial for her, something I can keep in my craft room that will bring a smile to my face when I look at it.

Christmas was her favorite holiday and growing up, I loved a decoration she had.  It was a red, wooden ladder leaning up against her tree with elves on the ladder.  They looked like they were climbing up the ladder and getting into the tree.  When I was old enough to have my own tree, she gave me a set of these and I loved them so much. A few years ago I got a divorce and moved and discovered that I did not have these and I was beyond upset.

There's a happy ending because the husband I have now surprised me with a new set.  :)

I made a shadow box out of card stock from a file I had in my Silhouette, embossed some little hearts and stars in clear embossing powder and colored in the open ones with clear and red Sakura glitter pens.  I added some white dots using Nuvo Glossy White Crystal Drops.


For the tree, I used a shaker card from The Cutting Cafe.  There is actually a set of eight Christmas shaker cards you can purchase or you can buy them individually.  Here is a LINK to the shaker cards, where you'll find the Christmas tree one that I used. I thought it looked cute to use striped red and white patterned paper.  I cut out all the pieces in the set and put them together like you would any shaker card.  Instructions are on the website as well. Included is an optional shaped card that you can use behind your shaker card and that is what I used.  The tree opens up and you can put a sentiment inside.  I chose a sentiment from a Gina K Designs stamp set (I apologize that I do not know the name).  I embossed it in white and added clear sequins.  I cut the ladder out from a design I had in my Silhouette files and stacked about five of them to give it some thickness.  I decided to use Crazy Birds for the elves.  I stamped and cut a couple out of Bristol Smooth Paper and colored with Zig Markers.  The santa hat is one of the Crazy Bird Accessories and I found the elf hat and shoes online.

The silver tinsel is Tim Holtz Tinsel Twine.  I've had this for years and never used it.  I like it but you need to use a good glue and hold it for a minute so it can start to adhere and then let it dry for awhile.

I hope you like my Christmas Tree Shaker Card shadow box and that I inspired you to think about something or someone you would like to remember by looking at a shadowbox filled with your handmade love.


Thanks for stopping by and have a great day!


Regina

P.S.  I think my Aunt Paula would like this <3

Wednesday, December 9, 2015

I Brake For Pine Spray Frames

Hi everybody!

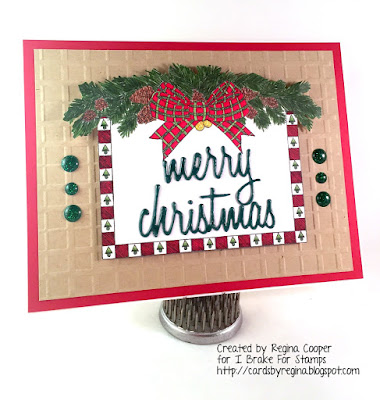
This week I needed to make a few masculine cards so I thought this stamp from I Brake For Stamps called Pine Spray Frame would be perfect.  I like that you can put any sentiment you want in the frame or even a photo.  Wouldn't a photo be super cute?

Use COUPON CODE SAVE10REGINA and receive 10% off your order.


I colored the stamp with Copics and it really came to life and then I  fussy cut it out.  I used Glossy Accents on the die to give it some shine and dimension and Stickles on the bells, added a few glittered enamel dots and made a great card for women or men.  

Did I inspire you to make some masculine Christmas cards?  Try this frame with a sentiment, die or photo.  

Thanks for stopping by and have a great day!

Regina - Design Team Member