Pages

Showing posts with label The Cutting Cafe. Show all posts

Friday, October 20, 2017

Fishbowl Shaker Card

Hi Everybody,

I have been wanting to make this Fishbowl Shaker Card from The Cutting Cafe for 3 months.  I saw it when I first became a Design Team Member and I asked for it and bought some of the embellishments from the shop so I am excited to show you my creation.

When you get your file, it will have a picture showing the different pieces that you'll cut out for the card and it was very self explanatory.  I decided not to make mine a shaker card, I opted to use sand and glitter from the shop and I'll have links for those.


I used Gina K Designs Turquoise Sea Cardstock for the folding part of the card and the back of the fishbowl which I embellished with a Cuttlebug folder. The top and frame parts are Gina K Designs Denim Blue Cardstock, one of my favorite blues in cardstock.  I used Clear Cardstock from The Cutting Cafe Shop for the window part of the card.

I used Brutus Monroe Glue (you really need to try this) for the sand and glitter.  I laid down a slightly thick coat and sprinkled sand on top and then laid down a layer on top of the sand and sprinkled the glitter.  That glue dries so fast, do you see that they hardly even mixed together??  I used Beach Sand Confetti and Swimming Pool Glitter by Doodlebug from The Cutting Cafe Shop and the Fish Stickers are called Mini Doodle Pops Cardboard Stickers by Doodlebug. I used Lawn Fawn Watercolor Wishes paper pad to cut out the pieces inside the fishbowl, starfish, seaweed, etc. and added some detail with a black Prismacolor Pencil and white gel pen.

There are a few sentiments to choose from with this set as printables so I printed one of them but took off the 'from all of us' part, printed it and cut it out with a Gina Marie Stitched Banner Die and sponged lightly around it with Gina K Designs Turquoise Sea Ink to match the cardstock.

I finished it off by adding some dots with a Sigmo Uni-Ball White Gel Pen.  There is also an envelope file with this so I cut it out as well and used 1/4" Scor Tape to tape the sides.  This is optional of course.  I wish I would've added something to look like bubbles in the fishbowl in hindsight.

Seems like fish, fish scenes, fish bowls, the sea, etc, are popular right now so try this shaker card as a cute card for someone or even as something special to put on a shelf in your craft room.  You don't have to feed these fish. :)

Thanks for stopping by and have a great day!


Regina

Friday, October 6, 2017

Candy Corn Treat Cup Card

Hi Everybody,

Do you like to make cute packaging for candy?  Do you give little treats at work or kid's school for Halloween, Valentine's, Christmas?  Well, the owner of The Cutting Cafe, Regina Easter, gave me some personalized ribbon and cellophane bags to use with my projects and I thought you might like the idea of the custom products to use with your goodies. 

I am using a file called Halloween and Fall Treat Cup Cards and I chose the Candy Corn Box of course.  I thought this box would be such a great idea to put candy corn in for my Mother in Law, who loves Halloween.  The personalized ribbon around the box is just a bonus that she will absolutely love to make it more special.


This is inside where there is a slider tab piece


I taped the window piece on the back down good with scor tape so the candy wouldn't fall out. 


I apologize for these next few pics being lighter than usual, I wanted you to be able to see the ribbon and cellophane bags, they were too dark at first.


There is an instructional video on how to put this box together. I watched it and it helped me a lot.  I just used 12x12 sheets of various Halloween papers that I got from a big box store years ago.  I used my Tombow Mono Adhesive Tape Runner on parts of the project and my Brutus Monroe Glue on others.  For the clear window part, I used Fellowes Binder Covers. 

I cut all the pieces out with my Silhouette, adhered pieces together per the video and then tied the custom ribbon around the box in a way that my name would show the best. I used the twist ties from bread to twist around the cellophane bags and then put a thin black satin ribbon around it and tied in a bow.  How cute would these be with your kid's names on them to hand out at school??  Just sayin'.... :)   The printed cellophane bags would be awesome as well for wedding goodies and also baby showers.  The possibilities go on and on.

HERE IS A LINK to The Cutting Cafe online shop.   You will see another link a few lines down where you click if you want custom clear polymer stamps, custom printed ribbon, etc.    I am actually going to contact Regina Easter about my updating the stamp I use on the back of my cards so if you need something like that, she can certainly help you.

Did I inspire you to make treat boxes for Halloween?  Who wouldn't want to be the recipient of one right?  It's a grown up way to get candy.  :)

Thanks for stopping by and have a great day!

Regina

Thursday, September 21, 2017

The Right Shoes

Hi Everybody,

The project I'm showing today is a card shaped like a high heel shoe.  This isn't just any high heel shoe though.  This shoe represents strength, hope, and life. 

October is breast cancer awareness month and I thought that I would make a pink high heel shoe in honor of this.

This file is from The Cutting Cafe and HERE IS A LINK to the online shop.  HERE IS A LINK to this high heel shoe file.


It was actually really easy to make this card.  I cut out the folding card part first with pink cardstock from Close To My Heart.  Then I cut out the piece called Top With Bottom Edge out of the patterned paper.  The pink glitter paper is the piece called Top.

The sentiment is included in this set and is a printable stamp.  I printed it with my laser printer and foiled it in pink foil using Thermoweb Pink Melon Deco Foil. 

I added a breast cancer ribbon cut out of the pink glitter paper.  I used Gina K Designs cardstock in Black Onyx and Innocent Pink.  To finish it off, I used the Tonic Ticket Punch in the corners and embellished with sequins from The Ton and Craft Medley. 

I think this is a really cute and different card that can be decorated anyway you want.  You can put the sentiment on the inside or print like a place card style like I did. You can write a few words of encouragement inside whether you put the sentiment inside or not.

I hope this card will sit on a shelf or somewhere visible where the recipient will see it and not only think about what a strong person she is but also about the loving friend she has who gave her the card.  You can of course put her favorite chocolate, etc., with the card.  I'm quite sure she would not mind that at all.  :)

I hope I inspired you to make a project for someone for October breast cancer awareness.

Thanks so much for stopping by and have a great day!


Regina


Sunday, September 10, 2017

Winner of the 3D Pumpkin Trio

Hi Everybody,

I want to thank you for hopping with The Cutting Cafe's blog hop that started this past Thursday.  I thought the 3D Pumpkin Trio was so cute as a fall decoration, Halloween, etc., so that's why I chose it and wanted someone to win it.  

The winner of this pumpkin file is Missy Dennis.  Congratulations!!!

Please send an email to me at cardsbyregina@gmail.com, with your email address and this file will be sent to you and I would LOVE to see what you make.  The instructions are included with the file but if have any questions, please feel free to ask, either on email or Facebook.  

If you have not ever been to The Cutting Cafe's online shop, I invite you to check out not only the many SVG files but there is also a separate area where you will find clear stamps and accessories for your stamps and files, such as patterned paper, inks, products to use with shaker cards to name just a few. 

The owner, Regina Easter, also makes custom stamps and printed custom ribbon and cellophane bags.  Watch in the near future for me to use some custom ribbon and cellphone bags in a Halloween project. 

If anyone is interested in the 3D Pumpkin Trio I made in the bloghop, HERE IS A LINK.


Thanks for stopping by and have a great day!


Regina

Thursday, September 7, 2017

3D Fall Trio of Pumpkins

Hi Everybody,

Welcome to The Cutting Cafe's blog hop!  Each designer will be giving away the file(s) used on their projects today as a prize.  All you have to do is leave a comment on my blog and let me know what you think about this project and if you win, where will you put it?  Leave a comment on the other designers blogs for a chance to win the file to make their project as well.  HERE IS A LINK to The Cutting Cafe online shop.  You'll find SVG files, clear stamps, 6x6 paper pads, inks, sand, and other products to help you with embellishing your creation.


It's starting to feel like Fall here.  I do not have my Fall decorations out yet so the file I chose for today's post is something that can be easily made to use as Fall decor.  HERE IS A LINK to the 3D Pumpkin Trio


This shows how you can fold them up and store them.


Here are a few different photos in different parts of my house.


This file is easy to work with.  I cut 6 of the pumpkins out for each size, small, medium, and large but you can make them fuller if you would like to by cutting a few more. The most difficult part for me was choosing what papers I wanted to use but it was also fun to look through my patterned papers.  I used some patterned and some solid and many of them were scraps I had.  Instructions are included with this file.  Then I cut 6 half sides out of the patterned papers to glue around the inside of the pumpkin. 


You are just going to be gluing the pumpkins together and then gluing the patterned papers where you want them.  Then you will cut out the stems, leaves, and curly thing (not sure what that is called) :)  I cut a small slit in the bottom of the stems and slid them over the top and used a drop of glue to glue down.  Then you glue the curly thing to the leaf and the leaf to the stem.  If you get this file and have any questions, please feel free to contact me here or on Facebook and I'll be glad to help you.  I used Brutus Monroe glue and I am extremely happy with it. It dries super quick!


You can also decorate these pumpkins with Halloween papers.  I think tying some black tulle around the top would look awesome.  You can put accessories on it such as spiders, etc.  I considered doing this but I need to get Fall projects out of my system first before Halloween.  


There are also some printable sentiments included with this file. 


If you are here then you came from Tina Goodwin's blog and I am your last stop.  If you would like to start from the beginning, here's a link to Regina Easter's blog, owner of The Cutting Cafe.  She has a special prize package for you to win and I'll give you a hint... if you like the color Teal, then you should visit her blog. 

Please comment if you liked my project and would like to win the file.  I'll choose a winner on Saturday, September 9th and post who the winner is on Sunday, the 10th.  Thanks for stopping by and have a great day!

Sunday, August 20, 2017

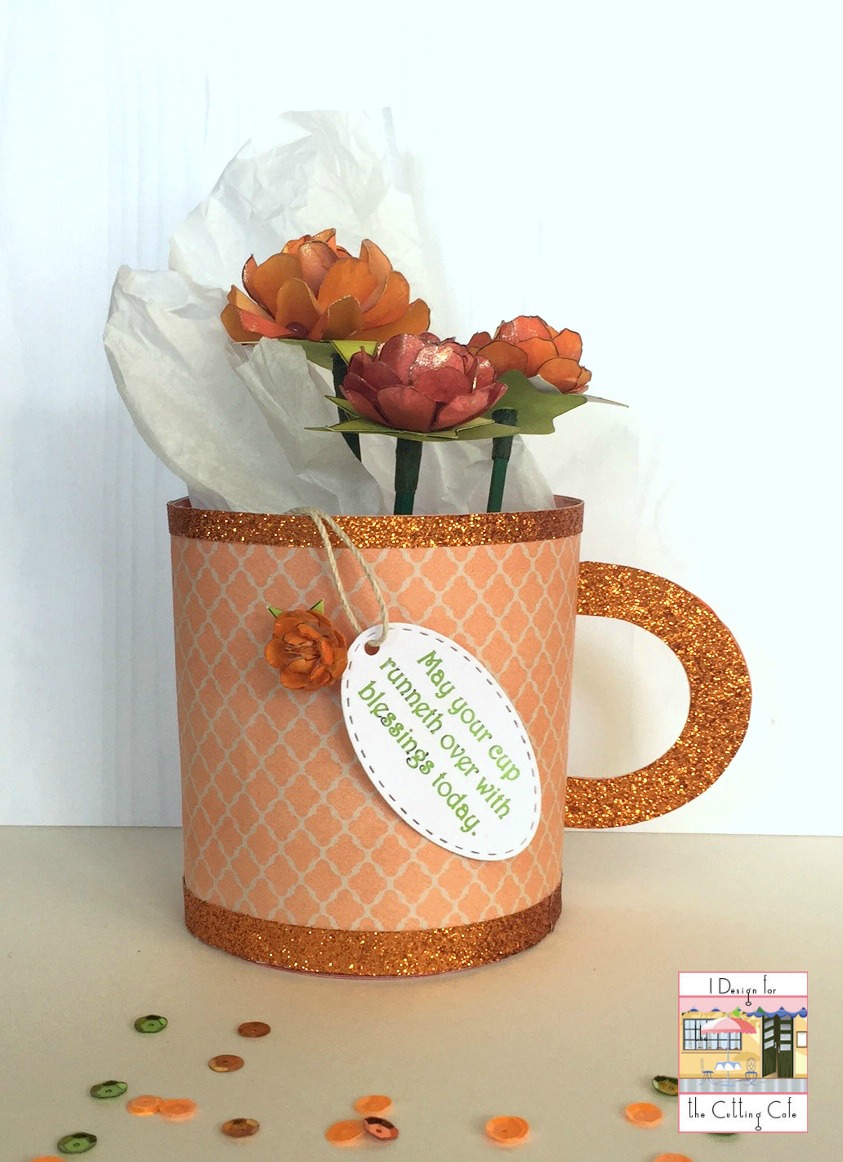
3D Cup with Paper Flowers

Hi Everybody,

Today I'm showing a 3D Cup that I made from The Cutting Cafe.  The file comes with all pieces for the cup and 26 sentiments I believe.  I also made my own flowers using the paper flowers template.

My Mother In Law will send home a little styrofoam cup with a paper towel in it containing 2 or 3 flowers that she picked from her garden when my husband stops by there. This is what inspired the project I made and I am giving it to her.  I made it in orange and the sentiment in green because she likes these two colors.

Click HERE for The Cutting Cafe online store.  You will find SVG files, clear stamps, embellishments.  You can order custom stamps here as well.  

Click HERE for a link to the 3D CUP that I used here.

Click HERE for a link to the Paper Flower file I used. (Scroll down until you see Paper Flower Template and Video and you'll see a carnation flower)


I used 12x12 paper from Close To My Heart for the cup and glitter cardstock from Heidi Swapp called Marquee Love.  I used Scor-Tape and Tombo Glue for the adhesive. For the flowers, I used my Ad-Tec hot glue gun.  I haven't used a glue gun in quite a while.  Oh the glue strings!!!  :) 

I cut out the flowers in all three sizes with my Scan N Cut.  Look how perfect this cuts!  No more fussy cutting for me!  (sorry for the shadow, I was in front of a window)


I actually foiled the flowers with rose gold but after I inked up the flowers you couldn't tell.  I used Tim Holtz Distress Inks and a jumbo sponge dauber to sponge ink in Spiced Marmalade, Fired Brick, and Scattered Straw just trying to make them all have different shades of orange petals.  Click HERE for a link to the page where you can find this paper flower file.  There is an excellent video on this page explaining how to make these flowers in three sizes.  Mine turned out pretty good I think.  They look like roses and carnations.  I went around the edge of the flowers after they were finished with Clear Wink of Stella.  For the stem, I used a floral pick.  I cut off the wire and wrapped floral tape around the very top and I hot glued the flower to it.  

The sentiment is from the print file included in the 3D Cup file.  First I foiled it with Spring Green Deco Foil by Thermoweb using a Mini Minc machine.  I used a Gina Marie Designs stitched oval die to cut it out.  I used natural twine for the tag to hang on the cup and a glue dot on the back of the tag to make it stay in place.  

Seems like I've gotten pretty sentimental lately, creating projects that family inspired.  I'm just trying to mimic the cup she gives me.  She'll love t his one because it's orange and has bling!  Gotta love some sparkle!

I hope I inspired you to check out these SVG and print files.  There are videos on how to make the cup and the flowers so don't be afraid to try it.  The cup can be decorated so many ways.  It can be decorated for a teacher gift, Halloween paper and treats, hot chocolate in the winter, Christmas and Valentine treats, etc. 

Thank you so much for stopping by and have a great day!

Regina


Monday, August 7, 2017

Christmas Tree Shaker Card in Shadow Box

Hi Everybody,

I haven't posted in a week because my Aunt Paula passed away last Monday.  She had fought cancer for 11 years and it's been so sad to see the toll it had taken on her, but the worst part was the dementia, well, for the family anyway.

My post today is kind of a memorial for her, something I can keep in my craft room that will bring a smile to my face when I look at it.

Christmas was her favorite holiday and growing up, I loved a decoration she had.  It was a red, wooden ladder leaning up against her tree with elves on the ladder.  They looked like they were climbing up the ladder and getting into the tree.  When I was old enough to have my own tree, she gave me a set of these and I loved them so much. A few years ago I got a divorce and moved and discovered that I did not have these and I was beyond upset.

There's a happy ending because the husband I have now surprised me with a new set.  :)

I made a shadow box out of card stock from a file I had in my Silhouette, embossed some little hearts and stars in clear embossing powder and colored in the open ones with clear and red Sakura glitter pens.  I added some white dots using Nuvo Glossy White Crystal Drops.


For the tree, I used a shaker card from The Cutting Cafe.  There is actually a set of eight Christmas shaker cards you can purchase or you can buy them individually.  Here is a LINK to the shaker cards, where you'll find the Christmas tree one that I used. I thought it looked cute to use striped red and white patterned paper.  I cut out all the pieces in the set and put them together like you would any shaker card.  Instructions are on the website as well. Included is an optional shaped card that you can use behind your shaker card and that is what I used.  The tree opens up and you can put a sentiment inside.  I chose a sentiment from a Gina K Designs stamp set (I apologize that I do not know the name).  I embossed it in white and added clear sequins.  I cut the ladder out from a design I had in my Silhouette files and stacked about five of them to give it some thickness.  I decided to use Crazy Birds for the elves.  I stamped and cut a couple out of Bristol Smooth Paper and colored with Zig Markers.  The santa hat is one of the Crazy Bird Accessories and I found the elf hat and shoes online.

The silver tinsel is Tim Holtz Tinsel Twine.  I've had this for years and never used it.  I like it but you need to use a good glue and hold it for a minute so it can start to adhere and then let it dry for awhile.

I hope you like my Christmas Tree Shaker Card shadow box and that I inspired you to think about something or someone you would like to remember by looking at a shadowbox filled with your handmade love.


Thanks for stopping by and have a great day!


Regina

P.S.  I think my Aunt Paula would like this <3