Pages

Showing posts with label Brutus Monroe. Show all posts

Monday, July 23, 2018

Shello - Guest Design Brutus Monroe

Hi Everybody,

I'm guest designing during the month of July for Brutus Monroe.  I had a blast making the card I'm showing you today called a Shadow Box Card. Jennifer McGuire made a video showing how to make this card and HERE IS A LINK to that video. I followed her video exactly in regards to how to put the cards together so please refer to video for instructions. 

It was a lot of fun decorating this card because you get to decorate the front and then the inside shadow box part. 


Sparkly background and fish :)


I made a background using three colors of Nuvo Shimmer Powders and used the Wave Die Set to cut it out. There are two dies in this set, I love it! I think this is just a gorgeous combination of this die and the shimmery colors used.  I stamped several fish from the Mermaid Lagoon stamp set and colored them with Zig Markers. I decided to use teal color cardstock on the front so I just cut a strip and embossed a stamp from the Mermaid Lagoon stamp set with Alabaster Embossing Powder.  I used the Embossing Ink as well because it is super juicy. I can see what I stamp really well because it's so juicy and shiny and if that makes sense. I'm a huge fan of Brutus Monroe Embossing Ink and Powders. I added a few of the 2-tone flat back pearls as embellishments to look like bubbles. 


On the inside I used the Mermaid Lagoon Underwater Background Stamp and colored it with Zig Markers.  I really like this background stamp because of the size, it is 4"x6" so as you can see, it was perfect for this card.  It is only 4" wide rather than 6" like most are so you can use it much easier on your cards. I also used the 2-tone flat back pearls as bubbles. I used a teal cardstock strip again on the inside to tie everything together and also the fish, shells and starfish from the Mermaid Lagoon Stamp Set. I just love this sentiment, "On a scale of 1 to 10 YOU are an 11."  

So just watch the video, link above, and decorate it however you want.  I used a pretty large die on mine to make the window because I wanted to use the background stamp and wanted to show as much as possible. You can use a smaller die and have room to stamp below the window and add embellishments

I hope you'll try to make a shadow box card and decorating it with mermaids and underwater scenes are so much fun.  Check out all of the stamp sets, stencil, die and embellishments for underwater/mermaid scenes HERE with this link.

Thank you so much for stopping by and have a great day!


Regina

Monday, July 16, 2018

Splashing To Say Hello - Brutus Monroe Guest Design

Hi Everybody,

I am very excited to be guest designing for Brutus Monroe this month.  I was on the design team the last quarter of last year and loved the excitement and passion that I saw from Christopher Alan, the owner of the company.  It was exciting for me to see the company growing while on the design team.  I fell in love with the products, especially the embossing powders and ink.... which leads me to how the card I am showing today came to fruition if you will. 

I am a messy crafter and currently I am not working in my craft room, which is upstairs due to a recent knee replacement and another in the near future (lucky me lol), so I have a table and on this table, my actual work area is probably 10" after I push everything aside.  

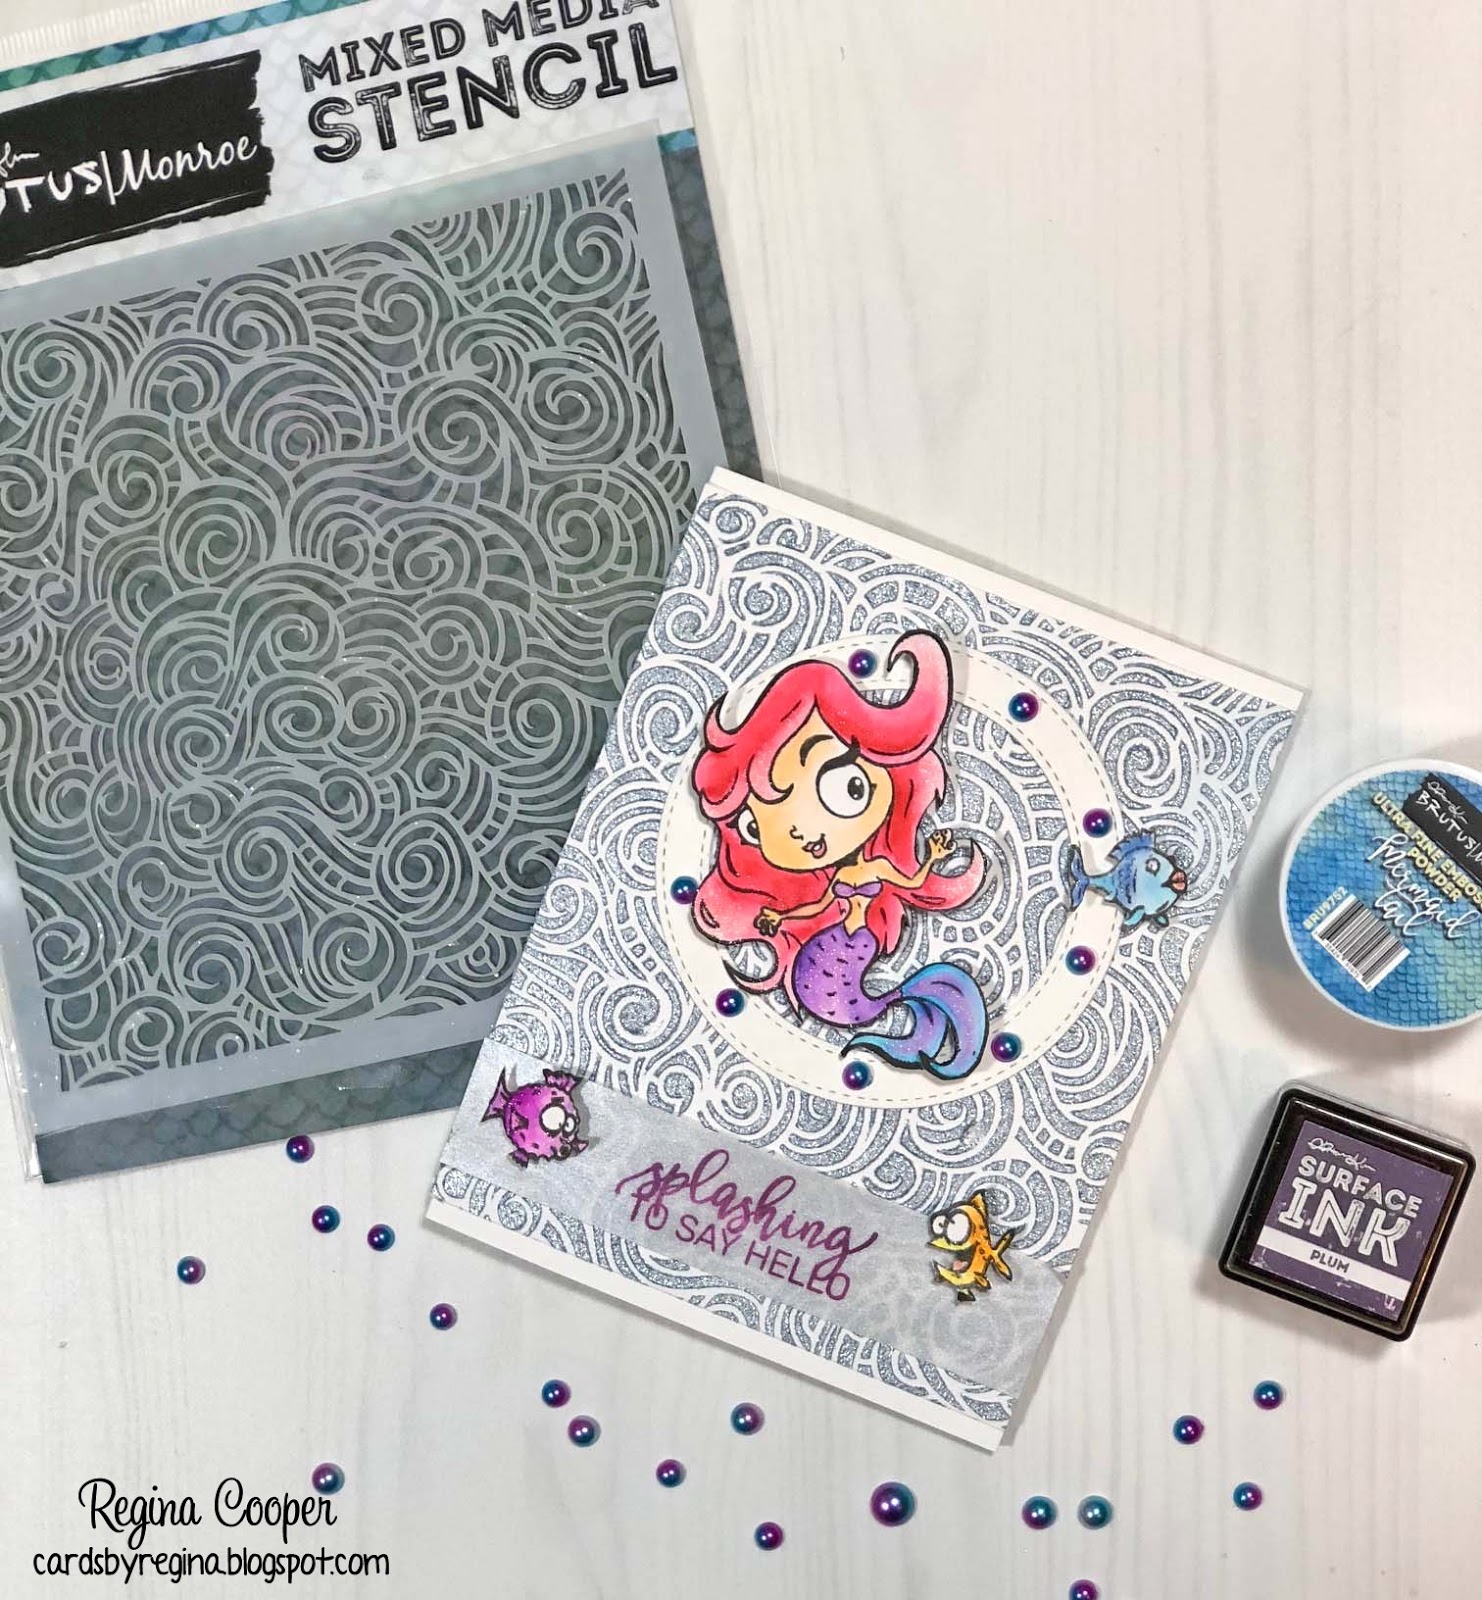
I was working on a project using Pearlescent Embossing Paste, I had some out of the jar on my kraft mat.  Well, it seems that I can't start one project and actually finish it, clean up, and move on to the next one, so I started playing around with some of the new products I got from Brutus Monroe.  I embossed on the cool new Tangled Waves Stencil and used the new Mermaid Tail Embossing Powder.  The result was beautiful!  It looked kind of like a metallic blue.  


Well, some of the embossing powder got in the embossing paste and at first I freaked out thinking I wasted those two products but I thought, what do I have to lose, and started mixing them together.  I was surprised to find out that the color was really light, not the darker blue like the powder. I spread it over the Tangled Waves Stencil and I was mesmerized by how beautiful this color turned out to be.  It is a pearly looking light blue/gray color.  It's gorgeous and I think perfect to use as water and with the Mermaid Lagoon stamp set that I used.  I created a masterpiece!!!  :)


I was curious what it would look like on black cardstock and it's a beautiful result as well!  I'll use this for another project!


Okay, I had to foil the stencil while it was out lol.  How beautiful is this?? This is the Deco Foil in Lapis Watercolor.  


So now I have this beautiful pearly background... I wanted to make something cute with the Mermaid Lagoon Stamp Set but careful not to cover too much of the background. 


(I apologize if the stamps are blurry, I used all of them so they have some residual black ink on them)


I stamped all of the stamps in the set on bristol smooth paper and used Zig Real Brush Markers as my coloring medium. I decided to use the cute mermaid and some fish from the stamp set.  I added Clear Wink of Stella to the mermaid to add a subtle shine.

I didn't just want to adhere her directly to the background so I used a die that cut a circle but cut the inside out so that the background can be seen through it.  I popped her up on the die with some foam squares and added some of the beautiful Blue and Purple Flat Back Pearls around the die.  Aren't they gorgeous??  I do have to make mention that you need a strong glue for your cardstock to stay adhered to this paste on the background so I used Brutus Monroe Glue.  This is such a strong glue that I highly recommend you try it.  I have even used it to glue a cracked ceramic tile coaster back together and it worked like a charm.  I trust this glue for anything, crafty or around the house. 

I positioned the mermaid kind of sideways like she's swimming and to look like she's waving because I'm using the sentiment from the set, "splashing to say hello".  I stamped the sentiment on a pearl color vellum using the Brutus Monroe Plum Surface Ink.  It inks up fabulously on vellum but use your heat tool to dry the ink or it will smear.  Do it carefully from the back so you don't warp the vellum. 

To finish it off, I popped up a few fish that I also colored with Zig Markers on the card.  

I think the Mermaid Tail Embossing Powder is such a fun color and now I've shown you a different way to use it. 

I had a lot of fun using the Tangled Waves Stencil, Mermaid Tail Embossing Powder and Mermaid Lagoon Stamp Set.  This is just one project that I've created... stay tuned for more to come in the month of July. 

I hope I've inspired you to play with your supplies. Get that palette knife out and mix the Mermaid Tail Embossing Powder with White or Translucent Embossing Pastes to see what they look like. Try it on different color cardstock as well. Have FUN!

Here is a link to the Brutus Monroe Blog for even more inspiration! https://www.brutusmonroe.com/blogs/news/guest-designer-regina-cooper

Thanks for stopping by and have a great day!


Regina

P.S. I also tried Nuvo Shimmer Powders with this stencil lol.  I love making backgrounds, what can I say?  :)


https://cardsbyregina.blogspot.com

Saturday, November 18, 2017

Merry Christmas

Hi Everybody,

I made this Christmas card for today's post using Brutus Monroe products and I'm also up on the Brutus Monroe blog today. 

I don't make a lot of square cards but sometimes when I'm using a 6"x6" stencil and I want to keep most of the background, I'll make it square.  This card base is 5-1/2"x5-1/2".  


I started by using a sheet of this pretty gray cardstock from the Kaleidoscope Wings Inspiration Kit.  An alternative would be to use the Lunchbag cardstock that is the Kraft color.  I wanted to use the Snowflake Stencil and make it glittery and dimensional.  I decided to use some Cosmic Shimmer Glitter Embossing Paste in Frosted Dawn Sparkle.  It has the exact look that I was going for!  You just spread the paste over the taped down stencil with a palette knife, get the excess off to put back in the jar and then pull off the stencil carefully.  It needs to dry for a few hours so keep that in mind when using this, but it's worth it.

Next I grabbed a cup of Gevalia Mocha Latte (because it is expresso coffee) and sat down to color some of the stamps in the new Comfort and Joy Holiday Kit. I stamped the images with Memento Black Tuxedo Ink and colored with Copic Markers, just using 2 reds and 2 greens.  I use Xpress It Blending Card when coloring with Copics. I decided to fussy cut them out which was a little bit of a challenge with the holly leaves but I took my time and was able to do it.  I popped these up with Scrapbook Adhesives Black 3D Foam Squares.  

I embossed the Merry Christmas sentiment on Wagon Cardstock with Brutus Monroe Ultra Fine Alabaster Embossing Powder and cut out with a banner die. 

To finish it off I added some gold glitter Stickles to the center of the poinsettia and glossy accents on the berries. 

This was a fun card to make!  Grab the coloring media of choice and a stencil and make a beautiful Christmas card. 

Thanks for stopping by and have a great day!


Regina

Saturday, November 11, 2017

Cozy Coffee

Hi Everybody,

Coffee stamps are very popular right now so I am using this cute stamp set from Brutus Monroe called Cozy Coffee. I love the sweaters the coffee cups have on, as well as the sentiments and the font used.  I made this card for my Mother in Law who is in the hospital right now and she LOVES coffee, which is really probably an understatement. :)


For the background I used the stencil called Jagged Heart.  I used a palette knife and spread Nuvo Mousse in Burnished Bronze over the openings in the stencil.  I love the shine and dimension from this mousse and it dries pretty quick as well, which is a huge plus for me because I do not like to wait to finish the card because of drying time.

I stamped the coffee cups with Memento Rich Cocoa and colored with Copic Markers.  I used Fall colors because that is what my MIL likes, especially green, her favorite color. 

I cut a strip of clear vellum to go across the middle of the card adhering it with Stick It and placing coffee cups on the vellum staggered popped up with pop dots.

HERE'S A TIP:  Stick It will not show under vellum as long as you don't mess the sticky part up, like with your finger.  

The sentiment was stamped with Memento Rich Cocoa and cut out with a stitched oval die.  I used Tim Holtz Distress Ink in Vintage Photo to go around the edges of the die and card stock the stencil was used on.  It bothers me to see light edges for some reason.

To finish it off I used some brown, glitter enamel dots and clear Wink of Stella glitter brush pen on parts of the cup.

For the inside, I used another scalloped edge die and kraft card stock.  I stamped the sentiment using Memento Rich Cocoa and the hearts with Memento Bamboo Leaves.  I stamped the hearts in green because that is my MIL's favorite color. 


Here's another version using patterned paper from Authentique. 


This stamp set is so much fun to color!  I hope you'll give it a 'shot' LOL, get it, shot?  :)

Thanks for stopping by and have a great day!

Regina


Saturday, November 4, 2017

Comfort and Joy Stamp Set with Colorburst

Hi Everybody,

Have you started playing around with your new Brutus Monroe Colorbursts?  I am just in awe watching those little specks turn into beautiful, colorful backgrounds like in the card I made for today's post.


I'm using the stamp set from the Comfort and Joy Holiday Card Kit.  I LOVE THESE STAMPS! They are all large sized and so much fun to stamp and also color.  I colored and fussy cut several of these with Copics because I couldn't decide what I wanted to do so I'll use the Copic colored one for another card. 

I love the contrast between the white embossing powder and the background.  I used every single image stamp in this set! 

I used the MISTI and stamped where I wanted the stamps to go, embossed using the Brutus Monroe Embossing Ink and with Brutus Monroe Alabaster Embossing Powder (white).  I know we all have Versamark Ink from back in the day but I challenge you to try this ink.  As a matter of fact, there is a cube size in the Comfort and Joy Holiday Card Kit so if you are interested in this stamp set, it is a chance to try several other products.  There is also a full size embossing powder in the kit. 

PLEASE NOTE:  This Comfort and Joy Holiday Card Kit is not the same thing as the monthly Inspiration Box. There will be a November Inspiration Box as well. 

I used the Brutus Monroe Colorbursts in Cornflower, Marsala and Rouge.  The paper I'm using here is Bristol Smooth.  I sprinkled the powder randomly on the paper and then spritzed with water until all the little beads of Colorburst were gone and then I used the heat gun on it.  I added a little more powder in the places that I felt needed more, spritzed and used the heat gun on it again.

Finally I added some Brutus Monroe Bottlecap Sequins in Crystal, Cotton Candy and Rose.  These sequins are so pretty.  They are flat and have grooves in them which give them even more shine.  This is my first time using them and I'm very pleased.  Now I want all the colors! I used Brutus Monroe Glue to adhere the sequins.

Did I inspire you to use Colorburst on your Christmas cards?  I do sometimes like to use non-traditional colors on my cards, just for a change. 

Thanks for stopping by and have a great day!


Regina


Saturday, October 28, 2017

Happy Thanksgiving Wine Tag Using Colorburst

Hi Everybody,

I'm on the Brutus Monroe Blog today.  I have not received our new release products for the month from the post office so took some time to play with some of the other products in the Brutus Monroe online store.  You can check out the new releases for October HERE.

I decided to make a wine tag for a large wine bottle.  It is Thanksgiving/Fall themed so you can use this on wine to take as a hostess gift or to Thanksgiving, Christmas for whoever is having dinner at their house or can use on champagne bottle for New Years, just change up the color of the Colorburst and stamp sets.  I think it makes a bottle of wine seem like you put more thought and care into it if you make a tag for it, and you know they will keep the tag forever! Wine will be gone that night!  :)


I used the Brutus Monroe Jumbo Media Tags which are 4" wide by 8" long.  There are smaller tags called Media Tags if you prefer a smaller size for a smaller bottle of wine which are about half the size and come in a variety of colors and a rainbow pack as well. The smaller size works great on cards as well.

I decided to use Colorburst for my tag background.  Brutus Monroe has their own exclusive line of colors that match their ink colors.  How cool is that??  Colorburst is basically a powder that reacts with water.  Sprinkle Colorburst on your paper and spritz with water, simple as that.  Heat set and then do it as many times as you want until you get the effect you want.  You can also wet your paper first and then sprinkle the Colorburst on as well.  Either way, you will get a great result.

I only used Jack O' Lantern (orange) and Zest (yellow) here and look at all of the speckles of color.  After I put about 3 layers on and let it dry, I stamped some of the stamps from Autumn Thanks with Embossing Ink and embossed with Penny Ultra Fine Embossing Powder. I went around the edges of the tag with a sponge dauber using Tim Holtz Vintage Photo Distress Ink.

I made something I have not made in years for this tag, a medallion.  I didn't want to stamp directly on the tag because of the Colorburst and embossing going on.  I wanted to somehow separate it. I just used some of a 12"x12" piece of paper from a big box store for the medallion. I stamped one of the leaves from the set with the Embossing Ink and also embossed with the Penny Ultra Fine Embossing Powder and fussy cut it out.

I used another stamp set called Happy Thanksgiving.  It is a 2"x3" set and I only used the sentiment from this one.  I embossed it also with the Penny Embossing Powder and cut the sentiment into strips.  I used the Brutus Monroe Glue to glue the sentiment strips because it held the strips on the medallion pleats. I used Gina K Designs Ivory Heavy Base Weight Cardstock for the leaf and sentiment.  I thought the ivory color would stand out well against the darker medallion color.

I am using beautiful, sheer ribbon with leaves on it that is so pretty and perfect for this I think.  It is easy to work with because it is wired. I got it at a big box store.

Did I inspire you to make a wine tag?  If not a wine tag, you can make a tag and put on a gift, with a gift bag, etc.  Endless possibilities! More ways to use Colorburst coming soon as well....

Be sure to 'Like' the Brutus Monroe Facebook Page and Fan Page to ensure you are in the know on new releases, etc.

Thanks for stopping by and have a great day!

Regina

BLOG | FACEBOOK | INSTAGRAM | YOUTUBE

Saturday, October 21, 2017

Botanical Banners - Thinking of You

Hi Everybody,

I'm on the Brutus Monroe Blog today with this beauty of a card and the great thing about this card is it was quick and easy. The watercolor look is all the rage these days but it doesn't have to take a lot of time.


I am using the Brutus Monroe Botanical Banners Stamp Set.  I love this set!  The floral image is perfect to stamp in the corners of your card as I did here.  The black strips with a white embossed sentiment are popular right now so you can stamp these banner stamps in black or emboss in black and voila' your black strip with white letters if on white cardstock and you didn't even have to cut them yourself. So for instance, you could use Raven Detail Ink which is a really dark black ink or you could use Brutus Monroe clear Embossing Ink (love!) and Ultra Fine Raven Embossing Powder if you want shine and some dimension. 

I decided to use the Brutus Monroe Ultra Fine Penny Embossing Powder on this card because it is such a rich, beautiful color and makes me think of Fall, which I love. I stamped the floral stamp in two corners using the clear Embossing Ink and embossed with the Penny Embossing Powder.  I chose a few Zig Real Brush Markers that I thought would look good together and not turn muddy.  If some of the colors do turn muddy, they can always be fixed. I chose darker colors for this one, jewel tones, because I thought they would look pretty with the Penny Embossing Powder.

I have a video on YouTube showing how I do this.  It was a live Facebook video I did several months ago so it's not picture perfect quality but I think you'll get the gist of what I'm showing here.  This was my very first video ever so go easy on me lol. (We have since chosen some paint colors in the yellow family to replace those green walls). 


I scribbled (literally scribbled) wherever I wanted on the paper with these markers, not worrying about getting out of any lines.  It doesn't really matter where you put the color because next you're going to spritz heavily with water. I used Strathmore Bristol Smooth Paper so that the ink can run freely and not get held up by the texture in watercolor paper.  You can control where it goes by moving it around and you can use a paintbrush to move it along the edges or if it's muddy, brush the muddy part away.  I purposely left the center lighter for the sentiment but you do not have to.  I stamped the Thinking of You Banner using the clear Embossing Ink and Penny Embossing Powder .  

You do not have to emboss your images to do this technique, you can also just stamp them but try to use the Bristol Smooth paper.  You can use your heat gun after you spritz it each time and you can add more color if you want and then use heat gun again.  You'll have to add darker colors if you want more color because the paper will be really saturated by this time and light colors won't show.

I used beautiful Copper Cardstock from Gina K Designs and also an Orchid color as well but this was a limited edition color a couple years ago or so.

I hope I inspired you to try this technique.  It's so much fun and you will be amazed at the results.  No two will turn out alike. 

There are a few additional posts using this technique.  If you'd like to see them, do a search for Zig Scribble. :)

Thanks for stopping by and have a great day!


Regina

BLOG | FACEBOOK | INSTAGRAM | YOUTUBE


Saturday, October 14, 2017

Monster #Selfie

Hi Everybody,

I think this stamp is SO cute!  This would make a cute Halloween card!  I used the #selfie stamp because I thought it was so appropriate given everything now is all about posting to Instagram, Twitter, etc.  There is also a Hello stamp in the set.  This set is from BRUTUS MONROEand HERE'S A LINK to the Monster Selfie Stamp Set.  HERE IS A LINK to the Brutus Monroe blog as well for lots more inspiration from the Design Team. 


This was an easy card to make because I wanted to stamp to be the star of the show so I used some patterned papers from My Mind's Eye and the green layer is Jellybean Green card stock from Gina K Designs.  I colored the stamp with Copic Markers and cut out with a Gina Marie Stitched Rectangle Die. I used Raven Surface Ink to stamp the #Selfie sentiment.  A few black enamel dots and natural twine finished it off. 

This would be such a cute stamp to use for kid's cards, birthday cards are what I first thought about. 

Did I inspire you to make some Halloween cards?  Halloween cards do not have to be scary, they can be cute as well.

OH, one more thing.... did you see that Brutus Monroe now has exclusive Color Burst colors???  How cool is that? Check it out! 

HERE'S A LINK to the Colorburst

I am giving away the two little girl stamps in the first When I Grow Up Collection and a Zippered Project Pouch.  Just comment and either tell me what your favorite Brutus Monroe product is OR if you're getting the new Color Burst and what your favorite color is. :)


When I Grow Up Astronaut


Thanks for stopping by and have a great day!


Regina


Saturday, October 7, 2017

Fish Bowl Dreams

Hi Everybody,

It is World Cardmaking Day!  How are you spending this day?  I hope you can work in a little time to craft or spend the entire day crafting because you know, it's a special day of the year set aside so that you can craft, guilt free.  They'll be lots of sales and give a ways so watch for those :)

(I apologize for the pics not being super clear, there was a huge reflection from the beautiful, sterling embossing powder)


I originally used the Sterling Embossing Powder but switched to Alabaster so it can be seen better. 


I used several Brutus Monroe products on today's card. I started by making an oxide ink background using Salty Ocean, Faded Jeans, Peacock Feathers, Cracked Pistachio and Wilted Violet.  I rubbed the ink pad over my Brutus Monroe Craft Mat, sprayed with water and quickly dipped my paper into ink randomly and heat set after a couple of colors and did it again.  I usually only do this twice and if there is a part that I am still not happy with, I spray a little water directly onto my paper and move the ink around.

I stamped a background stamp over the oxide ink background using the Brutus Monroe Wave Background Stamp.  I used Brutus Monroe Embossing Ink and Sterling Embossing Powder.  I think this Wave Background Stamp is SO COOL.  The very first time I saw it, I had a plan for it with the Fishbowl Stamp Set and Coordinating Dies that I used with it.  I colored the stamps with Zig Markers and cut out with dies.  I used the Inlaid Die technique here and fit the dies right into their designated spot like a puzzle.  Everything fit perfect with one exception.... I somehow put the crab die upside down and had run through Big Shot machine before I saw it.  I normally would get upset and redo the card but I figured a crab might can be on his back right?  Floating, chilling out or laying on the bottom of the ocean relaxing. See, I did it on purpose, yeah, that's it, on purpose lol.

I used sentiments from the new stamp sets, When I Grow Up Collection, Astronaut and Scientist.  I embossed both sentiments with the Sterling Embossing powder from Brutus Monroe.  I put the sentiments on a heavy weight vellum 48# so that it wouldn't overpower the background and I could see the background through it.  I did a die inlay with it as well with a Spellbinders Oval Die.  One of my best tips is that I use Stick It under vellum and I can't see it like other adhesives.  Make sure you are using a heavier weight vellum and do not mess up the smoothness of the adhesive and you won't be able to see it.  I used it here where the sentiment is. I finished it by adding some clear Wink of Stella glitter pen.

The thought behind these sentiments and this fish scene is Dream Big!  Oceans are Big and Endless! Never Stop Dreaming, Nothing is too large to keep you from your dreams. Simple as that.

These stamps were all so much fun to play with.  I hope I inspired you to try the Inlaid Die Technique and to try some fun, new Brutus Monroe products.  Lots of exciting new things to come from this company.  Stay tuned....

Thanks for stopping by and have a great day!


Regina


Thursday, October 5, 2017

Thank You For Listening Sentiment

Hi Everybody,

We all make thank you cards for people to thank them for things they have done for us, thanking them for their time, etc.  How many times have you vented to a friend, or running ideas by a friend, etc., I have the perfect stamp set and sentiment just for this very cause.  


I am using a stamp set from Sweet 'N Sassy Stamps called Thankful Blooms.  I love the big, bold flowers in this set.  I chose to stamp them in Fall colors but of course you can stamp in brighter colors such as pink, softer colors such as aqua or lilac and even red would look great as well.  Since these are solid image stamps, you will need to stamp a couple of times to get good coverage.  I stamped with the Misti and pressed normally the first time and very, very light with the second time. 

I used Colorbox dye inks in Pumpkin, Raspberry and Mustard for the flowers and Bamboo Leaves by Memento for the leaves and then cut everything out with coordinating dies. (these are no longer available but stamp set is)

I used Gina K Designs Heavy Base Weight Ivory for the base and Honey Mustard for the background.  I embossed with an embossing folder by We R Memory Keepers called Next Level, Woven.  It comes in a set of two folders. These provide the deepest impression of any folders I have every had.  

I used some Gina K Designs Layering Weight Ivory card stock and cut out the stitched tag from Paper Smooches.  I embossed the sentiment with Brutus Monroe Penny Embossing Powder.  If you are in the market to try some new embossing powders, I think you will really like these.  I sponged around the edge of the tag with copper pigment ink and thought it needed to be a little darker so I went back over with Tim Holtz Distress Ink in Gathering Twigs using a jumbo sponge dauber. 

I tied a bow with some natural twine and added a few glitter enamel dots in a golden color to finish it off. 

I just love the sentiments in this stamp set and the different combinations that the words can be used as.  If you vent to friends, like I do, you might like to pick this set up and use the Thank You for listening sentiment and I promise the recipient will love it.

I hope I inspired you to rethink your thank you cards and take them to the next level to make them even more special and meaningful.

Thanks for stopping by and have a great day!


Regina