Pages

Showing posts with label watercolor. Show all posts

Saturday, June 16, 2018

Love Ya- TupeloDesignsLLC DT Project

Hi Everybody,

I know many of you have been using Penny Black stamps for years and here's my question... why haven't I??  Flower stamps are my favorite and Penny Black has beautiful, detailed ones that look amazing when doing watercolor techniques, which are so popular right now.  I don't have many solid stamps so I got a few from TupeloDesignsLLC online store to color them with markers, colorburst, etc., so that is what I did with my card today.  A few weeks ago I sponged Oxide Inks onto a Penny Black stamp and here's a link to that post


This card was so easy and quick to make.  I used my MISTI stamping tool and colored the stamp with Memento Markers (you can also use Tombow Markers).  You need to use some kind of paper that works with water.  I used Arches Hot Press 140# paper for this card.  You can also used Cold Press paper as well and here is a link to Arches Cold Press 140# Block Paper. I used Flower Lanterns stamp from Penny Black for this card. I colored each part of the stamp a couple of times, first coloring and stamping and then coloring again and spritzing with water.  I colored the stems with Desert Sand, the leaves with Bamboo Leaves and the flowers with LuLu Lavender first and then parts of the flower with the darker purple, Sweet Plum.  You can't mess this up! 

Next, I masked around the stamp with tape and sponged inside the tape, around the flowers with a very light yellow ink and cut the panel down.

Sometimes purples can be difficult to match so I sponged the Sweet Plum ink along the edges of white cardstock that shows on each side of the card.  I also cut out a Lawn Fawn Die called, Love Ya Line Border, with white cardstock and sponged over it as well with the Sweet Plum.  I went over it again with the matching marker.  So anytime you can't match ink to cardstock, remember you can use white and sponge ink or marker on it for a perfect match. :)

To finish it off, I used some clear confetti as embellishments to add some shine. 

You'll notice the ones in the first picture I stamped with the white backgrounds... I couldn't stop making these because they're fast and pretty.  I think these would make great cards from everything from hello, happy birthday to sympathy cards as well. 

I hope you'll check out all of the Penny Black stamps and products at TupeloDesignsLLC online store.  Remember, you get FREE SHIPPING with NO Minimum Purchase. Gotta Love That!  

Thanks for stopping by and have a great day!


Regina


Wednesday, November 15, 2017

So Happy

Hi Everybody,

I have only been on the Sweet 'N Sassy Design Team a few months and I'm so excited to be a part of their 10th Anniversary Celebration.  There are lots of giveaways and surprises in store.  HERE'S A LINK outlining everything.

I used the stamp set below from Sweet 'N Sassy Stamps called So Happy.  

I made a couple of Quick and Easy birthday cards using this stamp set.  There are SO many possibilities.....


FREE GIFT WITH PURCHASE
Through the entire month of November EVERY $50 order* will also include the “So Happy” stamp set, a $15.95 value, at no additional charge!! No coupon required.
*Order must total $50 after discounts and before tax and shipping.


I have been wanting to make a card for so long just using a blob of watercolor as the background so that's what I did with this one.  I used Bristol Smooth paper and wet it first in the middle and then just added some Gambai Tambi Watercolor Paint in a purple color, I think it's #135.  I let it go wherever it wanted to.  I heat set it, added a little more color and swirled it around a little with a paint brush.  Next I embossed the word Happy with Brutus Monroe Ultrafine Alabaster Embossing Powder. I also embossed the word Birthday with the Alabaster on black cardstock and cut it down into a strip.  The silver glitter strip is a strip of glitter paper just cut into a strip.  I layered it on black cardstock and added a few clear sequins. 


For this card, I used Blue Lagoon cardstock by Gina K Designs, Turquoise Sea would also work.  I used the MISTI to stamp and space out the word, Happy, and embossed with Brutus Monroe Ultrafine Alabaster Embossing Powder.  Also embossed the word Birthday same powder.  I had used Thermoweb Transfer Gel with a stencil and foiled with Rainbow Decofoil so I cut a couple of thin strips and adhered to the sides.  This foil just screams birthday, celebration, etc., to me.  I added some clear sequins to finish it off. 


I think you will have a lot of fun with this stamp set and it would also make a great gift for a crafty friend. 

Thanks for stopping by and have a great day!


Regina


Saturday, October 21, 2017

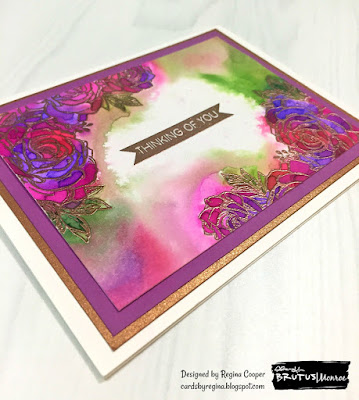
Botanical Banners - Thinking of You

Hi Everybody,

I'm on the Brutus Monroe Blog today with this beauty of a card and the great thing about this card is it was quick and easy. The watercolor look is all the rage these days but it doesn't have to take a lot of time.


I am using the Brutus Monroe Botanical Banners Stamp Set.  I love this set!  The floral image is perfect to stamp in the corners of your card as I did here.  The black strips with a white embossed sentiment are popular right now so you can stamp these banner stamps in black or emboss in black and voila' your black strip with white letters if on white cardstock and you didn't even have to cut them yourself. So for instance, you could use Raven Detail Ink which is a really dark black ink or you could use Brutus Monroe clear Embossing Ink (love!) and Ultra Fine Raven Embossing Powder if you want shine and some dimension. 

I decided to use the Brutus Monroe Ultra Fine Penny Embossing Powder on this card because it is such a rich, beautiful color and makes me think of Fall, which I love. I stamped the floral stamp in two corners using the clear Embossing Ink and embossed with the Penny Embossing Powder.  I chose a few Zig Real Brush Markers that I thought would look good together and not turn muddy.  If some of the colors do turn muddy, they can always be fixed. I chose darker colors for this one, jewel tones, because I thought they would look pretty with the Penny Embossing Powder.

I have a video on YouTube showing how I do this.  It was a live Facebook video I did several months ago so it's not picture perfect quality but I think you'll get the gist of what I'm showing here.  This was my very first video ever so go easy on me lol. (We have since chosen some paint colors in the yellow family to replace those green walls). 


I scribbled (literally scribbled) wherever I wanted on the paper with these markers, not worrying about getting out of any lines.  It doesn't really matter where you put the color because next you're going to spritz heavily with water. I used Strathmore Bristol Smooth Paper so that the ink can run freely and not get held up by the texture in watercolor paper.  You can control where it goes by moving it around and you can use a paintbrush to move it along the edges or if it's muddy, brush the muddy part away.  I purposely left the center lighter for the sentiment but you do not have to.  I stamped the Thinking of You Banner using the clear Embossing Ink and Penny Embossing Powder .  

You do not have to emboss your images to do this technique, you can also just stamp them but try to use the Bristol Smooth paper.  You can use your heat gun after you spritz it each time and you can add more color if you want and then use heat gun again.  You'll have to add darker colors if you want more color because the paper will be really saturated by this time and light colors won't show.

I used beautiful Copper Cardstock from Gina K Designs and also an Orchid color as well but this was a limited edition color a couple years ago or so.

I hope I inspired you to try this technique.  It's so much fun and you will be amazed at the results.  No two will turn out alike. 

There are a few additional posts using this technique.  If you'd like to see them, do a search for Zig Scribble. :)

Thanks for stopping by and have a great day!


Regina

BLOG | FACEBOOK | INSTAGRAM | YOUTUBE


Tuesday, October 10, 2017

Grateful Florals

Hi Everybody,

I am a guest designer again this month for Strawberry Jude Stamps.  If you know me at all, you know I love working with flower stamps and what a lovely set this is from Strawberry Jude Stamps this month.  It's called Grateful Florals.  I love this set for a lot of reasons!  It was really difficult to decide what to make with it only because my entire head was filled with ideas. I decided to use the large bouquet because it's the perfect size for the center of a card.  


I used Canson Montval paper, embossed the flowers with white embossing powder and colored with Zig Real Brush Markers.  I initially starting painting around the flowers with a light gray but I wasn't happy with that color with these flowers so I switched to a purple and wow, doesn't it make the flowers pop right off the page??  The bottom layer of card stock is black onyx by Gina K Designs. 

I used the MISTI to line up the sentiments straight, then stamped with Versafine Onyx Black ink and embossed over the top with clear embossing powder to give a little shine and dimension.  I added a few dew drop embellishments and added clear and orange Nuvo Drops.  

If you like raccoons, fox and leaves, then you should check out the other new release stamp set called Falling With Fox and Raccoon

Thanks for stopping by and have a great day!


Regina

Saturday, July 29, 2017

Stay Classy and Sassy Watercolor Card

Hi Everybody,

I needed a quick card for someone so I took one of the embossed card panels that I made up a couple of weeks ago and scribbled Zig Markers all over it and spritzed with water.  This is my new go to technique when I don't have time to watercolor.  This is my fake watercoloring lol.


The stamp set I used is from WPlus9 called Beautiful Bouquets Dahlias.  The sentiment is from WPlus9 also called Southern Sentiments.  I used Versafine Onyx Black ink and embossed over it with clear embossing powder to give it some shine.  I used Bristol Smooth Paper for this technique.  I cut a black piece of card stock out with a Lawn Fawn Stitched Large Rectangle Die.

"Zig Scribbling Technique"

If you would like to see a live video I did on Facebook showing how to do this, here is a link to my YouTube Channel. I would love it if you would subscribe if you like it.

Thanks for stopping by and have a great day!


Regina

Saturday, June 17, 2017

The Quickest, Easiest Card Using Zig Markers

Hi Everybody,

Who wants to know how to make the quickest card ever but still look pretty and like you put some time into it?  ME!  I saw a video on how to use Zig Markers and water spritzed to get a beautiful card by Laurel Beard so I tried it and it works!  


I used a Wink of Stella clear glitter brush pen on the petals but you can't see much of it in this pic.


So all you do is stamp or emboss your image on the Bristol Smooth or Watercolor Paper.  This is the first time I've tried this and I used Bristol only because I already had an image stamped on it but next time I will try watercolor paper.  Next, you take a few Zig Markers and literally scribble over the different sections of your image and you can mix colors, it doesn't matter where you put the ink. 

When everything is covered on the embossed or stamped image, spritz heavily with water everywhere you have Zig Marker ink and then watch the beauty happen.  You can pick it up and let the ink roll around.  I even took some of the droplets that fell off the card and used a medium sized, flat paint brush and I put some of the ink back onto the card, just some of the background and some around the edges.  Then I let it dry.  You can heat set it as well.

The floral image is from Altenew called Persian Motifs.  I embossed these with Ranger Silver Pearl embossing powder.  I love this color so much because it's softer than white.  The sentiment is from Concord & 9th called Hello Lovely.  I love the size and font of the word Lovely here.  I stamped that with Versafine Onyx Black ink and embossed with WOW clear embossing powder.  I added a few clear sequins from Pretty Pink Posh to finish it off.

The bottom layer is an orchid color from Gina K Designs but it was a limited edition color a long time ago. I wish she would bring it back since purples are being used so much in watercolor, oxide inks, etc.   Since quite a bit of the bottom layer was showing I decided to go around the edges with Versamark ink and use clear embossing powder, I stamped one of the flowers from Persian Motif.  It's so pretty! It's subtle but adds a lot when you look at the entire card all together.  

So that's my easiest, quickest card ever.  I think I'll go through and make up a bunch of these to have on hand for cards.  I hope I inspired you to get your Zigs out and start scribbling!  :)  

Thanks for stopping by and have a great day!


Regina

Thursday, March 30, 2017

Cas-ual Friday Stamps Challenge - No Dies

Hi Everybody,

I am taking a Copic Marker coloring class at www.kitandclowder.com and I love them!  Alyce Keegan is such a wonderful teacher and friend.  The leaves on the card are from the Nature Class colored with Copics.  How realistic are those droplets.  She teaches how to add detail to your images such as that to make them realistic.  I stamped and embossed daisies on the background with the Ranger Silver Pearl Embossing Powder that I love.  It's so much softer than white I think.  I wanted a light, soft, pretty background and have the leaves popped up to stand out and be the star of the show. I used Platinum pigment ink, which I never use, for the background.  It called out to me for some reason and I colored the flowers with Zig Watercolor Markers.  I added a few black dots.  I always tend to lean toward using sequins but the dots seemed better for this one to me.  Then used the Misti to stamp the sentiment at the bottom.


I am entering this card into a challenge over at CAS-UAL FRIDAYS STAMPS.  Have you been to their store to check out all of the cute stamps and dies??  Here's a link to their ONLINE STORE.  The challenge this week is NOT to use dies on your card, only stamps.  Lately I've been using a lot of dies, not only because they are quick, but also because there are so many cute word dies out that I tend to use one on most of my cards now.  I probably would've used a Hello word die on this one but I really like how the stamped sentiment looks on this card.

The name of the challenge is CFC-170  No Dies Allowed.  Pretty simple so check it out and enter for a chance to win a $25 gift certificate to the fabulous store.


Supplies Used:


  • Gina K Designs 120# Heavy Base Weight White for base, Grass Green
  • Strathmore 140# Cold Press Watercolor Paper
  • Technique Tuesday, Budding Poppies
  • Gina K Designs, Especially For You
  • Versafine Black Onyx
  • WOW Clear Gloss Embossing Powder
  • Ranger Silver Pearl Embossing Powder
  • Brilliance Platinum Planet Ink
  • Copic Markers
  • Zig Watercolor Markers
  • Faber-Casteel Black Waterproof Pen for the black dots
Thanks for stopping by and have a great day!


Regina


Tuesday, March 14, 2017

Clueless Card

Hi Everybody,

When I saw this stamp that I'm using on today's card, it just made me smile because I can think of a few people it would be perfect for lol.  This stamp is called Clueless from I Brake For Stamps.  If you like this stamp, if you use the Code, SAVE10CRYSTAL, you will receive 10% off your order.  


I used Zig Real Brush Markers to color him using Canson Montval Watercolor Paper.  I have to admit that I like my Zig Markers a lot better since I bought this paper.  It blends easily and can take a few layers.  I was using other papers in which the Zigs would seep into the paper and not blend and the fibers of the paper would pull up after one layer.  Try it! 


Supplies Used:


  • Canson Montval Cold Pressed 140# Watercolor Paper
  • Gina K Designs Cardstock in Turquoise Sea, Black Onyx, and Jellybean Green
  • Clueless Stamp, I Brake For Stamps 
  • Versafine Black Onyx Ink
  • Versamark Ink
  • Hero Arts White Embossing Powder
  • Lawn Fawn Stitched Rectangles Die
  • Gina Marie Designs Stitched Squares Die
  • Fun Foam
  • Scor-Tape
Every so often you need to make a silly card.  I had fun with this one.  I hope I inspired you to watercolor and get out one of your silly stamps.  

Thanks for stopping by and have a great day!


Regina

Wednesday, March 8, 2017

Altenew Wishing You Stamps and Watercolor

Hi Everybody,

I did a little watercoloring today.  I used Altenew stamps called Wishing You.  This is such a great Springtime set.  I also got the matching dies.


I used Gansai Tambi watercolor paints on the hummingbird and flower and also a little of some shimmer paints by Yasutomo.  Oh, I just looked and these shimmer paints are $7.95 on Amazon, here a link to the shimmer paints.  Here is a link to the Gansai Tambi watercolor paints, 36 set. There is also a 24 color set.  I used the light blue Zig pen to make a wash background and stamped the sentiment with Memento Lilac Posies.  Added some clear Pretty Pink Posh sequins and used a Tim Holtz distressing tool to go around the edges to give them some interest.

This card is for my Mom.  I took her to the doctor yesterday and then we went to lunch and we had a great time.   I'm giving this card to her to tell her how much fun I had and love her. :)


Thanks for stopping by and have a great day!


Regina
Wednesday, January 6, 2016

I Brake For Winter Trees

Hi Everybody and Happy New Year!

This is my first post of the year.  Seems like watercolor and watercolor powders are all the rage now so I made a card using the Bister watercolor powders.  You can purchase these from I Brake For Stamps and they are very affordable to try at $1.65 each.  You can buy all the colors at that price!  

Use Coupon Code SAVE10REGINA and receive 10% off your order. 

I used a stamp from I Brake For Stamps called Winter Tree.  I love scenery cards because they can be used for just about any occasion and for male or female recipients.  I used Blue Bister Powder on this card and spread it with a paint brush.  I love how there are flecks of browns and different color blues. I then stamped the trees with Versafine Onyx Black Ink while it was wet.  


There is no right or wrong with watercolor.  Play with it and have fun!  You can create such a masterpiece with Bister.  

Did I inspire you to use Bister watercolor powders?  I have more fun with these powders and they are very quick to use.  I only used one color for this card and look how pretty it turned out.  Try mixing two or three and see how beautiful it is! 

Thanks for stopping by and have a great day!

Regina - Design Team Member


Wednesday, October 14, 2015

I Brake For White Washed Flowers

Hi everybody!

I really love the stamp set that I'm using today.  It is called Ballerina, Flowers and Numbers from I Brake For Stamps.  Here's what it looks like:


This set has so any possibilities!  I am envisioning mixed media projects for the future but today I used the White Wash Technique.  I used the stamp with the flowers, script and dots, the butterfly and the love infinity stamp.  I love how it turned out!  

Use Coupon Code SAVE10REGINA to receive 10% off of your order.


I embossed the flowers with white embossing powder, took a water brush and used white pigment ink to water color the flowers to give them the 'white wash' look.  Let this dry or heat dry.  Then I just used some Fired Brick distress ink with water to give the flowers a soft color.  I had originally embossed the script white too but I decided I wanted the script part black so I masked off the flowers, stamped in black and fussy cut the flowers out that I had embossed white and used pop dots to give it some height next to the script.  I embossed the small butterfly with black ink and clear embossing powder and used a little of the Fired Brick distress ink to coordinate with the flowers and used pop dots with it also.  I stamped the love infinity symbol stamp at the bottom and used some black glitter enamel dots on each side.  I used a distress tool to distress the edges of the black and kraft card stock.  Finally, I used clear Wink of Stella on the butterfly.  

Remember to use Coupon Code SAVE10REGINA to receive 10% off of your order.  I'll be using this set more in the future to show you different ways to use it.

Supplies:


  • I Brake For Stamps stamp set called Ballerina, Flowers and Numbers
  • Recollections 110# White Card Stock for base
  • Gina K Designs Black Onyx and Kraft Card Stock
  • Tim Holtz Fired Brick Distress Ink
  • Close To My Heart White Daisy Pigment Ink
  • Versamark Ink
  • Versafine Onyx Black
  • Recollections white embossing powder in Snow
  • Stampendous Clear Detail Fine Embossing Powder
  • Water Brush
  • Tim Holtz Distress Tool
  • Pop Dots
  • Tombo Dot Runner Mono Adhesive
  • Virginia Turtle Black Glitter Enamel Dots
  • Wink of Stella Clear Glitter Brush Pen
  • MISTI

Thanks for stopping by and have a great day!!


Regina - I Brake For Stamps Design Team Member


Wednesday, October 7, 2015

I Brake for Watercolored Dahlias

Hi everybody!

I started out this year loving poppies and I still do but now I am on to a new flower, the dahlia.  I love all of the little petals and they are super fun to watercolor.  I got my inspiration from a Kristina Werner video.  Her inspiration was from a comforter and she made a card using the purple inks I used below. 

Here's a link to I Brake For Stamps online store.  I LOVE this stamp set!  It's great when you know you will actually use all the stamps in a set.  

The set is called, Quarter Sheet Dahlia.  I also used Large Grungy Leaves stamp.  This is what it looks like...


Use Coupon Code SAVE10REGINA to receive 10% off your order.


I stamped the flower and leaves in Versamark ink and embossed with white embossing powder.  I chose a few Tim Holtz inks in Fall colors and just pressed the ink pad on my craft mat and spritzed with water and used a watercolor brush to paint the different colors on my flower and blended.  It's so easy and relaxing.  I also used Fossilized Amber, I added that later to have a golden brown yellow color.  Be careful not to paint outside the lines of the flower.  Then I used Antique Linen to paint the background.  Be careful not to touch the flower when you're painting the background because the colors will run.  Ask me how I know that!  LOL!  Use a heat gun to dry.  Take a paper towel and wipe off the flower and the ink will come off of the embossed part, it resists the ink.  Then I put a few drops of water in my hand and let them drop onto the paper.  After the water sits for 30 seconds to a minute, take a paper towel and blot and you will have the white spots, dry with heat gun.  You can add more water droplets but dry in between.  I sponged ink around the edge of the watercolor paper and around the sentiment.  I added a few sequins and twine and called it a day.  

Supplies:
  
  • Recollections 110# card stock for card base
  • Gina K Designs Tomato Soup and Cherry Red card stock
  • Strathmore 140# Cold Press Watercolor Paper
  • Tim Holtz Distress Inks in Fired Brick, Fossilized Amber, Ripe Persimmon, Spiced Marmalade and Abandoned Coral.  Antique Linen for background and Gathered Twigs for sponging around edges and stamping the sentiment
  • Sizzix Framelits Die, Phrases.  Stephanie Barnard's name is on package and these numbers 658838
  • Versamark Ink
  • Recollections Detail Embossing Powder in Snow
  • Watercolor Brush
  • Tombo Mono Adhesive
  • Pop Dots
  • Craft Medley Sequins in Citrus
  • American Crafts Twine
Purple card, same as above but used Tim Holtz Victorian Velvet, Seedless Preserves and Dusty Concord.  Sequins are Craft Medley, Viola, Gina K Designs card stock in Kraft and Edible Eggplant.

Did I inspire you to start watercoloring?  These Tim Holtz inks are so easy to work with and the colors are so vibrant.  You can do a lot with this Dahlia Stamp Set. 

Don't forget to use Coupon Code SAVE10REGINA to get 10% off order.  Check out the Christmas stamps too.  There are deals of the week for 50% off. 

Thanks for stopping by and have a great day!


Regina - I Brake For Stamps Design Team Member