Pages

Saturday, July 28, 2018

Merry Christmas Non-Traditional Foil Colors - TupeloDesignsLLC DT Project

Hi Everybody,

This is my last post as guest designer for TupeloDesignsLLC.  Since they're having a Christmas in July sale, I thought I'd make another Christmas card.  Wow, I'll have two already!  I've never made them in July, it's fun actually to do something different than flowers, etc.

I made a very easy card this week using Thermoweb Deco Foil and Foil Mates. I like using non-traditional colors on Christmas cards occasionally so I thought it would be fun to us them with the foils. I used aqua and hot pink. 


I used a Lawn Fawn Mini Wreath Die Set.  You can cut this wreath apart and make it larger as well but I did not here. I used Thermoweb Deco Foil in Aqua and the Gina K Designs Fancy Foil in Passionate Pink.  I think these two colors look fabulous together! I used Thermoweb Toner Paper to cut out the dies first and then ran these through my Mini Minc Machine with Foil over them. I made a few extra berries. The sentiment is from Lawn Fawn called Merry Christmas Border Die. I used the Aqua Deco Foil for this to tie in with wreath. I used a Zig Two Way Glue Pen to glue everything down. 

The background is Gina K Designs Foil Mates in Polka Party.  I used Deco Foil in Silver for this.  I tied some silver metallic twine around the left side of card, adding a bow and then used fun foam to pop it up on a white card base. 

Super easy and fun to make!!  

Did I inspire you to make a Christmas card in July using Thermoweb Deco Foil?  I think these Foil Mates are so great because they already have the toner on them, you just choose your color foil and run it through your machine and you're done. 

TupeloDesignsLLC offers FREE shipping with NO minimum purchase. 

Thanks so much for stopping by and have a great day!


Regina

Monday, July 23, 2018

Shello - Guest Design Brutus Monroe

Hi Everybody,

I'm guest designing during the month of July for Brutus Monroe.  I had a blast making the card I'm showing you today called a Shadow Box Card. Jennifer McGuire made a video showing how to make this card and HERE IS A LINK to that video. I followed her video exactly in regards to how to put the cards together so please refer to video for instructions. 

It was a lot of fun decorating this card because you get to decorate the front and then the inside shadow box part. 


Sparkly background and fish :)


I made a background using three colors of Nuvo Shimmer Powders and used the Wave Die Set to cut it out. There are two dies in this set, I love it! I think this is just a gorgeous combination of this die and the shimmery colors used.  I stamped several fish from the Mermaid Lagoon stamp set and colored them with Zig Markers. I decided to use teal color cardstock on the front so I just cut a strip and embossed a stamp from the Mermaid Lagoon stamp set with Alabaster Embossing Powder.  I used the Embossing Ink as well because it is super juicy. I can see what I stamp really well because it's so juicy and shiny and if that makes sense. I'm a huge fan of Brutus Monroe Embossing Ink and Powders. I added a few of the 2-tone flat back pearls as embellishments to look like bubbles. 


On the inside I used the Mermaid Lagoon Underwater Background Stamp and colored it with Zig Markers.  I really like this background stamp because of the size, it is 4"x6" so as you can see, it was perfect for this card.  It is only 4" wide rather than 6" like most are so you can use it much easier on your cards. I also used the 2-tone flat back pearls as bubbles. I used a teal cardstock strip again on the inside to tie everything together and also the fish, shells and starfish from the Mermaid Lagoon Stamp Set. I just love this sentiment, "On a scale of 1 to 10 YOU are an 11."  

So just watch the video, link above, and decorate it however you want.  I used a pretty large die on mine to make the window because I wanted to use the background stamp and wanted to show as much as possible. You can use a smaller die and have room to stamp below the window and add embellishments

I hope you'll try to make a shadow box card and decorating it with mermaids and underwater scenes are so much fun.  Check out all of the stamp sets, stencil, die and embellishments for underwater/mermaid scenes HERE with this link.

Thank you so much for stopping by and have a great day!


Regina

Saturday, July 21, 2018

Let It Snow Shaker Card - TupeloDesignsLLC DT Project

Hi Everybody,

It's Saturday which means I'm guest designing for TupeloDesignsLLC today. I told you I wouldn't make any more shaker cards but I kind of fibbed, that's what I'm showing today.  I said I wouldn't show anymore 'shaped shaker cards' lol.  

I wanted to make a few Christmas cards in July to at least get ahead of the game by a few.  I seem to always be scrambling at the end of November, first of December making them. Some people make them throughout the year but I've never been able to do that and plus, I put away my Christmas stamps, paper, dies (until end of November).  Hmm, maybe if I kept Christmas craft supplies out all year, I wouldn't start making cards after Thanksgiving. 


I have been playing with a new product called Tonic Mirror Card.  I love the weight and thickness of this cardstock!  It's a great alternative to foil and comes in a variety of colors.  If you don't have a laminator or Minc Machine, this is a product you might want to try because it looks similar to foil but it is cardstock.

I've been using the Mirror Card mostly for word dies but I'm trying something new today with it.  I used it on the entire card!  I think it looks awesome!  

I made a snowglobe shaker card.  First, I used the Chrome Silver Mirror Card for the background and embossed it with a snowflake embossing folder I had in my stash. This cardstock embosses so beautifully!  

I have a snowglobe outline die in my stash so I cut it out using the Ruby Red Mirror Card and I cut the base off. I used My Favorite Things Wide Circle Stitched Dies for the snow globe part, using thick white cardstock for the window and cut a circle also for the inside window out of clear acetate. I used Scotch 3D 1/2" foam tape under the circle to give it the height so there is room for the sequins. I also use Scor-Tape with shaker cards to make sure I have a super sticky double sided tape to hold the window in place. I wish I would've embossed the clear acetate window with a snowflake embossing folder. Have you tried that?  It really adds something to your window but is subtle. 

I filled the shaker card with sequins, seed beads, etc., you can use whatever you'd like in a shaker card but here I chose red and silver metallic sequins, clear seed beads, and a longer clear bead. (not sure what they're called)  Here is a link to various sequins

I decorated the snowglobe window with snowflakes from the Lawn Fawn Mini Snowflake Die Set. I really love these dies because of the assortment in different sizes. If I had more time, I actually would've filled this snow globe with these snowflakes, adhering two together using the Silver Mirror Card.  How pretty would that be!  The back of the mirror card is white so that's what I meant by adhering two together, so you wouldn't see the white on the back. 

Finally I used a strip of clear vellum at the bottom of the card adhering it with Stick It.  That's actually my secret to not seeing under vellum, use Stick It. Try not to mess up the glue with your fingers when sticking it down and you won't be able to see under it at all!  I've searched years for the solution to seeing under vellum.  Now you don't have to hide your glue dots, etc, under your die cuts or whatever you're using on the vellum.  I used the Lawn Fawn Let It Snow Border Die cut out in Imperial Blue Mirror Card on the vellum.  To finish it off, I added a few of the snowflakes I had cut out of the Lawn Fawn Mini Snowflake Die Set. I used a Nuvo Glue Pen to glue down the snowflakes. 

I am going to give this card to my husband's nephew who loves Ole Miss college football team, their colors are red, blue, and white. I make him some kind of Ole Miss color card every year and he loves them. I'll put Ole Miss on the base of the snow globe in silver letters. 

Did I inspire you to start your Christmas cards?  Think about how many you typically send out and make a few every month.  It was fun making this Christmas/winter card in July.  One reason I made this card a snowflake card is it is so freakin' hot here in Mississippi!!  It feels like 105 degrees outside right now.   Yuck!  Did it make me feel cooler to make a snowflake card, kind of, or maybe it was the fact that I turned the A/C down to 70 degrees.  :)

Remember TupeloDesignsLLC offers free shipping with no minimum purchase. 

Thanks so much for stopping by and have a great day!


Regina

Monday, July 16, 2018

Splashing To Say Hello - Brutus Monroe Guest Design

Hi Everybody,

I am very excited to be guest designing for Brutus Monroe this month.  I was on the design team the last quarter of last year and loved the excitement and passion that I saw from Christopher Alan, the owner of the company.  It was exciting for me to see the company growing while on the design team.  I fell in love with the products, especially the embossing powders and ink.... which leads me to how the card I am showing today came to fruition if you will. 

I am a messy crafter and currently I am not working in my craft room, which is upstairs due to a recent knee replacement and another in the near future (lucky me lol), so I have a table and on this table, my actual work area is probably 10" after I push everything aside.  

I was working on a project using Pearlescent Embossing Paste, I had some out of the jar on my kraft mat.  Well, it seems that I can't start one project and actually finish it, clean up, and move on to the next one, so I started playing around with some of the new products I got from Brutus Monroe.  I embossed on the cool new Tangled Waves Stencil and used the new Mermaid Tail Embossing Powder.  The result was beautiful!  It looked kind of like a metallic blue.  


Well, some of the embossing powder got in the embossing paste and at first I freaked out thinking I wasted those two products but I thought, what do I have to lose, and started mixing them together.  I was surprised to find out that the color was really light, not the darker blue like the powder. I spread it over the Tangled Waves Stencil and I was mesmerized by how beautiful this color turned out to be.  It is a pearly looking light blue/gray color.  It's gorgeous and I think perfect to use as water and with the Mermaid Lagoon stamp set that I used.  I created a masterpiece!!!  :)


I was curious what it would look like on black cardstock and it's a beautiful result as well!  I'll use this for another project!


Okay, I had to foil the stencil while it was out lol.  How beautiful is this?? This is the Deco Foil in Lapis Watercolor.  


So now I have this beautiful pearly background... I wanted to make something cute with the Mermaid Lagoon Stamp Set but careful not to cover too much of the background. 


(I apologize if the stamps are blurry, I used all of them so they have some residual black ink on them)


I stamped all of the stamps in the set on bristol smooth paper and used Zig Real Brush Markers as my coloring medium. I decided to use the cute mermaid and some fish from the stamp set.  I added Clear Wink of Stella to the mermaid to add a subtle shine.

I didn't just want to adhere her directly to the background so I used a die that cut a circle but cut the inside out so that the background can be seen through it.  I popped her up on the die with some foam squares and added some of the beautiful Blue and Purple Flat Back Pearls around the die.  Aren't they gorgeous??  I do have to make mention that you need a strong glue for your cardstock to stay adhered to this paste on the background so I used Brutus Monroe Glue.  This is such a strong glue that I highly recommend you try it.  I have even used it to glue a cracked ceramic tile coaster back together and it worked like a charm.  I trust this glue for anything, crafty or around the house. 

I positioned the mermaid kind of sideways like she's swimming and to look like she's waving because I'm using the sentiment from the set, "splashing to say hello".  I stamped the sentiment on a pearl color vellum using the Brutus Monroe Plum Surface Ink.  It inks up fabulously on vellum but use your heat tool to dry the ink or it will smear.  Do it carefully from the back so you don't warp the vellum. 

To finish it off, I popped up a few fish that I also colored with Zig Markers on the card.  

I think the Mermaid Tail Embossing Powder is such a fun color and now I've shown you a different way to use it. 

I had a lot of fun using the Tangled Waves Stencil, Mermaid Tail Embossing Powder and Mermaid Lagoon Stamp Set.  This is just one project that I've created... stay tuned for more to come in the month of July. 

I hope I've inspired you to play with your supplies. Get that palette knife out and mix the Mermaid Tail Embossing Powder with White or Translucent Embossing Pastes to see what they look like. Try it on different color cardstock as well. Have FUN!

Here is a link to the Brutus Monroe Blog for even more inspiration! https://www.brutusmonroe.com/blogs/news/guest-designer-regina-cooper

Thanks for stopping by and have a great day!


Regina

P.S. I also tried Nuvo Shimmer Powders with this stencil lol.  I love making backgrounds, what can I say?  :)


https://cardsbyregina.blogspot.com

Saturday, July 14, 2018

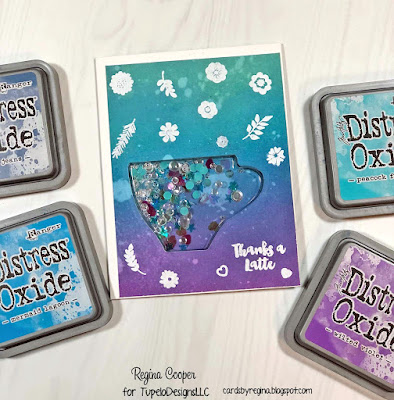
Thanks a Latte Shaker Card - TupeloDesignsLLC DT Project

Hi Everybody,

It's Saturday!  I am guest designing this month posting on Saturday's for TupeloDesignLLC.  I hope y'all aren't tired of seeing shaker cards but if you know me, you know when I learn something new or try something different, I get excited and post about 10 times on it.  This is the last one I promise. 

I made a coffee cup (can also be a tea cup) shaped shaker card using a Jillibean Soup stamp and die set called Latte Love and also the coordinating shaker cards with envelopes.  The shaped coffee cup PVC window fits perfectly into the cards. I had a lot of fun with this set!  The only thing that I did not do is cut out some flowers with the dies. I'll do that soon because I just got a Sizzix Sidekick so that would be perfect to use for this!


The first thing I did was take a piece of Strathmore watercolor paper and sponged Oxide Inks on it, blending well. I used Broken China, Peacock Feathers, Mermaid Lagoon, Faded Jeans and Wilted Violet. I spritzed water into my hand and sprinkled it on the watercolor paper and after a few seconds, dabbed the water off with a paper towel.  

Next, I embossed some of the stamps and a sentiment on the card using my Misti.  I used Hero Arts white embossing powder so that it would show up well. 

I sponged a few different pieces of watercolor paper and chose another one for the inside of the card.  I used all of the colors on this one except for the Wilted Violet.  I also sprinkled water from my hand onto the paper. 

Next you place the coffee cup shaker window in the slot, fill it with whatever you'd like, such as sequins, beads, confetti, etc., and tear off the backing of the shaker window.  I used some from both of these packs... they're SO much prettier in person, Sequin Pack Watercolor and Sequin Pack Birthday.  Close the card together and firmly press together.  I had cut out the coffee cup shape with the die in the stamp set so I used the piece of the watercolor paper from the die shaped like the coffee cup in the back of my window.  You don't have to do this. So now you can see some of the purple color from the front to tie them in together. 

I used a metallic silver pen and drew steam coming out of the cup.  I feel like I can't draw very good at all but I like how this looks. :)  I drew it and just thickened it up some.

The final thing I did was use a Die-Namics set from My Favorite Things called, Words for Friends.  I cut it out using a thick white cardstock and fun foam.  I wanted it to have some dimension.  I sponged the Wilted Violet Oxide Ink that I used on the front of the card on almost all of the letters, leaving some white at the top.  Next, I took used embossing ink and went over all the letters with it and sprinkled sparkly embossing powder over it.  I saw this done a while ago on a Jennifer McGuire video and I love making letters/words look this way.  So fun!


Did I inspire you to try a shaped shaker window?  A couple of previous posts showed me using a chipboard star shaker window and a balloon shaker window. The balloon one was fun because I made a coordinating tag, gift bag and card.  The tag had the shaker window on it. 

TupeloDesignsLLC offers free shipping with no minimum purchase. 

Thank you so much for stopping by and have a great day!


Regina


Saturday, July 7, 2018

Coordinating Card, Shaker Tag and Gift Bag! TupeloDesignsLLC DT Project

Hi Everybody,

I will be a guest designer in July also for TupeloDesignsLLC so please stick with me for my Saturday posts this month.  I'm always behind making my Christmas cards so I'll be making a couple this month for 'Christmas in July'.  

For today's post, I'm doing something a little different.  I made a matching card, shaker tag and gift bag.  What inspired me to do this was a sheet of Alexandra Renke paper with balloons on it.  I needed a birthday card for someone and looked through my supplies and saw that I had a balloon shaker window with coordinating tag. 


First I made this Eclipse Card using the Alexandra Renke paper called Circus Design Paper - Balloon.  I am so hooked on using these 12x12 patterned papers.  The paper is thick, not flimsy, so it won't tear, which is the reason I used it for the gift bag in this post. If you would like instructions on how to make an Eclipse Card, HERE IS A LINK to a post I did a few weeks ago.  When you see the instructions you'll see that I used 5 layers under letters and that's because I wanted them to really stick out from the card.  On this card today, I only used two layers. I used a dark gray cardstock for the letters for a subtle shadow. They still stick out so two is plenty. :)  I used a die from My Favorite Things, Die-Namics Big Birthday. (If you want this die, there is a place to click on left side of screen that says email when available). 

I love how this tag turned out!  I used Jillibean Soup Shaped Shaker Tag Insert - Balloon Shaker with coordinating tags for this. The tags are called, Die Cut Tag & Twine - Balloon. There is a coordinating stamp and die set that goes with these but it's out of stock at the moment. 


If you do not know how to make a shaker card/tag or want to make a quick one even if you do know how, these are awesome!  Here's how I made this:

First, I traced around the tag and cut it out from the piece of patterned paper. I traced the balloon shape on the tag where it goes and cut it out and then adhered these tag shaped papers onto the actual tag. Next I laid the balloon shaker window down in the opening with the tag open and put the sequins, etc., that I wanted in it.  I used some from these Jillibean Soup Sequin Packs. This one is Birthday Sequin Pack (love it)! and I used, Watercolor Shapes.  I can promise you that these look so much better in person than in the pics online. 

After you fill the shaker window you close the tag down on top of it.  Now I did cut out a slightly larger balloon shape to use as the back of the window as well. Then you're just going to use a tape runner or glue to adhere the back and front of the tag together. I cut out the word, celebrate from Thermoweb Toner Paper and used Deco Foil Summer Rainbow and I love how this looks! This is one of my favorite foil colors I must say. I added a few of the sequins from the birthday pack on the tag to finish it off.  These tags come with twine but I used a couple of pink colors of twine from my stash for my tag. 

I only had a navy blue small gift bag so I decided to show that you can use this paper to cover a gift bag.  Unfortunately, I only had one sheet total when I started this so I couldn't cover the entire bag.  I'm ordering more though, so I can cover it and show it in a later post referencing this one or even make a video showing you how. 


All you do is measure the sides of the bag so in this case, I measured the front of this bag and then I added about 1/4" extra on both sides. You can add more, it doesn't matter because you're going to be folding it back.  Next, you make score lines on each side so in my case I made score lines at 1/4".  Next I folded the paper back where the score lines are and pressed really good with my bone folder. The next step is to put the paper on top of the bag and fold those sides back around the sides.  You're going to adhere these sides down so use either scor tape or strong glue. I used Brutus Monroe glue because I trust it. 

You don't have to do this but I had a few small pieces of paper left so I used a Fiskars Scallop Punch and punched the top and bottom of this paper, made scor lines and folded it back around sides of bag and glued down.  The scallops just add a little more to the top of bag I think.  Then tie the tag to the handle of the bag.  I apologize that I didn't have enough paper to finish the bag but wanted to give you this idea in this post. 

If you decide to do this, don't start with the front.  Start with a side going to the back, other side and then front so that you don't see the scored 'flaps'. 

I've seen people stamp on bags so that's one way to get the bag you want or like I did here, you can use patterned papers.  I hope you will try Alexandra Renke papers because like I said, they are thick, so they're not going to tear.  I'm hooked on the quality and the beauty of these papers. 

That's it for me for now.  I think the recipient will really love these!  How fun!

I hope I inspired you to make your own coordinating cards and shaker tags.  The coordinating gift bag is just a fun extra. 

If you shop at TupeloDesignsLLC, you will get free shipping, no minimum purchase. 

Thanks so much for stopping by and have a great day!


Regina


Saturday, June 30, 2018

Star Shaker Card - TupeloDesignsLLC DT Project

Hi Everybody,

It's Saturday!  That means I'm posting using some products from TupeloDesignsLLC.  The card I made for today is special to me because I have a three month follow up next week with the surgeon who did my knee surgery and I want to give him this card to thank him.  

I made the card in the red, blue and silver because 4th of July is next week already.  This year is flying by!  

I started by using Yupo Paper for this project because I made an alcohol ink background.  You can also use Glossy Cardstock or Photo Paper.  I think I have 20 packs of photo paper that I got free in with the box of inks for one of my printers. I'm glad I finally found a good use for them and they're already cut to perfect size. 


I used Ranger Alcohol Inks in Watermelon, Sailboat Blue and Silver Mixative.  I tried to separate the red and blue inks so that they wouldn't run into each other making purple so I left a little gap and put the silver mixative in that area in between.  Next I used some Ranger Alcohol Ink Blending Solution to move it around.  I blew through a straw a little also.  

I let it sit for a few minutes and then used a heat gun just for a few seconds.  There were a few sticky spots from the ink so I used Thermoweb Deco Foil in Ocean Blue and Red and wow, this is so pretty in person!  Just that little bit of shine added so much.  All you do is press the foil down over the sticky spots with the pretty side face up. I love doing this!

I made this a shaker card using the Clear Scraps Chipboard and Acrylic Shaker Shape in the Star Shape.  I thought this would be a fun card continuing with the 4th of July theme as well.  I've heard people say that they don't know how to make a shaker card.  If you use something like this, the work is done for you because all of the layers, backing and window are included.  Since these are chipboard you can color them however you want, with paints, sponge inks, etc.  I chose to emboss these in silver.  I did it three times to get this beautiful smooth look. 


I didn't use the chipboard backing. I used a star die same size as this shaker with blue metallic paper and embossed it using an embossing folder with stars on it.  I think this looks fabulous!  Really starting to pull everything together.

I cut out the sentiment using a Lawn Fawn die called Scripty Thanks, using a layer of fun foam and then added a couple of white cardstock layers. I thought the white would look awesome against these other colors. I used a thin layer of Glossy Accents so give some shine. 

I used sequins and confetti from my stash for the inside of the shaker star.  After you fill it, all you do is glue the layers together.  Make sure you peel off the removable film on both sides. This is to prevent scratching before you use it on your project. To finish it off, I embossed a few silver stars on the background.  Be careful if you emboss on alcohol inked Yupo Paper, Glossy Paper, etc.  Don't hold the heat gun too close or it will start to warp. 

Here are a couple other examples of chipboard shakers.  Everything is in here to make one shaker card except for what you want to put inside, sequins, etc.  Super easy!  Mine looked like this...


I also have these:  


Did I inspire you to make a shaker card?  Even if you know how to make a shaker card, these shaped ones are FUN!  I know how to make them but I will definitely use these as well.  I can't wait to use the cupcake for a birthday card matter of fact. 

TupeloDesignsLLC offers free shipping with no minimum purchase.  

Thanks for stopping by and have a great day!


Regina