Pages

Showing posts with label Zig Markers. Show all posts

Monday, July 23, 2018

Shello - Guest Design Brutus Monroe

Hi Everybody,

I'm guest designing during the month of July for Brutus Monroe.  I had a blast making the card I'm showing you today called a Shadow Box Card. Jennifer McGuire made a video showing how to make this card and HERE IS A LINK to that video. I followed her video exactly in regards to how to put the cards together so please refer to video for instructions. 

It was a lot of fun decorating this card because you get to decorate the front and then the inside shadow box part. 


Sparkly background and fish :)


I made a background using three colors of Nuvo Shimmer Powders and used the Wave Die Set to cut it out. There are two dies in this set, I love it! I think this is just a gorgeous combination of this die and the shimmery colors used.  I stamped several fish from the Mermaid Lagoon stamp set and colored them with Zig Markers. I decided to use teal color cardstock on the front so I just cut a strip and embossed a stamp from the Mermaid Lagoon stamp set with Alabaster Embossing Powder.  I used the Embossing Ink as well because it is super juicy. I can see what I stamp really well because it's so juicy and shiny and if that makes sense. I'm a huge fan of Brutus Monroe Embossing Ink and Powders. I added a few of the 2-tone flat back pearls as embellishments to look like bubbles. 


On the inside I used the Mermaid Lagoon Underwater Background Stamp and colored it with Zig Markers.  I really like this background stamp because of the size, it is 4"x6" so as you can see, it was perfect for this card.  It is only 4" wide rather than 6" like most are so you can use it much easier on your cards. I also used the 2-tone flat back pearls as bubbles. I used a teal cardstock strip again on the inside to tie everything together and also the fish, shells and starfish from the Mermaid Lagoon Stamp Set. I just love this sentiment, "On a scale of 1 to 10 YOU are an 11."  

So just watch the video, link above, and decorate it however you want.  I used a pretty large die on mine to make the window because I wanted to use the background stamp and wanted to show as much as possible. You can use a smaller die and have room to stamp below the window and add embellishments

I hope you'll try to make a shadow box card and decorating it with mermaids and underwater scenes are so much fun.  Check out all of the stamp sets, stencil, die and embellishments for underwater/mermaid scenes HERE with this link.

Thank you so much for stopping by and have a great day!


Regina

Monday, July 16, 2018

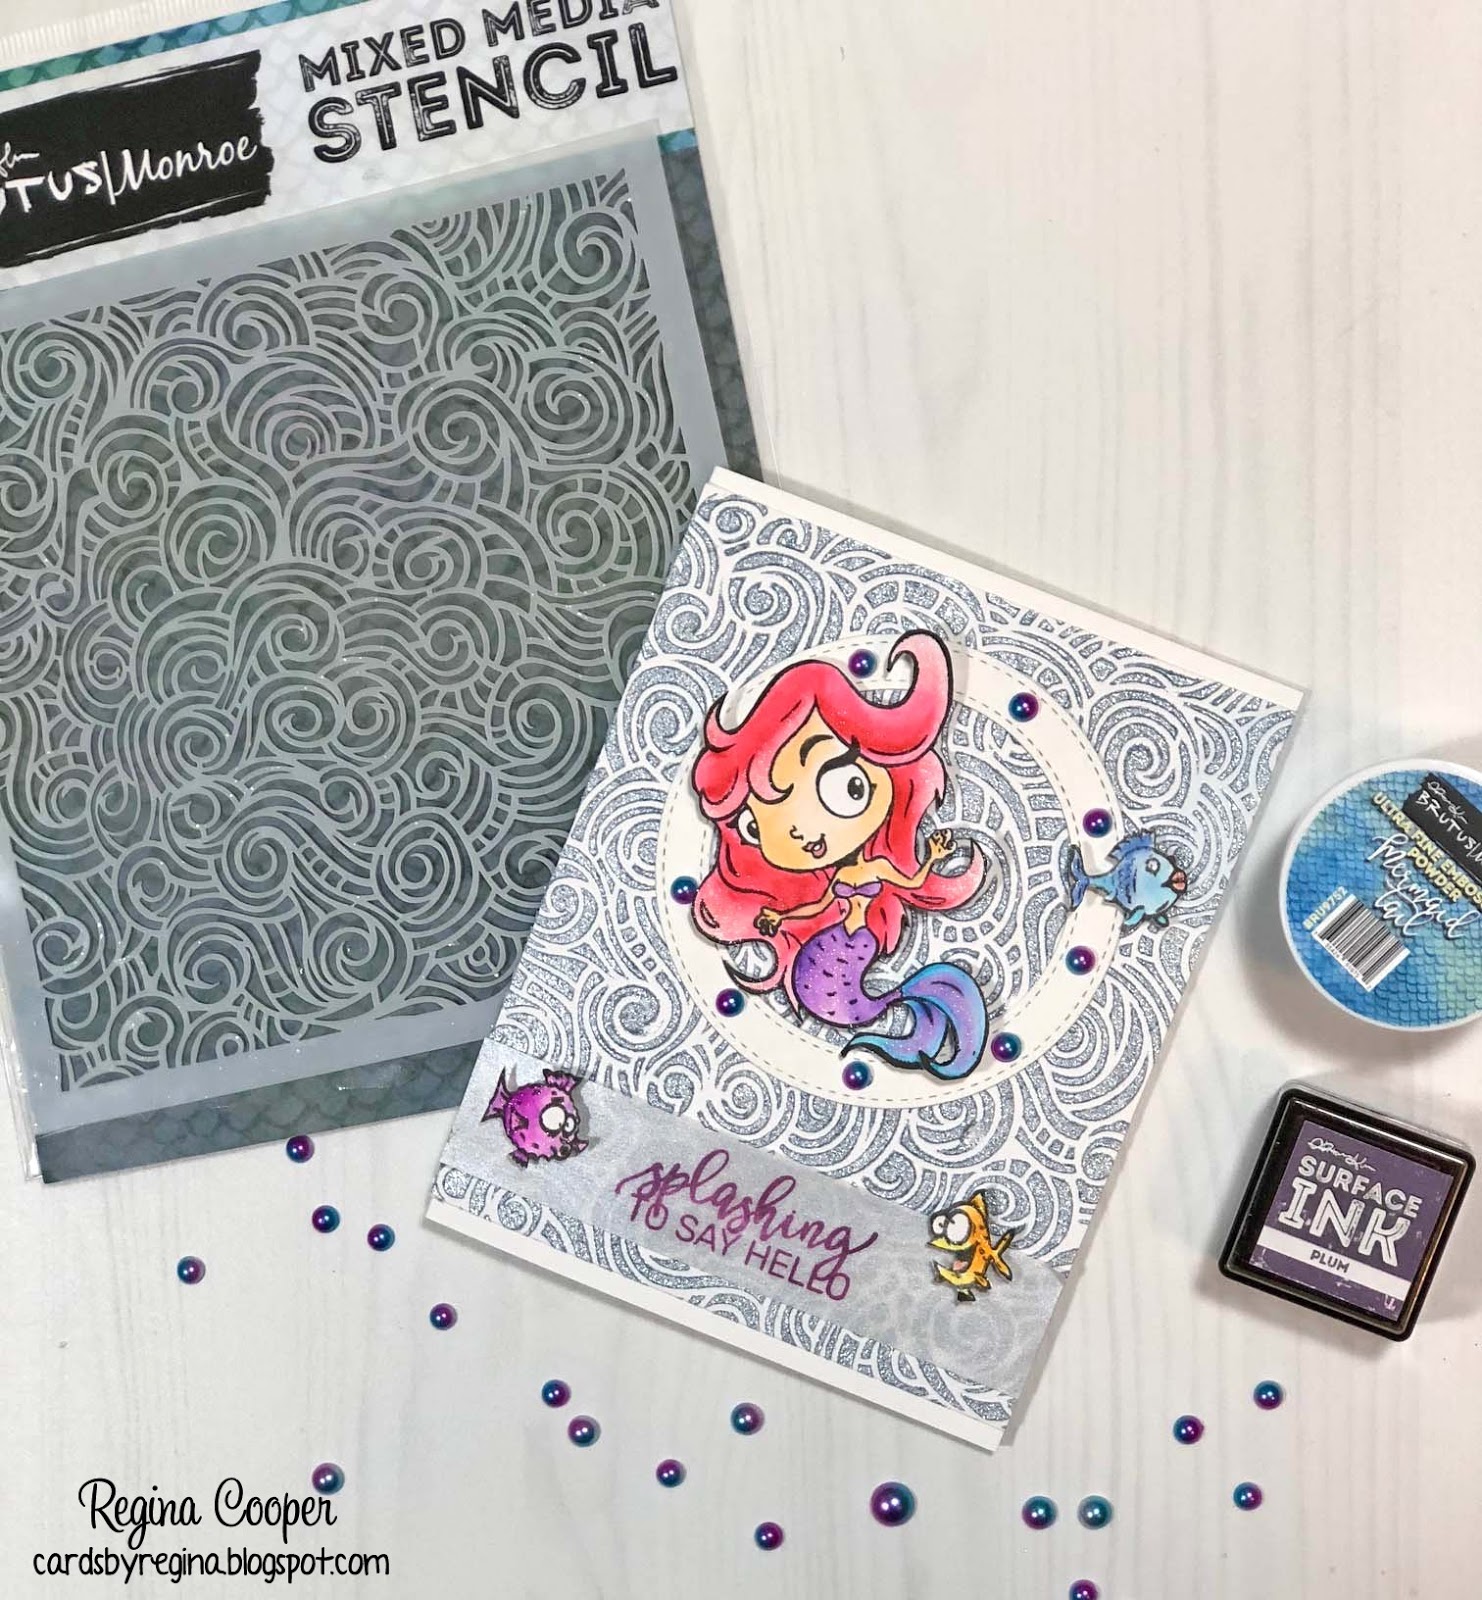
Splashing To Say Hello - Brutus Monroe Guest Design

Hi Everybody,

I am very excited to be guest designing for Brutus Monroe this month.  I was on the design team the last quarter of last year and loved the excitement and passion that I saw from Christopher Alan, the owner of the company.  It was exciting for me to see the company growing while on the design team.  I fell in love with the products, especially the embossing powders and ink.... which leads me to how the card I am showing today came to fruition if you will. 

I am a messy crafter and currently I am not working in my craft room, which is upstairs due to a recent knee replacement and another in the near future (lucky me lol), so I have a table and on this table, my actual work area is probably 10" after I push everything aside.  

I was working on a project using Pearlescent Embossing Paste, I had some out of the jar on my kraft mat.  Well, it seems that I can't start one project and actually finish it, clean up, and move on to the next one, so I started playing around with some of the new products I got from Brutus Monroe.  I embossed on the cool new Tangled Waves Stencil and used the new Mermaid Tail Embossing Powder.  The result was beautiful!  It looked kind of like a metallic blue.  


Well, some of the embossing powder got in the embossing paste and at first I freaked out thinking I wasted those two products but I thought, what do I have to lose, and started mixing them together.  I was surprised to find out that the color was really light, not the darker blue like the powder. I spread it over the Tangled Waves Stencil and I was mesmerized by how beautiful this color turned out to be.  It is a pearly looking light blue/gray color.  It's gorgeous and I think perfect to use as water and with the Mermaid Lagoon stamp set that I used.  I created a masterpiece!!!  :)


I was curious what it would look like on black cardstock and it's a beautiful result as well!  I'll use this for another project!


Okay, I had to foil the stencil while it was out lol.  How beautiful is this?? This is the Deco Foil in Lapis Watercolor.  


So now I have this beautiful pearly background... I wanted to make something cute with the Mermaid Lagoon Stamp Set but careful not to cover too much of the background. 


(I apologize if the stamps are blurry, I used all of them so they have some residual black ink on them)


I stamped all of the stamps in the set on bristol smooth paper and used Zig Real Brush Markers as my coloring medium. I decided to use the cute mermaid and some fish from the stamp set.  I added Clear Wink of Stella to the mermaid to add a subtle shine.

I didn't just want to adhere her directly to the background so I used a die that cut a circle but cut the inside out so that the background can be seen through it.  I popped her up on the die with some foam squares and added some of the beautiful Blue and Purple Flat Back Pearls around the die.  Aren't they gorgeous??  I do have to make mention that you need a strong glue for your cardstock to stay adhered to this paste on the background so I used Brutus Monroe Glue.  This is such a strong glue that I highly recommend you try it.  I have even used it to glue a cracked ceramic tile coaster back together and it worked like a charm.  I trust this glue for anything, crafty or around the house. 

I positioned the mermaid kind of sideways like she's swimming and to look like she's waving because I'm using the sentiment from the set, "splashing to say hello".  I stamped the sentiment on a pearl color vellum using the Brutus Monroe Plum Surface Ink.  It inks up fabulously on vellum but use your heat tool to dry the ink or it will smear.  Do it carefully from the back so you don't warp the vellum. 

To finish it off, I popped up a few fish that I also colored with Zig Markers on the card.  

I think the Mermaid Tail Embossing Powder is such a fun color and now I've shown you a different way to use it. 

I had a lot of fun using the Tangled Waves Stencil, Mermaid Tail Embossing Powder and Mermaid Lagoon Stamp Set.  This is just one project that I've created... stay tuned for more to come in the month of July. 

I hope I've inspired you to play with your supplies. Get that palette knife out and mix the Mermaid Tail Embossing Powder with White or Translucent Embossing Pastes to see what they look like. Try it on different color cardstock as well. Have FUN!

Here is a link to the Brutus Monroe Blog for even more inspiration! https://www.brutusmonroe.com/blogs/news/guest-designer-regina-cooper

Thanks for stopping by and have a great day!


Regina

P.S. I also tried Nuvo Shimmer Powders with this stencil lol.  I love making backgrounds, what can I say?  :)


https://cardsbyregina.blogspot.com

Saturday, February 17, 2018

Calendar Card

Hi Everybody,

I've been wanting to use the new stamp set from Gina K Designs called Stately Flowers 12, illustrated by Melanie Muenchinger since I bought it in January.  The problem was that I lost a row of the numbers lol.  I finally found them stuck to something today!  My husband gave me a metal bowl to put dies and stamps in because I keep losing small pieces.  I think this will help tremendously!  :)

I made this for my Mother in Law, who loves purple.


I used Gina K Designs cardstock colors in Wild Lilac and Lovely Lavender and the matching ink cube in Wild Lilac to sponge around the oval dies.  

Melanie made a video showing how to use this set if you'd like to see how she made an easel card with it, link is below.  She used another frame set which I do not have so I improvised and used Holiday Frame.  The calendar wouldn't fit inside the circle on this frame so I cut the oval dies out to cover the circle.  I stamped the frame with Versafine Onyx Black Ink and embossed with Brutus Monroe Icicle Embossing Powder, which is clear. I then used a Zig Marker to color inside the frame outline.  It's easier to stay in the lines when it is embossed. 

I used the Misti to line up the parts of the calendar and stamped with the Versafine Onyx Black.  I don't think I could've done this without the Misti.  I fussy cut the flower in the set after coloring with Zig Markers and cut them in half, popping up with Black 3D Foam Squares from Scrapbook Adhesive.  I used Wink of Stella in Clear over the flowers to add a little shimmer. I thought the calendar looked a little plain (it probably didn't but I never feel like I have enough on a card lol) so I added a few clear sequins adhered with Gina K Designs Connect Glue.  

I cut out the frame and put it on a layer of Gina K Designs Black Onyx cardstock.  I'm going to send a new card calendar to my Mother in Law every month.  

I stamped a few of these calendars for extras to give to friends so I don't have to try and line up the numbers each time I want to use it.  Smart huh?  :)

I hope I inspired you to try this great new set by Gina K Designs.  Check out Melanie's YouTube video HERE to see how she made it as an easel card. 


Thanks for stopping by and have a great day!

Regina

Monday, October 16, 2017

Blessed

Hi Everybody,

Did you know that Graciellie Design offers rubber stamps sold through Unity Stamp Company?  There was a new stamp release beginning of this month and the design team is having a blog hop to inspire you.  If you purchased stamp sets at the beginning of the month, you'll get lots of ideas.

I used two stamp sets for the card I'm showing today called Sending Kindness and May Blessings Follow You.  You can purchase these two sets in digital or rubber stamp form.  Here are links for both stamp sets in digital and rubber stamp form.


Sending Kindness Digital Stamp Set
Sending Kindness Rubber Stamp Set (Unity)

May Blessings Follow You Digital Stamp Set
May Blessings Follow You Rubber Stamp Set (Unity)


I used the apple blossom flower stamp, it's the perfect size for the center of a card.  I love the sentiments  in the May Blessings Follow You about blessings and blessed. There are SO many people I could send this card to.

I used Brutus Monroe Gilded Embossing Powder.  This was the first time for me to use this and it was fabulous.  It embossed so smooth and such a beautiful, shiny color.  I colored the stamp with Zig Real Brush Markers and I actually only used one color for the flowers.  I found out after the fact this was not watercolor paper but I tried it anyway.  The results weren't too bad actually.  I embossed the sentiment also with the Gilded Embossing Powder.

To finish it off I added some pink sequins from The Ton and flicked some gold Gansai Tambi watercolor paint on the card to get some specks on there.  I put post it tape over the sentiment and flower when I did this.  No way could I have flicked that paint and it not gotten it on either of those.

I used Gina K Designs Passionate Pink Cardstock for the mat layer.

Your next stop is Terri Burson who always blows me away with her outstanding, amazing creations.

If you would like to start the hop from the beginning, start at Graciellie Design blog.

Thank you so much for stopping by and have a great day!


Regina


Tuesday, October 10, 2017

Grateful Florals

Hi Everybody,

I am a guest designer again this month for Strawberry Jude Stamps.  If you know me at all, you know I love working with flower stamps and what a lovely set this is from Strawberry Jude Stamps this month.  It's called Grateful Florals.  I love this set for a lot of reasons!  It was really difficult to decide what to make with it only because my entire head was filled with ideas. I decided to use the large bouquet because it's the perfect size for the center of a card.  


I used Canson Montval paper, embossed the flowers with white embossing powder and colored with Zig Real Brush Markers.  I initially starting painting around the flowers with a light gray but I wasn't happy with that color with these flowers so I switched to a purple and wow, doesn't it make the flowers pop right off the page??  The bottom layer of card stock is black onyx by Gina K Designs. 

I used the MISTI to line up the sentiments straight, then stamped with Versafine Onyx Black ink and embossed over the top with clear embossing powder to give a little shine and dimension.  I added a few dew drop embellishments and added clear and orange Nuvo Drops.  

If you like raccoons, fox and leaves, then you should check out the other new release stamp set called Falling With Fox and Raccoon. 

Thanks for stopping by and have a great day!


Regina

Saturday, October 7, 2017

Fish Bowl Dreams

Hi Everybody,

It is World Cardmaking Day!  How are you spending this day?  I hope you can work in a little time to craft or spend the entire day crafting because you know, it's a special day of the year set aside so that you can craft, guilt free.  They'll be lots of sales and give a ways so watch for those :)

(I apologize for the pics not being super clear, there was a huge reflection from the beautiful, sterling embossing powder)


I originally used the Sterling Embossing Powder but switched to Alabaster so it can be seen better. 


I used several Brutus Monroe products on today's card. I started by making an oxide ink background using Salty Ocean, Faded Jeans, Peacock Feathers, Cracked Pistachio and Wilted Violet.  I rubbed the ink pad over my Brutus Monroe Craft Mat, sprayed with water and quickly dipped my paper into ink randomly and heat set after a couple of colors and did it again.  I usually only do this twice and if there is a part that I am still not happy with, I spray a little water directly onto my paper and move the ink around.

I stamped a background stamp over the oxide ink background using the Brutus Monroe Wave Background Stamp.  I used Brutus Monroe Embossing Ink and Sterling Embossing Powder.  I think this Wave Background Stamp is SO COOL.  The very first time I saw it, I had a plan for it with the Fishbowl Stamp Set and Coordinating Dies that I used with it.  I colored the stamps with Zig Markers and cut out with dies.  I used the Inlaid Die technique here and fit the dies right into their designated spot like a puzzle.  Everything fit perfect with one exception.... I somehow put the crab die upside down and had run through Big Shot machine before I saw it.  I normally would get upset and redo the card but I figured a crab might can be on his back right?  Floating, chilling out or laying on the bottom of the ocean relaxing. See, I did it on purpose, yeah, that's it, on purpose lol.

I used sentiments from the new stamp sets, When I Grow Up Collection, Astronaut and Scientist.  I embossed both sentiments with the Sterling Embossing powder from Brutus Monroe.  I put the sentiments on a heavy weight vellum 48# so that it wouldn't overpower the background and I could see the background through it.  I did a die inlay with it as well with a Spellbinders Oval Die.  One of my best tips is that I use Stick It under vellum and I can't see it like other adhesives.  Make sure you are using a heavier weight vellum and do not mess up the smoothness of the adhesive and you won't be able to see it.  I used it here where the sentiment is. I finished it by adding some clear Wink of Stella glitter pen.

The thought behind these sentiments and this fish scene is Dream Big!  Oceans are Big and Endless! Never Stop Dreaming, Nothing is too large to keep you from your dreams. Simple as that.

These stamps were all so much fun to play with.  I hope I inspired you to try the Inlaid Die Technique and to try some fun, new Brutus Monroe products.  Lots of exciting new things to come from this company.  Stay tuned....

Thanks for stopping by and have a great day!


Regina


Tuesday, September 12, 2017

Just The Two Of Us

Hi Everybody,

Today I'm on Strawberry Jude Stamps blog.  I'm very excited to be a guest designer this month for them.  The stamp set I used is called Fishing With Moose and Hedgehog and is so adorable and perfect for a masculine card.  I am going to give the card I am posting today to my husband for his birthday this month. It can also be great for a Valentine's Day card as well. 

HERE IS A LINK to Strawberry Jude Stamps online store and HERE IS A LINK to the stamp set I am using today. There is also a super cute dragon stamp set available in the new release called, Dragons and Jewels and HERE IS A LINK to that stamp set. 


This is what the stamp set looks like that I used...


I really had a lot of fun with this one.  I made a scene using the moose and hedgehog in the hammocks, the 2 trees and the sentiment, just the two of us. 


I used Bristol Smooth paper and began by sponging a light layer of Memento Summer Sky, which is a perfect light blue color for this.  Next I wanted to add some texture with clouds so I used a couple of older Spellbinders Scalloped Oval Dies in two different sizes.  I sponged right around the edge of the die positioning it different ways and I used Gina K Designs Powder Blue ink.  

I used Gamsai Tambi watercolor paints and simply painted a strip of grass across the bottom and then I used a Zig Real Brush Marker to flick blades of grass on top.  I also used these watercolor paints to color in  he trees and hammocks and Zig Markers to color the animals.  

The hearts were cut out of Gina K Designs kraft card stock using Poppy Stamps Heart Frames dies and the sentiment was stamped with Versamark ink and embossed with Hero Arts white embossing powder. 

I hope you'll check out the Strawberry Jude Stamps online store for the two new release stamps as well as all of the other clear polymer stamps.  I am really impressed with the quality of these stamps. This was my first time using their stamps and I highly recommend them.  

I hope I inspired you to try building a scene around your stamps.  It's very easy and fun to see each part come together. It's just another way to enhance your stamps. 

Thanks for stopping by and have a great day!


Regina

Sunday, July 30, 2017

Dahlia Bouquet with Watercolor

Hi Everybody,

Well, I showed a pic of this piece of cardstock to my Stamp Junkies group because I was upset that I stamped the sentiment crooked so I asked if I should cut the bouquet off, trash it, how to fix it.  Everybody said it was fine like it is, that it even looks intentional. So, I made a card with it.  It still bothers me that it's crooked because it wasn't intentional lol.  I put the stamp on my beloved MISTI and my husband called me wanting me to look at something and when I went back to the card, I just inked up the stamp and stamped.  I thought I had already put it on straight.  

Thank you for your feedback my Junkie Friends, if any of you read my blog.  I appreciate you all so much.  There have been days when you all put a smile on my face when there wasn't one.  There have been days when you made me look at a situation through different eyes.  I am inspired everyday by the amazing creations going down the group post.  I'm so thankful to have found this group.  :)

I embossed this with white embossing powder I think, I can't hardly see anymore without readers.  I embossed several of these with different stamped flowers in white, clear and silver pearl.  Some I will take my time and actually watercolor and when I don't have much time, I will use the Zig Markers and water and make them like this.  


Here's a link to my silly live FB video on me doing this if you're interested in watching and please subscribe. Thank you!


Regina Cooper YouTube Channel


Thank you so much for stopping by and have a great day!  


Regina

Saturday, July 29, 2017

Stay Classy and Sassy Watercolor Card

Hi Everybody,

I needed a quick card for someone so I took one of the embossed card panels that I made up a couple of weeks ago and scribbled Zig Markers all over it and spritzed with water.  This is my new go to technique when I don't have time to watercolor.  This is my fake watercoloring lol.


The stamp set I used is from WPlus9 called Beautiful Bouquets Dahlias.  The sentiment is from WPlus9 also called Southern Sentiments.  I used Versafine Onyx Black ink and embossed over it with clear embossing powder to give it some shine.  I used Bristol Smooth Paper for this technique.  I cut a black piece of card stock out with a Lawn Fawn Stitched Large Rectangle Die.

"Zig Scribbling Technique"

If you would like to see a live video I did on Facebook showing how to do this, here is a link to my YouTube Channel. I would love it if you would subscribe if you like it.

Thanks for stopping by and have a great day!


Regina
Thursday, July 27, 2017

Easy Card Using A Die As A Stencil

Hi Everybody,

I was looking through all my dies and I ran across a set that I have never used.  I remembered that I had bought them because I saw someone do some cool things with them but of course now I can't remember what it was.  

The set is Tim Holtz Mixed Media #2.  I used the die that looks like a flourish like a stencil and colored it in with Zig Markers.  It was so much fun too!  Then I realized I already have these in real stencils LOL!!!  It will be fun to use these dies for the inlaid die technique as well.  


So first I cut out the die and used some semi-heavy card stock since I am using it as a stencil.  I taped this 'stencil' over a piece of watercolor paper.  I chose 2 colors of Zig Markers that I liked and colored in the stencil.   

I stamped a sentiment from WPlus9 called Southern Sentiments with my Versafine Onyx Black cube and embossed with clear powder.  I LOVE this cube by the way because I used to always drop the regular sized pad and I can handle this cube without getting it all over the place.

For the card stock, I used Gina K Designs Tomato Soup and Passionate Pink.  I cut them so that you would see the pink on two sides and the orange on the other two sides.  I just wanted to do something different. 

I added a few clear sequins from Pretty Pink Posh and brushed over the flourish with a clear Wink of Stella brush glitter pen to finish it off.  You can flick water droplets on it if you would like to as well.

If you liked this card today, it was easy.  I hope I inspired you to try this.  

Thanks for stopping by and have a great day!


Regina

Saturday, July 8, 2017

Card Made from Live Video Technique with Zig Markers

Hi Everybody,

Did you see the LIVE FB Video I did a few days ago??  I can't believe I did a live video but it was actually fun.  I did have my phone backwards but hey, it was my first one.... the main thing is you could see the technique being done.  I look forward to doing more videos in the future.  I hope you'll subscribe to my YouTube channel.  


This is the card I made from the "Zig Scribble" Technique that I showed on the video. Isn't it gorgeous???  I'm telling you, you can't mess this up.  Anything you do will be awesome.


I love the bright colors.  You can somewhat control how light or dark your colors are by how much you spray with water and the color markers you choose.  I chose purple and dark pink as two of mine so it's a little dark.  

Please Note:  Use Bristol Smooth Paper

I embossed a word background which I think turned out beautiful, by Heartfelt Creations called Large Elegant Background Words.  I used Ranger Silver Pearl Embossing Powder which I think is a must to have in your stash.  I stamped 'I Love' in Versafine Onyx Black Ink and put Clear Embossing Powder over it to give it a little shine.  This is from Simon Says Stamp called You Matter.  The large You is a die from this set that matches the large stamp.  I cut it out with black and then a silver pearl vellum.  I wanted it to look like a slight shadow behind the silver pearl. The silver pearl vellum didn't show up quite as much as I wanted it to.  The vellum is from Graphix called Specialty Assortment.  It is 40# so it is a good weight, not real flimsy and cut good with the die. 

I finished it off by adding a few clear sequins from Pretty Pink Posh.

I hope I inspired you to try this technique.  I wanted to make a video to show you it is easy, fast and great results.  This technique really does only take a minute.  It took longer for me on the video because I just wanted to demonstrate how you can keep spritzing and what the result would be and using a paint brush to move ink around, etc.

I hope you'll stick with me as I start my YouTube video endeavor hopefully within the next week.  My husband took over the project of establishing a video area and setup so it's taken more time than I expected lol.  I am blessed because he said he wanted to provide all the tools to help make me successful.  Awwww!  

Thanks for stopping by and have a great day!


Regina


Monday, June 26, 2017

A New Day Encouragement Card

Hi Everybody,

I want to share a card I made for someone going through a difficult time.  I hope this is an appropriate card for her situation.  

I used a WPlus9 stamp called A New Day.  


I decided to stamp with my Tim Holtz Oxide Inks.  I used Fossilized Amber for the background using an Impression Obsession stamp called Canvas.  I stamped the script words with Vintage Photo using a stamp from Heartfelt Creation called Large Elegant Words.  I used the heat gun because the ink was so wet. These oxide inks stamp really good!  I embossed the bird stamp using Versamark Ink and Zing Chestnut Embossing Powder.  

I made a bunch of these just playing around using regular card stock and watercolor papers.  This happens to be regular card stock. I used Zig Real Brush Markers to color the stamp.  I was surprised that they did pretty well on regular card stock because I always had used them on watercolor paper. 

I used a Spectrum Noir Clear Glitter pen on the bird's chest and the berries.  You can also put some Glossy Accents on the berries to give them lots of shine and dimension and can probably still see the glitter pen underneath, not sure.  I'll have to try that but that would look really pretty.  

When I stamped the sentiment with Versamark, I was brushing away a few stray powders and my hand rubbed off the part that says 'is a new day' so I put it a little lower in case I still had versarmark there.  You just put tape over the part you don't want to stamp, in this case, the word Tomorrow, and stamp with Versamark and then remove the tape and stamp on your card.  

This is such a lovely stamp and it is very inexpensive, around $5.  I hope I inspired you to make something beautiful today.

Thanks for stopping by and have a great day!


Regina


Tuesday, May 16, 2017

Flaunt It Butterfly Card - Just For Fun

Hi Everybody,

I just wanted to share a card with you that I made today.  I used a cute stamp set by Hampton Arts called Lift Me Up.  One of the sentiments in the set is, If you got it, flaunt it.  Oh my, this is so perfect for a person I have in mind.  I love buying stamp sets in which I don't already have the sentiments, such as this one.

I embossed the butterfly with white WOW embossing powder and used Zig Real Brush Markers to color it.  I didn't give it much thought as to where the colors would go, I just had fun with it.  I used a chevron stencil as the background inked up with Memento London Fog ink.  The stencil I used is from My Favorite Things called One Way Chevron.  The sentiment is stamped with Versafine Onyx Black ink.  Remember to heat set this ink if you aren't going to put embossing powder over it.  I got in a hurry and almost smeared it.  I finished the card off with some clear sequins from Pretty Pink Posh and a couple of white glitter enamel dots and Clear Wink of Stella Glitter Pen over butterfly.  The card stock I used is from Gina K Designs, Ocean Mist.

I also embossed another butterfly with Stampendous Detail Fine Gold Embossing Powder.  I am loving gold here lately.  I also used Zig Markers on this one and I'll make a card with it as well.

I love that this stamp set comes with a die to cut out the butterfly.  Bye Bye fussy cutting lol!!  I actually do have a Scan n' Cut and am embarrassed to say I don't use it.  The Scan n' Cut will eliminate fussy cutting.


I guess this butterfly is 'zentangle' ??  I have never colored anything like this so I wanted to give it a try.  Now I can appreciate when someone colors an entire coloring book page filled with zentangle designs.  It does take a little while to color but is so much fun.

Thanks for stopping by and have a great day!


Regina

Sunday, April 23, 2017

Faith The Fairy - Stamping Bella

Hi Everybody,

I was asked to make a very special card.  My friend's Father was in hospice and asked her to get a card for her sister's 40th birthday because he knew he wouldn't be here for it and wanted to write in it and let her know how much he loved her.  My friend asked me if I could do it and of course I said yes...
He always called her Princess and she loves pink poodles so she asked if I could put a pink poodle beside the image I chose.  The good thing about us cardmakers is that we can do almost anything we want.  I found a digi poodle image, colored it with Zig markers using water so it would be lighter than the dress and colored the main image with Copic Markers.  Here's what I came up with:


It was sad for me in a way because of the circumstance but I was so happy and honored I could do it for her.  My friend gave her sister this card on last night at her party and sent me a video of her opening it.  OMgosh, it was so emotional to watch.  If you are friends with me on Facebook, the video is posted today on my page.


Supplies Used:

  • Recollections 110# white cardstock for base, Gina K Designs, Passionate Pink, Black Onyx
  • Stamping Bella, Faith the Fairy
  • Gina Marie Designs, not sure of the name of this scalloped rectangle die
  • Heidi Swapp glitter cardstock, 
  • Heidi Swapp patterned paper, Favorite Things
  • Heidi Swapp glitter cardstock, Marquee Love
  • Copic Markers
  • Zig Real Brush Markers
  • Poodle Clipart
  • Quick Kutz  English Rose Alphabet Dies
  • Pretty Pink Posh Clear Sequins
  • Craft Medley Pink Sequins


To my cardmaking friends.... just remember, we can make ANY situation better with our creations.

Thanks for stopping by and have a great day!


Regina