Pages

Showing posts with label Gina K Designs. Show all posts

Saturday, July 28, 2018

Merry Christmas Non-Traditional Foil Colors - TupeloDesignsLLC DT Project

Hi Everybody,

This is my last post as guest designer for TupeloDesignsLLC.  Since they're having a Christmas in July sale, I thought I'd make another Christmas card.  Wow, I'll have two already!  I've never made them in July, it's fun actually to do something different than flowers, etc.

I made a very easy card this week using Thermoweb Deco Foil and Foil Mates. I like using non-traditional colors on Christmas cards occasionally so I thought it would be fun to us them with the foils. I used aqua and hot pink. 


I used a Lawn Fawn Mini Wreath Die Set.  You can cut this wreath apart and make it larger as well but I did not here. I used Thermoweb Deco Foil in Aqua and the Gina K Designs Fancy Foil in Passionate Pink.  I think these two colors look fabulous together! I used Thermoweb Toner Paper to cut out the dies first and then ran these through my Mini Minc Machine with Foil over them. I made a few extra berries. The sentiment is from Lawn Fawn called Merry Christmas Border Die. I used the Aqua Deco Foil for this to tie in with wreath. I used a Zig Two Way Glue Pen to glue everything down. 

The background is Gina K Designs Foil Mates in Polka Party.  I used Deco Foil in Silver for this.  I tied some silver metallic twine around the left side of card, adding a bow and then used fun foam to pop it up on a white card base. 

Super easy and fun to make!!  

Did I inspire you to make a Christmas card in July using Thermoweb Deco Foil?  I think these Foil Mates are so great because they already have the toner on them, you just choose your color foil and run it through your machine and you're done. 

TupeloDesignsLLC offers FREE shipping with NO minimum purchase. 

Thanks so much for stopping by and have a great day!


Regina

Sunday, June 17, 2018

You're My Favorite Human

Hi Everybody,

I have one more post today.... Barney, my half Pointer, half English Springer Spaniel wanted me to make his Daddy a card for Father's Day.  :)


This is Barney :)


I used this adorable stamp from Dreamerland Crafts called My Dear Puppy, coloring with Copic Markers.  A2 Circle Cut and Stitch is the cover die I used by CC Designs. The sentiment inside is from Wreath Builder Stamp Set by Gina K Designs. I just love this sentiment!  I started to write in parentheses (other than my Mommy) lol.

I really enjoyed making this card for Richie from Barney.  He loved it and it will go up in his office. I hope you're enjoying your Father's Day.

Thanks for stopping by and have a great day!


Regina

Sunday, May 27, 2018

Scripty Sayings - Sympathy Card

Hi there crafty friends,

I made a sympathy card today for a very special person.  I don't usually like making sympathy cards for obvious reasons but I do try to make them as pretty as I can because I would rather get a card in happy colors than in black, brown, neutral colors.  I used to make all my sympathy cards in those dark colors.  What do you use for yours?  I'd love to know.


I used this beautiful stamp from Gina K Designs called Heartfelt Hydrangea, stamping with Tuxedo Black Memento Ink on Xpress It Blending Card paper and colored with Copic Markers. In the centers of the flowers I used Nuvo Drops in Sherbert Shimmer. It's a beautiful glitter pink color. 

I did this particular layout because I wanted the flowers to look framed so I put a scalloped stitched die frame around it from Gina Marie Designs.  

The sentiment is stamped with Onyx Black Versafine Ink and embossed with Clear Embossing Powder from Brutus Monroe called Icicle. The stamp set is from Gina K Designs called Scripty Sayings.  I put ink only on the words to make it fit where I wanted it to go.  The green polka dot paper is patterned paper I had in my stash.  

I hope you liked my card today.  Oh, my husband brought it to my attention that I didn't center it right lol.  I do normally center my cards but, I don't know, today I felt like I wanted to offset it.  I think it looks great this way.  What do you think?  

I hope I inspired you to try using brighter colors on your sympathy cards.  Thanks for stopping by and have a great day!! 


Regina


Saturday, March 10, 2018

Hello Friend

Hi Everybody,

I'm playing with the Wreath Builder Stamp Set again from Gina K Designs,  adding a few more colors and elements this time.  I'll get braver the more I play around with it.  This set has a stencil template so that you can turn your cardstock around a 'notch' and continue stamping around it using a stamp positioner such as a Misti. 


I love the colors on this card!  I used Gina K Designs mini ink cubes in Lipstick, In The Navy, Sweet Corn and Applemint.  The hearts are from the stamp set that she used as the incentive stamp set with the current kit called Doodle Sayings, as well as the sentiment inside the circle.  The stems I stamped in the green color is from the set by Lisa Hetrick called, You Are (love this set too.  I used matching cardstock from Gina K in In The Navy and Lipstick as well. 

I am so excited about this stamp set because I have so many stamp sets with small stamps that I normally don't use and now that problem is solved. 

I used Clear Wink of Stella Glitter Brush Pen on the yellow berries and Gina K's new Crystalline Drops on the navy hearts.  This is the first time I've used this pen and I LOVE it!  It was so easy to use and guide because of the pen form. 

Thanks so much for stopping by and I hope I inspired you to try this awesome new stamp set that takes the guess work out of making a wreath style design on your card.  


Regina


Thursday, March 8, 2018

Wreath Builder Stamp Set

Hi Everybody,

I made a quick and simple card today using the new Gina K Designs Wreath Builder stamp set.  I LOVE this set!  There are so many possibilities!  I only had about 30 minutes to play so I made this in about 15 minutes.  Next time I will add more stamps and colors.  You use a stencil template with this stamp set to position the stamps all the way around the card using your Misti stamp positioner.

I used Gina K Designs mini ink cubes in Wild Lilac and Turquoise Sea.  The cardstock I used is the Gina K white heavy base weight and the circle die is Wild Lilac.  Bottom layer is Lawn Fawn Perfectly Plain Rainbow patterned paper. I stamped a sentiment in Wild Lilac from the Gina K Designs Heartfelt Hydrangeas stamp set.  

So... I made a boo boo... First I embossed one of the circle stamps in the Wreath Builder kit and masked it off but I didn't stamp my leaf stamps back far enough so it didn't look right to me because some of the leaves were cut off a little  It probably did not matter but I wanted to cover it so I used a die from My Favorite Things called Wild Circle Stitch.  I finished it off by putting Nuvo Crystal Drops in Caribbean Ocean in the centers of the flowers.  They matched the Turquoise Sea ink perfectly. 


I have been seeing some beautiful cards made with this stamp set.  You can get as detailed as you want, use as many colors as you want.  This was my first time using it so now I'm a pro lol.  

Thanks for stopping by and have a great day!


Regina


Friday, February 23, 2018

Ink Lifting

Hi Everybody,

I owe a lot of people cards.  I am making them now for friends whom I did not get to send a Christmas card to and ones I received a sweet card from after first of year.  


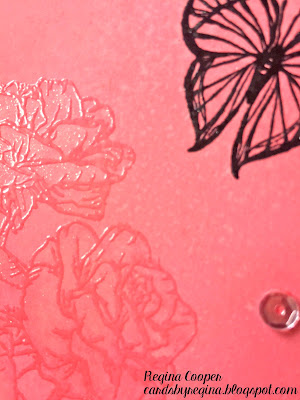
I made an Oxide Ink background, sponging a couple colors over Bristol Smooth paper and splattering water drops.  Next I stamped this beautiful rose stamp from Gina K Designs called, Rose Bouquet, embossing with clear embossing powder.  I used my waterbrush to lift a little bit of the ink and then went over the entire stamp with Clear Wink of Stella Glitter Brush Pen.  To lift the ink, you simply take your waterbrush and go over the parts you want to lift ink from and then dab with a paper towel. Now I have subtle shine against that matte background.  I stamped the Hello sentiment with Versafine Onyx Black Ink and embossed with clear powder, this comes from same set.  

I could've left it as is but I never feel like I have enough on a card so I stamped the butterfly from Gina K Designs Heartfelt Hydrangeas stamp set, stamping with Versafine Onyx Black and embossing with clear.

To finish it off, I just added a few clear sequins. 

Thank you for stopping by and have a great day!


Regina

Saturday, February 17, 2018

Calendar Card

Hi Everybody,

I've been wanting to use the new stamp set from Gina K Designs called Stately Flowers 12, illustrated by Melanie Muenchinger since I bought it in January.  The problem was that I lost a row of the numbers lol.  I finally found them stuck to something today!  My husband gave me a metal bowl to put dies and stamps in because I keep losing small pieces.  I think this will help tremendously!  :)

I made this for my Mother in Law, who loves purple.


I used Gina K Designs cardstock colors in Wild Lilac and Lovely Lavender and the matching ink cube in Wild Lilac to sponge around the oval dies.  

Melanie made a video showing how to use this set if you'd like to see how she made an easel card with it, link is below.  She used another frame set which I do not have so I improvised and used Holiday Frame.  The calendar wouldn't fit inside the circle on this frame so I cut the oval dies out to cover the circle.  I stamped the frame with Versafine Onyx Black Ink and embossed with Brutus Monroe Icicle Embossing Powder, which is clear. I then used a Zig Marker to color inside the frame outline.  It's easier to stay in the lines when it is embossed. 

I used the Misti to line up the parts of the calendar and stamped with the Versafine Onyx Black.  I don't think I could've done this without the Misti.  I fussy cut the flower in the set after coloring with Zig Markers and cut them in half, popping up with Black 3D Foam Squares from Scrapbook Adhesive.  I used Wink of Stella in Clear over the flowers to add a little shimmer. I thought the calendar looked a little plain (it probably didn't but I never feel like I have enough on a card lol) so I added a few clear sequins adhered with Gina K Designs Connect Glue.  

I cut out the frame and put it on a layer of Gina K Designs Black Onyx cardstock.  I'm going to send a new card calendar to my Mother in Law every month.  

I stamped a few of these calendars for extras to give to friends so I don't have to try and line up the numbers each time I want to use it.  Smart huh?  :)

I hope I inspired you to try this great new set by Gina K Designs.  Check out Melanie's YouTube video HERE to see how she made it as an easel card. 


Thanks for stopping by and have a great day!

Regina

Thursday, February 8, 2018

Winter Fun

Hi Everybody,

I made this card a couple weeks ago and didn't post it.   I used lots of fun foils on this one.


Polar Bear Pals by My Favorite Things is the stamp set used.  I colored this cute bear with Copic Markers and cut him and a slightly larger layer out with stitched oval dies.  

I used Gina K Designs Ocean Mist cardstock for bottom layer and the top layer is Foil Mates from Gina K Designs.  I don't think this particular snowflake background is sold but there are larger snowflakes called Foil Mates Background Blizzard which is similar.  I used Iridescent Deco Foil from Thermoweb.  I just love this particular foil, it's so much fun because when you move the card around you see a rainbow of color.  

I used a Martha Stewart snowflake punch for the blue snowflakes and Winter Fun is a die from Die-Versions, Express Edges. Ocean Blue Deco Foil is what I used for both of these, along with the Toner Paper from Thermoweb for the die.  

To finish the card off, I lightly sponged around the bear with Ocean Mist Ink from Gina K Designs.  The embellishments are Brutus Monroe Bottle Cap Sequins in Cotton Candy.  I LOVE the bottlecap sequins!  They are flat and just plop down exactly where you need them to be with no fuss.  The white dots are Nuvo Drops in White Blizzard I used them in Morning Dew under the skates (I think that's the name).  A Sakura Metallic Silver Pen was used on the skate blades and along the sides of the card.

I hope you like this card and thanks for stopping by!  Have a great day!


Regina

Tuesday, February 6, 2018

You Are Amazing

Hi Everybody,

Wow, I didn't realize it has been so long since I posted.  I have been having severe knee pain since about last September.  I started getting the different injections such as cortisone, gel injections, etc., and nothing worked.  I have to get a double knee replacement!!!  I was in shock, both knees bone on bone.  First surgery is in April.  I just haven't felt like being creative but I'm really trying hard to make a card once every day or so to keep my mojo up. :) 

The card I made today is from Gina K. Designs called You Are.  I have to admit, I'm not very good at figuring out the best ways to use piece parts in a stamp set.  I usually shy away from the ones that will build a scene or add to a wreath like with this one I used today but I am trying to take a leap out of my comfort zone this year.  I can honestly say I had a lot of fun with this.  I can see lots of possibilities!  


I made a background using Oxide Inks in Picked Raspberry, Abandoned Coral and Candied Apple.  I really do love this color combination.  Next I stamped the wreath with Versafine Onyx Black Ink and stamped a few additional pieces having no clue what I was doing.  At the end of this post I will provide a link to ideas on how to use this set on the illustrator's blog. 

I used Zig Realbrush Markers in the same colors as my background and used the Clear Nuvo Drops on top to add a little shine for a separation from the matte background. I used Brutus Monroe Alabaster Embossing Powder for the sentiment.  I didn't plan very well as there wasn't enough space at the bottom for the sentiment I wanted to use.  I used tape on two of the stamps to mask the words I didn't want to use.  

To finish off, I used clear sequins from The Ton Stamps and added Pale Gold Nuvo Drops on the berries. 

Here's a link to Lisa Hetrick's blog, illustrator for Gina K Designs.  You will find ideas on how to use this set and cut files as well.   HERE'S the link.... 

I hope I inspired you to take the plunge out of your comfort zone and try something new.

Thanks for stopping by and have a great day!


Regina

Wednesday, December 27, 2017

Dashing Poinsettias

Hi Everybody,

I want to share one more Christmas card that I made this year.  I love making this card.  I followed a video by Theresa Momber, an Illustrator for Gina K Designs.  The stamp set I used is called Dashing.  This stamp set is one of my favorites because I can make feminine and masculine cards with it.  Here's a link to the video. 

I just followed the video using the color inks she said to use.  The background stamp is called Music Background.  On the gold embossed card, I stamped it slightly darker, lighter on the other one.


I think I like the gold embossed one better.  I used colors that are more peachy, coral on this one and it looks good with the gold.  I just did a quick Copic coloring job on both but it seems like the gold embossing can make the coloring look better. :)

Which do you like?

Thanks for stopping by and have a great day!


Regina

Snow Globe Scene

Hi Everybody,

I just wanted to share another Christmas card I made.  I made this card for someone that lives in a log cabin.  How cute is this scene??  She couldn't understand why I kept asking what color her door is hee hee.  I used a stamp set from Gina K Designs called Holiday Frame.  If you like snowglobes and building scenes, then this is the set for you!


I stamped with Gina K Designs Black Onyx Ink and colored with Copic Markers.  I used Nuvo Drops in White Blizzard to add dimension to the roof and snowflakes.  I used a white gel pen to add some white to the trees. 

This was a fun card to make!  Check out the Frame Stamp Sets by Melanie Muenchinger by clicking on Stamp Sets and then By Illustrator and click on her name.

Thanks for stopping by and have a great day!

Regina

Friday, March 3, 2017

My Favorite Things Blueprint Happy Birthday Card

Hi Everybody!

Trying to get caught up on posting cards I've made.  This card was made for an Ole Miss Football Fan.  Every year I incorporate Ole Miss into his card.  I made a fun one this year, if you love dies, then you will love this card because I went DIE CRAZY!  


Everything is made with a die except the words Ole Miss.  I used the My Favorite Things Blueprint 26 Happy Birthday Die Set.  I love this set!!!  I use pieces out of it all the time.  There is also a word happy in it but I used another die for the word happy from Winnie and Walter. I embossed it with red and blue.  I tried to get it perfect, half and half but I kind of like it mixed a little.  It was a lot of fun to make.  Here's a link to the MFT Blueprint 26 Happy Birthday Die Set

Supplies Used:

  • Gina K Designs white 120# card base, Red Hot, In The Navy, Metallic Silver. (Gina's metallic card stocks are awesome!)
  • My Favorite Things Blueprint 26 Happy Birthday Die Set
  • Happy Die, Winnie and Walter
  • Red and Blue Embossing Powders, Zing
  • Clear Vellum, Grafix 48#
  • White Fun Foam under Happy Die
  • Red and White Twine, WeRMemory Keepers
  • Silver Glitter Stickers, Sticko by ekSuccess
  • Tombo Mono Adhesive
  • Scor-Tape
  • Zig Glue Pen
  • Close To My Heart Gray Glossy Chevron Cardstock (from a paper pack no longer sold)

Check out the My Favorite Things Blueprints, they include all the dies to make a card and so much fun!

Thanks for stopping by and have a great day!


Regina


Altenew Layered Lily

Hi Everybody!

I've been making cards but not blogging them in the last few days, oops.  I've had some kind of sinus crud stuff going on and yesterday I got my first sinus cocktail shot!  I feel so much better today.  This must be a Southern thing because when I lived in St. Louis and asked for one, they looked at me like I was cray cray lol.

I made this card for a friend to tell her how awesome and talented she is and I know she loves Altenew Stamps so I used the Layered Lily set.  I love this set because it is so quick but so impressive like you spent a lot of time on it.  I did actually spend a lot of time in the beginning going through my inks and figuring out color combos.  If anyone is interested in what I came up with I'll be glad to share.


I meant to stamp a lily inside the card.  My hands were faster than my brain and I adhered the layer before I realized it.  I wanted it stamped off the side.  

I will list the colors I used below.  If you haven't already tried layered stamps, I highly recommend them and this set was fairly inexpensive at $15.00.  Here is a link to Altenew Layered Lily Stamp Set


Supplies Used:


  • Gina K Designs Cardstocks, white 120# for base, Passionate Pink, Bubblegum Pink, and Dusty Rose
  • Altenew Layered Lily Stamp Set on front of card
  • Stampin' Up sentiment on inside from a set called, Botanicals for You
  • From Light to Dark Inks Used:  Memento Angel Pink, Gina K Designs Bubblegum Pink, Memento Rose Bud, and Tim Holtz Picked Raspberry
  • Clear Sequins, Pretty Pink Posh
  • Tombo Mono Adhesive
  • Ranger Multi Media Matte 
I hope you liked this card and will try some layered stamps soon! 

Have a great day and thanks for stopping by!

Regina